Categories
Articles

PhoneGap Cordova Accelerometer HTML5 Canvas Animation XCode Example


This is a template example using the accelerometer with Cordova or Phonegap and animating a sprite on the HTML5 canvas.blog_image400x545

Learn cocos2D Game Development
PhoneGap Essentials: Building Cross-Platform Mobile Apps

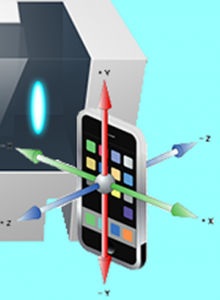
I was working on a game using the html canvas and the accelerometer. I developed a way to combine both in IOS using Objective C and the UIWebView in the UIKit. That approach limits distribution to the IOS platform but allows you to have all of the native UI items like screen navigation and just use the canvas for animations.

Then I became curious about distributing on multiple devices containing an accelerometer since the animation is being done in html canvas. The solution was a hybrid mobile platform like Cordova. UI in Cordova is really up to you although you can find UI libraries written in HTML, JavaScript and JQuery optimized for mobile.

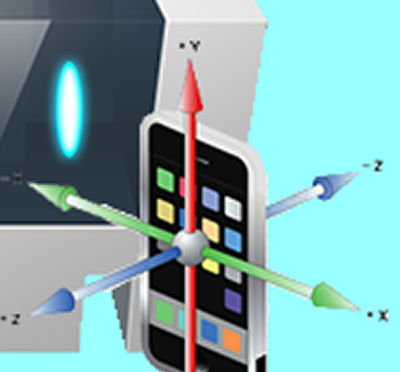
Here are screen shots for the app.

There is only one screen and these are just showing the animated red circle in different positions. The functionality is simple in that the red circle moves in the direction of the accelerometer’s x and y values – well with some adjustments but we will cover them in a bit.

When it reaches the boundaries of the canvas for either direction, it stop moving in that one direction. Thus you can move it to any corner and it will stay fixed and you can move it around the edges of the canvas.

You can also tap the canvas to start and stop the animation.

The Project Files

The project uses Cordova 1.6, XCode 4.3.2 and was tested using iOS 5.1 on a IPhone 4.

I had started the example using Cordova 1.5. Cordova 1.6 was released before completing this article and Cordova 1.6 changed the accelerometer values. The release notes included “Rewrite of accelerometer code and removed DeviceInfo old init approach” and “Added unification of accelerometer values on ios (based on android values)”. Boiling those entries down we get that the values are the same across platform, but if you are using IOS you better divide by 10. I commented in the code in case you are still using 1.5 or earlier.

I added a simple html console area to display debugging messages from the Javascript.

I also stripped out most of the extra Cordova comments that were not relevant to this example.

Download XCode Project Files

Step 1 – Install Cordova for XCode

Instructions for setting up your development environment are located at the PhoneGap site Getting Started with iOS.

Step 2 – Create New Cordova-based Application

Step 3 – Set XCode Project Options


Set the XCode project options as follows:

  • Product name: Here I used CordovaAccelerometerCanvas as the project name. You can use a name of your own choosing.
  • Company identifier: Provide your own reverse domain name.
  • Use Automatic Reference Counting: Uncheck

Step 4 – Choose A File Location

Once you select a file location on your computer you will have a folder structure as follows:

And in XCode you will see a project window as follows:

You may notice the project has a warning. Ignore this for now.

Step 5 – Create and Add the www Folder and Files to the Project

These are the normal setup instructions for a Cordova alias PhoneGap XCode project. You can skip this step if you are used to creating Cordova XCode projects.

The process is creating a www folder by running the app once in the IPhone simulator and then add to the project explorer.

First run the app in the IPhone simulator.

The app runs but complains of the missing index.html file.

A www folder with this file and one other js file were created on your file system as this the app launched in the simulator. Here you see them and you need to drag the www folder into the Project Explorer. Do not drag to or copy to the XCode folders outside of XCode.

Fill out the “Choose options for adding these files” dialog as follows.

  • Destination: Unchecked
  • Folders: “Created folder references for added folders” selected.
  • Add to targets: CordovaAccelerometerCanvas checked.

And here are the final results you see in the Project Explorer window.

Run the app in the IPhone simulator one more time.

This time you will be greeted with an Alert dialog with the “Cordova is working” message.

Step 7a – The Completed index.html File

Here is the full index.html file completed for your copy convenience. Just replace your index.html file with this and you can test on your device.

I removed Cordova code comments and commented code not related to our needs that is included in the index.html file.

<!DOCTYPE html>
<html>
    <head>
        <title></title>
        <meta name="viewport" content="width=device-width, initial-scale=1.0, maximum-scale=1.0, user-scalable=no;" />
        <meta charset="utf-8">
        <script type="text/javascript" charset="utf-8" src="cordova-1.6.0.js"></script>
        <script type="text/javascript">
            var console_log;                // Debugging div on device
            var canvas_ctx;                 // HTML canvas 2d context
            var SPEED = 10;                 // Canvas redraw speed in milliseconds and accelerometer frequency
            var DISTANCE_FACTOR = .1;       // Factor to adjust accelerometer values to screen distance. Cordova 1.6 changed to values to be Android compatible which appeared to be * 10. For Cordova 1.5 make this value 1.
            var ax = 0;                     // Acceleration x axis (Accelerometer value adjusted for direction)
            var ay = 0;                     // Acceleration y axis (Accelerometer value adjusted for direction)
            var x;                          // Circle x position
            var y;                          // Circle y position
            var vx = 0;                     // Velocity x axis
            var vy = 0;                     // Velocity y axis
            var WIDTH = 320;                // Width of canvas
            var HEIGHT = 300;               // Height of canvas
            var RADIUS = 50;                // Width of circle object
            var CIRCLE_COLOR = "#f00";      // Circle color
            var CANVAS_COLOR = "#FAF7F8";   // Color of canvas background
            var watchID;                    // Accelerometer.watchAcceleration return value. 
            var drawID;                     // Draw time interval. 
            var playing = true;             // Boolean if animation is playing.
            /* DOM body onload event callback */
            function onBodyLoad()
            {		
                document.addEventListener("deviceready", onDeviceReady, false);
            }
            /* Cordova has been initialized and is ready to roll */
            function onDeviceReady()
            {
                console.log('console_div');
                console_log = document.getElementById('console_div');
                console_log.innerHTML += "onDeviceReady()<br/>";
                init();
            }
            /* Initialize canvas and animation */
            function init() 
            {
                var canvas = document.getElementById("canvas");
                canvas_ctx = canvas.getContext("2d");
                // Center 
                x = WIDTH / 2 ;
                y = HEIGHT/ 2 ;
                startPlay();
            }
            /* Start watching the accelerometer */
            function startWatch() 
            {
                var options = { frequency: SPEED };
                watchID = navigator.accelerometer.watchAcceleration(onSuccess, onError, options);
            }   
            // Stop watching the accelerometer
            function stopWatch() 
            {
                if (watchID) {
                    navigator.accelerometer.clearWatch(watchID);
                    watchID = null;
                }
            }
            /* Accelerometer data callback */
            function onSuccess( acceleration )
            {
                // Set drawing acceleration values
                ax = acceleration.x * DISTANCE_FACTOR * -1; // -1 to change direction for Cordova 1.6. Removed for Cordova 1.5.
                ay = acceleration.y * DISTANCE_FACTOR ;// Add * -1 for Cordova 1.5;
                // Optional ouput for understanding accelerator values.
                console_log.innerHTML = 
                'Acceleration X: ' + acceleration.x + '<br />' +
                'Acceleration Y: ' + acceleration.y + '<br />' +
                'Acceleration Z: ' + acceleration.z + '<br />' +
                'Timestamp: '      + acceleration.timestamp ;
            }
            /*  Accelerometer error callback */
            function onError()
            {
                alert("Accelerometer Error");
            }
            /* Steps to start animation play */
            function startPlay()
            {
                playing = true;
                vx = 0;
                vy = 0;
                startWatch();
                drawID = setInterval(draw, SPEED);
            }
            /* Steps to stop animation play */
            function stopPlay()
            {
                clearInterval(drawID);
                stopWatch();
                playing = false;
            }
            /* Draw circle */   
            function circle( x, y, r ) 
            {
                canvas_ctx.beginPath();
                canvas_ctx.arc(x, y, r, 0, Math.PI*2, true);
                canvas_ctx.fill();
            }
            /* Draw rectangle */
            function rect( x, y, w, h ) 
            {
                canvas_ctx.beginPath();
                canvas_ctx.rect(x,y,w,h);
                canvas_ctx.closePath();
                canvas_ctx.fill();
            }
            /* Clear canvas */
            function clear() 
            {
                canvas_ctx.clearRect(0, 0, WIDTH, HEIGHT);
            }
            /* Compute drawing metrics and draw frame */    
            function draw() 
            {
                // Increase velocity by acceleration
                vx += ax;
                vy += ay;
                // Update circle drawing position.
                x += vx;
                y += vy;
                /* Boundaries testing */
                // Right boundary
                if ( x + RADIUS > WIDTH  )
                {
                    x = WIDTH - RADIUS ;
                    vx = 0;
                }
                // Left boundary
                if (x - RADIUS  <= 0)
                {
                    x = RADIUS   ;
                    vx = 0;
                }
                // Bottom boundary
                if (y +  RADIUS  > HEIGHT)
                {
                    y = HEIGHT - RADIUS ;
                    vy = 0;
                }
                // Top boundary
                if (y - RADIUS  <= 0)
                {
                    y = RADIUS  ;
                    vy = 0;
                }
                
                // Debugging info.
                //console_log.innerHTML = 
                //'x: ' + x + '<br />' +
                //'y: ' + y + '<br />' +
                //'vx: ' + vx + '<br />' +
                //'vy: ' + vy + '<br />' +
                //'ax: ' + ax + '<br />' +
                //'ay: ' + ay + '<br />' ;    
                
                /* Draw frame */
                // Clear canvas
                clear();
                // Draw canvas background
                canvas_ctx.fillStyle = CANVAS_COLOR;
                rect( 0, 0, WIDTH, HEIGHT );
                /* Draw circle */
                canvas_ctx.fillStyle = CIRCLE_COLOR;
                circle( x, y, RADIUS );
            }
            /* Canvas tag touch end event handler */
            function canvasTouchEnd()
            {
                if (playing)
                {
                    stopPlay();
                }
                else
                {
                    startPlay();
                }
            }
        </script>
    </head>
    <body onload="onBodyLoad()" style = "text-align:center;background-color:#ccc;padding:0px;margin:0px;">
        <div>
            <h1 style = "font-size:20px;margin-bottom:0px;margin-top:0px;padding-top:0px;">Accelerometer + HTML5 Canvas</h1>
            <canvas id="canvas" width="320" height="300" ontouchend = "canvasTouchEnd();" >
                This text is displayed if your browser 
                does not support HTML5 Canvas.
            </canvas>
            <div id = "console_div" style = "position:absolute;text-align:left;margin:2px;border:1px solid black;background-color:#fff;top:330px;left:0px;width:314px;height:118px;overflow:auto;" 
                >
            </div>
        </div>
    </body>
</html>

The remaining part of this article will explain the parts of the index.html file by topic.

Step 7a – The index.html body Section

Key in this section is the canvas tag on line 189. I am using the ontouchend event versus the onclick event to prevent a canvas flicker when the screen is touched. The action is to start and stop the animation.

Line 193 is my own html debugging console for simple examples. You should see the accelerometer values displayed in here when testing on a device.

 <body onload="onBodyLoad()" style = "text-align:center;background-color:#ccc;padding:0px;margin:0px;">
        <div>
            <h1 style = "font-size:20px;margin-bottom:0px;margin-top:0px;padding-top:0px;">Accelerometer + HTML5 Canvas</h1>
            <canvas id="canvas" width="320" height="300" ontouchend = "canvasTouchEnd();" >
                This text is displayed if your browser 
                does not support HTML5 Canvas.
            </canvas>
            <div id = "console_div" style = "position:absolute;text-align:left;margin:2px;border:1px solid black;background-color:#fff;top:330px;left:0px;width:314px;height:118px;overflow:auto;" 
                >
            </div>
        </div>
    </body>

[ad name=”Google Adsense”]
Step 7b – The index.html Accelerometer Code

Cordova provides an api for the accelerometer. We use a good portion of it with this example.

The variables on lines 11 to 14 are helpers for the animation. We do not need them for raw access to the accelerometer. You can see their explanations and we will look at them applied further along.

            var SPEED = 10;                 // Canvas redraw speed in milliseconds and accelerometer frequency
            var DISTANCE_FACTOR = .1;       // Factor to adjust accelerometer values to screen distance. Cordova 1.6 changed to values to be Android compatible which appeared to be * 10. For Cordova 1.5 make this value 1.
            var ax = 0;                     // Acceleration x axis (Accelerometer value adjusted for direction)
            var ay = 0;                     // Acceleration y axis (Accelerometer value adjusted for direction)

Line 24 has an id for the accelerometer watch event. This can be used to clear the watch event when you do not need the accelerometer anymore.

            var watchID;                    // Accelerometer.watchAcceleration return value. 

I created the startWatch function for this example to call when we need to start collecting accelerometer data.

The accelerometer works by calling your own event handler functions using the watchAcceleration method you see on line 54.
The watchAcceleration take a reference to your success and error handler as the first two arguments.

It also takes an options object for the third argument. Currently the only option object key is frequency measured in milliseconds. I am using the SPEED variable set to 10 milliseconds for the frequency.

The watchAcceleration returns an id so we can refer to it later.

            /* Start watching the accelerometer */
            function startWatch() 
            {
                var options = { frequency: SPEED };
                watchID = navigator.accelerometer.watchAcceleration(onSuccess, onError, options);
            }   

The stopWatch function is also created for the example to stop requesting accelerometer data anywhere in the code. Line 60 uses the clearWatch method to stop watching the accelerometer. The watchID variable from line 54 identifies the watch activity to end.

To prevent throwing errors, logic is included to test for the watchID.

            // Stop watching the accelerometer
            function stopWatch() 
            {
                if (watchID) {
                    navigator.accelerometer.clearWatch(watchID);
                    watchID = null;
                }
            }

The onSuccess function on line 64 is called from the watchAcceleration on line 54.

The onSuccess function passes an acceleration object. The acceleration object currently has four values and they are all displayed in our html console on line 71.

The other code in the onSuccess method prepares variables for the animation.

The ax and ay variables on line 68 and 69 are accelerometer x and y values respectively. They represent acceleration in our animation.

For the x-axis value we need to reverse the value sign so the tilt of the device represents the direction of the x-axis animation. Interesting this is for Cordova 1.6. In Cordova 1.5 this is not needed.

For the y-axis value we need to reverse the value sign if you are using Cordova 1.5. Again to represent the direction by the tilt of the device.

Finally the x and y acceleration values were adjusted with Cordova 1.6. As I had mentioned I started the example in Cordova 1.5 and was able to use the raw values. But with Cordova 1.6 the values are 10x so I added the DISTANCE_FACTOR variable set to .1 to compensate. Perhaps I should have called it a “VERSION_FACTOR”.

I had no need for z and timestamp properties in this example, but they are displayed for interest. You may get updates from the device due to your frequency of request, but the device has not sensed new values, so you can use the timestamp property in case you are using the accelerometer updates for a cpu intensive function that without a change is unnecessary.

            /* Accelerometer data callback */
            function onSuccess( acceleration )
            {
                // Set drawing acceleration values
                ax = acceleration.x * DISTANCE_FACTOR * -1; // -1 to change direction for Cordova 1.6. Removed for Cordova 1.5.
                ay = acceleration.y * DISTANCE_FACTOR ;// Add * -1 for Cordova 1.5;
                // Optional ouput for understanding accelerator values.
                console_log.innerHTML = 
                'Acceleration X: ' + acceleration.x + '<br />' +
                'Acceleration Y: ' + acceleration.y + '<br />' +
                'Acceleration Z: ' + acceleration.z + '<br />' +
                'Timestamp: '      + acceleration.timestamp ;
            }

This final code snippet is simply the error handler for watching the accelerometer. Apparently there is no information provided for the error, so you will need to improvise.


            /*  Accelerometer error callback */
            function onError()
            {
                alert("Accelerometer Error");
            }

Step 7c – User Start and Stop Interaction

Touching the canvas starts and stops the animation. This starts on line 189 with the canvas tag ontouchend event calling the canvasTouchEnd() function on line 172.

           <canvas id="canvas" width="320" height="300" ontouchend = "canvasTouchEnd();" >
                This text is displayed if your browser 
                does not support HTML5 Canvas.
            </canvas>

There is the playing variable set on line 26 that retains the state of animation playing.

            var playing = true;             // Boolean if animation is playing.

The canvasTouchEnd function uses the playing boolean variable to determine starting or stopping animation and calls function to handle changing the animation playing state.

            /* Canvas tag touch end event handler */
            function canvasTouchEnd()
            {
                if (playing)
                {
                    stopPlay();
                }
                else
                {
                    startPlay();
                }
            }

The startPlay function first sets the playing state to true.

To start playing the velocity variables are set to zero. This prevents any timing issues that may cause the animation move in a direction not indicative of the tilt of the device when the animation is restarted.

Receiving events from the accelerometer is started with the call to the startWatch function we reviewed earlier.

Handing the canvas redraw is done on line 89 with a JavaScript timer. The timing of the of the canvas redraw is the same as the updates from the accelerometer. You could consider a different design where the accelerometer updates perform the canvas redraw. However the approach we are using allows animations to occur that not dependent on the accelerometer changes should you need to add them.

            /* Steps to start animation play */
            function startPlay()
            {
                playing = true;
                vx = 0;
                vy = 0;
                startWatch();
                drawID = setInterval(draw, SPEED);
            }

Stopping animation is done by clearing the timer interval, stopping the accelerometer watching and setting the playing state to false.

            /* Steps to stop animation play */
            function stopPlay()
            {
                clearInterval(drawID);
                stopWatch();
                playing = false;
            }

Step 7d – The index.html Canvas Animation

The canvas animation does not require Cordova. It is just an interesting way to demonstrate using the accelerometer. All the animation in the canvas could be done in any HTML5 web browser.

First is the canvas tag which has a predefined width and height. We could create the canvas tag dynamically in JavaScript, but I left it out to keep code simpler.

           <canvas id="canvas" width="320" height="300" ontouchend = "canvasTouchEnd();" >
                This text is displayed if your browser 
                does not support HTML5 Canvas.
            </canvas>

Next there are some variables that impact the canvas animation work.

Line 10 has a variable to reference the canvas 2d context to allow drawing. This will refer back to the canvas tag.

The SPEED variable on line 11 is for the JavaScript timer that will call the draw function. The draw function does all the work on the canvas.

Line 13 and 14 are acceleration values that are updated using the accelerometer.

The x and y on lines 14 and 15 are the position of the circle sprite we are animating.

The velocity variables are initialized to zero on lines 16 and 17.

Height and width of the canvas are repeated here for computing the boundaries for our animated circle sprite.

The diameter of the circle sprite is configurable on line 21

Adding some color on lines 22 and 23 for the circle sprite and background respectively.

Then we have on line 25 the JavaScript timer interval id for redrawing the canvas.

            var console_log;                // Debugging div on device
            var canvas_ctx;                 // HTML canvas 2d context
            var SPEED = 10;                 // Canvas redraw speed in milliseconds and accelerometer frequency
            var DISTANCE_FACTOR = .1;       // Factor to adjust accelerometer values to screen distance. Cordova 1.6 changed to values to be Android compatible which appeared to be * 10. For Cordova 1.5 make this value 1.
            var ax = 0;                     // Acceleration x axis (Accelerometer value adjusted for direction)
            var ay = 0;                     // Acceleration y axis (Accelerometer value adjusted for direction)
            var x;                          // Circle x position
            var y;                          // Circle y position
            var vx = 0;                     // Velocity x axis
            var vy = 0;                     // Velocity y axis
            var WIDTH = 320;                // Width of canvas
            var HEIGHT = 300;               // Height of canvas
            var RADIUS = 50;                // Width of circle object
            var CIRCLE_COLOR = "#f00";      // Circle color
            var CANVAS_COLOR = "#FAF7F8";   // Color of canvas background
            var watchID;                    // Accelerometer.watchAcceleration return value. 
            var drawID;                     // Draw time interval. 
            var playing = true;             // Boolean if animation is playing.

The init() function is called when the app boots up and here you see on line 43 and 44 the standard way to get the drawing context to the canvas tag.

Also the starting position of the circle sprite is placed at the center of the screen.

            /* Initialize canvas and animation */
            function init() 
            {
                var canvas = document.getElementById("canvas");
                canvas_ctx = canvas.getContext("2d");
                // Center 
                x = WIDTH / 2 ;
                y = HEIGHT/ 2 ;
                startPlay();
            }

There are some utility functions for drawing shapes in the html canvas. First we have the circle method which demonstrates how to draw a circle given x, y and radius values.

Discussing the values for drawing on the canvas are beyond the scope of this article but I strongly suggest you get a copy of Foundation HTML5 Animation with JavaScript.

The values for the canvas 2d context arc method are centerX, centerY, radius, startingAngle in radians, endingAngle in radians and the boolean antiClockwise.

The startingAngle and endingAngle have radian values to draw a complete circle.

Note you will need to compensate for x and y because the values for x and y reference the center. You will see this offset in the boundary testing code.

            /* Draw circle */   
            function circle( x, y, r ) 
            {
                canvas_ctx.beginPath();
                canvas_ctx.arc(x, y, r, 0, Math.PI*2, true);
                canvas_ctx.fill();
            }

Next is the rect function on line 106 to draw a rectangle. The canvas 2d context rect method is straightforward drawing from top left corner of the rectangle.

            /* Draw rectangle */
            function rect( x, y, w, h ) 
            {
                canvas_ctx.beginPath();
                canvas_ctx.rect(x,y,w,h);
                canvas_ctx.closePath();
                canvas_ctx.fill();
            }

In drawing for animation, you will need to clear the canvas, so this clear function allows that to happen. The one line is clearRect method of the canvas 2d context. The clearRect method clears a rectangular area and here we have the entire canvas covered.


            /* Clear canvas */
            function clear() 
            {
                canvas_ctx.clearRect(0, 0, WIDTH, HEIGHT);
            }

The drawing position computations and actual drawing are both done in the draw function. Some animation applications you may want to split the drawing from the computations, but in this case putting them together meets our needs.

The velocity in the x and y directions are computed on lines 122 and 123. Simply they are increased or decreased by the change in acceleration values from the accelerometer. Acceleration values contain direction as well as acceleration.

Then we recompute the circle sprite position on lines 125 and 126.

Lines 127 – 151 are computing the boundaries for the canvas in relation to the proposed position of the center point, the x and y values, of the circle sprite. If any boundary is reached, then the velocity for that direction is set to zero and the position value is computed to keep the circle sprite in view at the edge.

I left the debugging information lines in but commented. If you use them, then comment lines 71 – 75.

Final work is to draw and this starts on line 164 where the canvas is cleared of all drawings.

Then lines 166 and 167 get our canvas background drawn.

The circle sprite is drawn on lines 169 and 170.

            /* Compute drawing metrics and draw frame */    
            function draw() 
            {
                // Increase velocity by acceleration
                vx += ax;
                vy += ay;
                // Update circle drawing position.
                x += vx;
                y += vy;
                /* Boundaries testing */
                // Right boundary
                if ( x + RADIUS > WIDTH  )
                {
                    x = WIDTH - RADIUS ;
                    vx = 0;
                }
                // Left boundary
                if (x - RADIUS  <= 0)
                {
                    x = RADIUS   ;
                    vx = 0;
                }
                // Bottom boundary
                if (y +  RADIUS  > HEIGHT)
                {
                    y = HEIGHT - RADIUS ;
                    vy = 0;
                }
                // Top boundary
                if (y - RADIUS  <= 0)
                {
                    y = RADIUS  ;
                    vy = 0;
                }
                
                // Debugging info.
                //console_log.innerHTML = 
                //'x: ' + x + '<br />' +
                //'y: ' + y + '<br />' +
                //'vx: ' + vx + '<br />' +
                //'vy: ' + vy + '<br />' +
                //'ax: ' + ax + '<br />' +
                //'ay: ' + ay + '<br />' ;    
                
                /* Draw frame */
                // Clear canvas
                clear();
                // Draw canvas background
                canvas_ctx.fillStyle = CANVAS_COLOR;
                rect( 0, 0, WIDTH, HEIGHT );
                /* Draw circle */
                canvas_ctx.fillStyle = CIRCLE_COLOR;
                circle( x, y, RADIUS );
            }

Good luck!

[ad name=”Google Adsense”]

Categories
Articles

PhoneGap Cordova Camera XCode Example


This is a bare bones example of using Cordova or Phonegap to take a photo with your IPhone or IPad camera.

Learn cocos2D Game Development
PhoneGap Essentials: Building Cross-Platform Mobile Apps

The project uses XCode 4.3.2 and was tested using iOS 5.1 on a IPhone 4. There are no frills. I did make the button large enough for IPhone human guideline standards. I also added a simple console area to display debugging messages from the Javascript.

I also stripped out most of the extra Cordova comments that were not relevant.

Each time you take a picture another file is added. This example does not provide a way to delete the files. If you remove the app from the phone, the images are deleted. You may need to study the Cordova File API for how to manage your app’s local storage.

Here are the screens for the app.

The left screen is the app before any photo has been taken. It shows the integrated debugging console with the logged message that the Cordova onDeviceReady() method was called.

The middle screen is the IPhone Camera app with a photo just taken.

The right screen shows the app with a photo taken. You also see in the integrated console messages logged from the Javascript. The second line is the method called by touching the “Take Picture” button. The final message is the callback method from the Cordova getPicture camera method for a successful photo take. In particular you can see the file path and name of the photo.

Download XCode Project Files

Step 1 – Install Cordova for XCode

Instructions for setting up your development environment are located at the PhoneGap site Getting Started with iOS.

Step 2 – Create New Cordova-based Application

Step 3 – Set XCode Project Options


Set the XCode project options as follows:

  • Product name: Here I used CordovaCamera as the project name. You can use a name of your own choosing.
  • Company identifier: Provide your own reverse domain.
  • Use Automatic Reference Counting: Uncheck

Step 4 – Choose A File Location

Once you select a file location on your computer you will have a folder structure as follows:

And in XCode you will see a project window as follows:

You may notice the project has a warning. Ignore this for now.

Step 5 – Create and Add the www Folder and Files to the Project

These are the normal setup instructions for a Cordova alias PhoneGap XCode project. You can skip this step if you are used to creating Cordova XCode projects.

The process is creating a www folder by running the app once in the IPhone simulator and then add to the project explorer.

First run the app in the IPhone simulator.

The app runs but complains of the missing index.html file.

A www folder with this file and one other js file were created on your file system as this the app launched in the simulator. Here you see them and you need to drag the www folder into the Project Explorer. Do not drag to or copy to the XCode folders outside of XCode.

Fill out the “Choose options for adding these files” dialog as follows.

  • Destination: Unchecked
  • Folders: “Created folder references for added folders” selected.
  • Add to targets: CordovaCamera checked.

And this is the final results you see in the Project Explorer window.

Run the app in the IPhone simulator one more time.

This time you will be greeted with an Alert dialog with the “Cordova is working” message.

[ad name=”Google Adsense”]

Step 7 – Code the index.html File

I removed code comments and commented code that is included in the index.html file.

Here is the full index.html file completed for your copy convenience.

<!DOCTYPE html>
<html>
  <head>
  <title>Camera</title>
    <meta name="viewport" content="width=device-width, initial-scale=1.0, maximum-scale=1.0, user-scalable=no;" />
	<meta charset="utf-8">
	<script type="text/javascript" charset="utf-8" src="cordova-1.5.0.js"></script>
    <script type="text/javascript">
    // Debugging div on device
    var console_log;
	
	function onBodyLoad()
	{		
		document.addEventListener("deviceready", onDeviceReady, false);
	}
	
	/*  Cordova has been initialized and is ready to roll */
	function onDeviceReady()
	{
        console_log = document.getElementById('console_div');
        console_log.innerHTML += "onDeviceReady()<br/>";
	}
        
    /*  Open the device camera app */
    function capturePhoto() 
    {
        console_log.innerHTML += "capturePhoto()<br/>";
        // navigator.camera.getPicture( cameraSuccess, cameraError, [ cameraOptions ] );
        navigator.camera.getPicture(getPhoto, 
                                    onFail, 
                                    { 
                                    quality: 50,
                                    destinationType: Camera.DestinationType.FILE_URI, // // Return image file URI
                                    sourceType:Camera.PictureSourceType.CAMERA,
                                    targetWidth:120,  // Width in pixels to scale image. Aspect ratio is maintained. Required targetHeight.
                                    targetHeight:180  // Height in pixels to scale image. Aspect ratio is maintained. Required targetWidth.
                                    });
    }
   /* navigator.camera.getPicture success function */
    function getPhoto(imageData) 
    {
        var cameraImage = document.getElementById('cameraImage');
        cameraImage.src = imageData;
        console_log.innerHTML += "getPhoto() - cameraImage.src: " + cameraImage.src + "<br/>";
    }
    /* navigator.camera.getPicture fail function */
    function onFail(message) 
    {
        alert('Failed because: ' + message);
    }       
    </script>
  </head>
  <body onload="onBodyLoad()" style = "text-align:center;background-color:#ccc;padding:0px;">
      <div>
          <h1 style = "margin-bottom:0px;">Cordova Camera</h1>
          <button style = "font-size:20px;width:200px;height:44px;;margin-bottom:5px;" onclick="capturePhoto();">Take Picture</button> 
          <br>
          <img style="width:120px;height:180px;;background-color:#fff;" id="cameraImage" src="" />
          <div id="console_div" style = "text-align:left;border:1px solid black;background-color:#fff;height:150px;overflow:auto;"></div>
      </div>
  </body>
</html>

First look at the html starting on line 53. To simplify, the css is placed inline with tags versus the better approach of using an external css file.

  <body onload="onBodyLoad()" style = "text-align:center;background-color:#ccc;padding:0px;">
      <div>
          <h1 style = "margin-bottom:0px;">Cordova Camera</h1>
          <button style = "font-size:20px;width:200px;height:44px;;margin-bottom:5px;" onclick="capturePhoto();">Take Picture</button> 
          <br>
          <img style="width:120px;height:180px;;background-color:#fff;" id="cameraImage" src="" />
          <div id="console_div" style = "text-align:left;border:1px solid black;background-color:#fff;height:150px;overflow:auto;"></div>
      </div>
  </body>

Line 54 is the container div.

Line 55 provides a simple page heading.

Line 56 is the “Take Picture” button. It calls the capturePhoto() method when touched. Notice that you use the onClick handler, Cordova does the translation to touch up event for you.

Line 57 is the img tag for the photo once we take a picture.

Line 58 is a debugging div for output from your javascript. There are other debugging console solutions that may better serve your needs.

Back to the top of index.html, line 10 declares the console_log variable. It will globally reference the console_div div tag in the html. You can then see on lines 20 and 21 getting the reference from the DOM for console_div div tag.

<!DOCTYPE html>
<html>
  <head>
  <title>Camera</title>
    <meta name="viewport" content="width=device-width, initial-scale=1.0, maximum-scale=1.0, user-scalable=no;" />
	<meta charset="utf-8">
	<script type="text/javascript" charset="utf-8" src="cordova-1.5.0.js"></script>
    <script type="text/javascript">
    // Debugging div on device
    var console_log;
	
	function onBodyLoad()
	{		
		document.addEventListener("deviceready", onDeviceReady, false);
	}
	
	/*  Cordova has been initialized and is ready to roll */
	function onDeviceReady()
	{
        console_log = document.getElementById('console_div');
        console_log.innerHTML += "onDeviceReady()<br/>";
	}

The onBodyLoad function on line 12 is called from the DOM body tag onload event. It then provides a listener to the deviceready event from Cordova.

The deviceready event calls the onDeviceReady function to get the ball rolling.

This boot strapping is all standard for Cordova apps as it has since it was called PhoneGap.

Moving down to line 24 the capturePhoto function was added and is called by the “Take Picture” button in the html.

The function logs to our makeshift console on line 27.

The key item is the Cordova Camera API being used on line 29.

You see the Cordova API is attached to the DOM navigator object.

In this case we are using the camera.getPicture method.

The first argument is the function to call for a successful use of the device camera and the second is for failed usage of the device camera.

    /*  Open the device camera app */
    function capturePhoto() 
    {
        console_log.innerHTML += "capturePhoto()<br/>";
        // navigator.camera.getPicture( cameraSuccess, cameraError, [ cameraOptions ] );
        navigator.camera.getPicture(getPhoto, 
                                    onFail, 
                                    { 
                                    quality: 50,
                                    destinationType: Camera.DestinationType.FILE_URI, // // Return image file URI
                                    sourceType:Camera.PictureSourceType.CAMERA,
                                    targetWidth:120,  // Width in pixels to scale image. Aspect ratio is maintained. Required targetHeight.
                                    targetHeight:180  // Height in pixels to scale image. Aspect ratio is maintained. Required targetWidth.
                                    });
    }

The details are in the third argument which is an array of properties called cameraOptions.

For the quality option on line 32 I choose the value of 50. This is a blatant copy from the documentation. But also I read that values over 50 may become a factor in memory issues. Something for you to research if you need a quality value over 50.

On line 33 the destinationType option takes values defined by Camera.DestinationType.

For the destinationType option I choose Camera.DestinationType.FILE_URI. The Camera.DestinationType.FILE_URI sends a file url of the picture taken to the success function. The only other choice for the destinationType property as of this writing is Camera.DestinationType.DATA_URL which returns an image as base64 encoded string to the success function.

Line 34 sets the sourceType option. It uses values from Camera.PictureSourceType. The official documentation leaves the sourceType option values up to your interpretation based on naming. The sourceType option I used is Camera.PictureSourceType.CAMERA since my plan is to use the device camera. The other two values are Camera.PictureSourceType.PHOTOLIBRARY and Camera.PictureSourceType.SAVEDPHOTOALBUM.

Finally on lines 35 and 36 I included the targetWidth and targetHeight options.

I found if you omit the targetWidth and targetHeight options you may have aspect ratio issues with displaying correct scaling. I discovered this when taking a picture using portrait and using landscape orientations in the camera app. The landscape orientation would have a distorted aspect ratio.

The html I set the img tag height and width to 120px and 180px respectively. As you see I used the same values for targetWidth and targetHeight respectively and that resolved my scaling issue. You see I copied the API documentation comments for these two options and added my own interpretation.

The last part of the javascript contains the navigator.camera.getPicture method success and fail functions named getPhoto and onFail respectively.

   /* navigator.camera.getPicture success function */
    function getPhoto(imageData) 
    {
        var cameraImage = document.getElementById('cameraImage');
        cameraImage.src = imageData;
        console_log.innerHTML += "getPhoto() - cameraImage.src: " + cameraImage.src + "<br/>";
    }
    /* navigator.camera.getPicture fail function */
    function onFail(message) 
    {
        alert('Failed because: ' + message);
    }       

For getPhoto the image url is passed in the imageData argument in line 40. All is needed is to assign the url to img tag src property. In the html the img tag has the id of cameraImage and on line 42 we get a reference from the DOM and on line 43 the url assignment to the img tag is complete.

Line 44 displays the url in our makeshift console window for observation.

The navigator.camera.getPicture fail callback is the onFail function on line 47. Line 49 displays feedback using the argument which has a message. I have not yet hit a problem and do not know how to simulate one.

Step 8 – Run the App

When you run the app, you need to use your IPhone or IPad. The camera cannot be simulated. Here is the first screen. At the beginning of the blog are all the screens for your reference.

Good luck!

[ad name=”Google Adsense”]

Categories
Articles

Tap, Move, Shake: Turning Your Game Ideas into iPhone & iPad Apps


Todd Moore’s new book, Tap, Move, Shake: Turning Your Game Ideas into iPhone & iPad Apps, is currently the best choice for getting started with writing and publishing IOS games.

A key feature is that the apps in the book are IN THE APP STORE. Never saw that trick before and I think is a standard for anyone writing IOS books. I actually followed the steps of creating an app I could download suffice it had a tad more flash in the store.

Tap, Move, Shake: Turning Your Game Ideas into iPhone & iPad Apps

This is the first book I have seen in XCode/ObjectiveC that takes the submission to the App store as important a learning step as is the process of writing code. I loved the give and take App store rejection emails that provided a lot of insight for anyone who is going to submit an app the first time.

Also insightful is the special effort in giving the coder who is light on media creation great chapters on creating graphics and sound. Links provided are well researched.

On the wish list for me was not to dismiss ARC (Automatic Reference Counting) at the onset. Gee the book kinda assumes the beginner and ARC leans to that. But I suspect a case of examples completed at a time Apple was busy upsetting the cart for writers in progress.

The chapters are extremely well thought out especially the progression of development with the sections in each chapter.

I think you need a basic skill in XCode and Objective C to follow the book. XCode is introduced nicely for beginners and Objective C is learned more by example and less by explanation. I could not have solved some bugs without a basic skill in Objective C. The architecture of IOS app is explained well. I loved the clarity of explaining the bootstrap of an IOS app. I finally got it!

The book covers EVERYTHING you need from setting up for development, coding, basic testing, resource creation, app submission and even app marketing. All at a very clear to the point approach. The book examples make you feel you are starting at the beginning because they are from the gaming industry beginnings tuned to the phone.

This is 254 page book that has a good number of images taking up pages. Compared to 3 and 4 inch opus magnum IOS books out there that are OMGs difficult to hold open on the desk or in a lounge chair, Todd gets a great deal done as a focused writer. Cutting content is key. I rather buy more books than have big monsters.

Want to get started in IOS gaming without a gaming engine or better understand your gaming engine, then do this book.

[ad name=”Google Adsense”]

Categories
Articles

XCode 4 IPhone Mountains of the USA Tutorial: Lesson 9 – Add Annotation to MapView


<== Lesson 8 || Overview ||

This lesson adds an annotation and pin on the map to better show the location of the mountain.

Detail View with MapView Annotation

MapAnnotation class is all that you need to get a pin on the map with an annotation above it.

However, you may want the annotation and pin to “drop in” or you might want to control the pin color. This requires a MKMapViewDelegate class and the viewForAnnotation method. In this method a MKPinAnnotationView object is created to embellish the annotation with more functionality as well as the “drop in” effect. The DetailViewController class will serve as the MKMapViewDelegate.

As you proceed through the steps, the code items not needed to “just show an annotation and pin” are identified for you so you can try an example without the special drop in effect. To summarize that approach in advance, you do not need to add the MKMapViewDelegate protocol to your DetailViewController.h file, you exclude the [mapView setDelegate:self]; line from the viewWillAppear method in the DetailViewContoller.m files and you will not need the viewForAnnotation method added in step 3.

Source Download

  1. Starting XCode 4 Project. This is the lesson 8 project completed.
  2. PHP and CSV Files. Script to read data file and selects by elevation and returns XML. See Lesson 2.
  3. Completed XCode 4 Project

[ad name=”Google Adsense”]

Step 1: DetailViewController.h – Add the MKMapViewDelegate Protocol
Download and uncompress the Starting XCode Project file and open in XCode.

Open the DetailViewController.h class and add line 3 to include the MapAnnotation header.

On line 6 you need to edit in the MKMapViewDelegate protocol. This line is needed only if you want more functionality over the annotation such as pin color or a “drop in” effect by including the viewForAnnotation method.

#import &amp;amp;lt;UIKit/UIKit.h&amp;amp;gt;
#import &amp;amp;lt;MapKit/Mapkit.h&amp;amp;gt;
#import "MapAnnotation.h"
#import "MountainItem.h"

@interface DetailViewController : UIViewController &amp;amp;lt;MKMapViewDelegate&amp;amp;gt;{
    MKMapView *mapView;

    MountainItem *mountainItem;
}

@property (nonatomic, retain) IBOutlet MKMapView *mapView;

@property (nonatomic, retain) MountainItem *mountainItem;

@end

Step 2: DetailViewController.m – Create the Annotation
Open the DetailViewController.m file.

The first 51 lines of code are not changing but included here for online reference:

#import "DetailViewController.h"

@implementation DetailViewController
@synthesize mapView;
@synthesize mountainItem;
- (id)initWithNibName:(NSString *)nibNameOrNil bundle:(NSBundle *)nibBundleOrNil
{
    self = [super initWithNibName:nibNameOrNil bundle:nibBundleOrNil];
    if (self) {
        // Custom initialization
    }
    return self;
}

- (void)dealloc
{
    [mapView dealloc];
    [super dealloc];
}

- (void)didReceiveMemoryWarning
{
    // Releases the view if it doesn't have a superview.
    [super didReceiveMemoryWarning];

    // Release any cached data, images, etc that aren't in use.
}

#pragma mark - View lifecycle

- (void)viewDidLoad
{
    [super viewDidLoad];
    // Do any additional setup after loading the view from its nib.

}

- (void)viewDidUnload
{
    [super viewDidUnload];
    // Release any retained subviews of the main view.
    // e.g. self.myOutlet = nil;
    self.mapView = nil;

}

- (BOOL)shouldAutorotateToInterfaceOrientation:(UIInterfaceOrientation)interfaceOrientation
{
    // Return YES for supported orientations
    return (interfaceOrientation == UIInterfaceOrientationPortrait);
}

Add the highlighed line in the next code view.

Line 68 sets this class to receive MKMapViewDelegate messages. In the last step you defined this class as MKMapViewDelegate.

Line 68 is not needed if all you want to show the annotation and pin without any special view or effects. A MKMapViewDelegate is not needed for that.

Line 70 clears all annotations from the map. You can leave this line out and the previous pins and their annotations will stay on the map. If you try some mountains in the same range or zoom way out, you will see the previous pins and when you touch the pin the annotation will appear.

Lines 71 to 73 create the annotation object, give it a title and position in the center of the view region created in the last lesson on lines 61 to 66.

The annotation is added to the map on line 75.

The annotation is selected on line 77. When you test the app, you should touch the annotation and the pin. You will see the selected and unselected state. Unselected, just a pin appears. Selected the title appears. Line 77 is achieving the selection process in code.

Line 78 is clean up.

-(void)viewWillAppear:(BOOL)animated
{
    [super viewWillAppear:animated];
    [self.navigationController setNavigationBarHidden:NO animated:YES];
    [self setTitle:mountainItem.name];

    [mapView setMapType:MKMapTypeStandard];
    [mapView setZoomEnabled:YES];
    [mapView setScrollEnabled:YES];
    MKCoordinateRegion region = { {0.0, 0.0 }, { 0.0, 0.0 } };
    region.center.latitude = [mountainItem.latitude doubleValue] ;
    region.center.longitude = [mountainItem.longitude doubleValue] ;
    region.span.longitudeDelta = 1.0f;
    region.span.latitudeDelta = 1.0f;
    [mapView setRegion:region animated:YES];

    [mapView setDelegate:self];

    [self.mapView removeAnnotations:self.mapView.annotations];
    MapAnnotation *ann = [[MapAnnotation alloc] init];
    ann.title = mountainItem.name;
    ann.coordinate = region.center;

    [mapView addAnnotation:ann];

    [mapView selectAnnotation:ann animated:YES];
    [ann release];
}

[ad name=”Google Adsense”]

Step 3: DetailViewController.m – Add Annotation View and Drop In Effect

The viewForAnnotation method is called to develop the view for an annotation.

This implementation is simple because we only have one annotation. The method is called for all annotations. With multiple annotation, you may need to treat certain annotations differently, so you might need to identify which is calling this method. As well if you are using a unpredictable number of annotations and some annotations persist, this is a place to determine how to reuse MKPinAnnotationView objects. All of this is beyond the scope of the tutorial, but this explains why you will see more lines of code in other examples and why this example appears simpler.

Line 83 creates the MKPinAnnotationView annView object. You are going to reuse the same MKPinAnnotationView, so the identifier MyPin is created to help that happen.

The pin “drop in” effect occurs because of line 84.

Line 85 is needed to show the pin annotation title. There are more items that can be added to the annotation such as a subtitle and left and right views.

The pin color is set on line 87. You can use MKPinAnnotationColorGreen and MKPinAnnotationColorPurple. These and MKPinAnnotationColorRed were added in IOS 3.0.

- (MKAnnotationView *) mapView:(MKMapView *)mapView viewForAnnotation:(id &amp;amp;lt;MKAnnotation&amp;amp;gt;) annotation

{
    MKPinAnnotationView *annView = [[[MKPinAnnotationView alloc ] initWithAnnotation:annotation reuseIdentifier:@"MyPin"] autorelease] ;
    annView.animatesDrop=TRUE;
    annView.canShowCallout = YES;

	annView.pinColor = MKPinAnnotationColorRed;

    return annView;
}

Try in the simulator. Tap the annotations and the pins to get the feel for them.

Categories
Articles

XCode 4 IPhone Mountains of the USA Tutorial: Lesson 8 – Add MapView


<== Lesson 7 || Overview || Lesson 9 ==>

Now you have the second view added in the last lesson, you can add a map to show where the mountain is located. You can use the longitude and latitude that are part of the MountainItem data passed to the second view.

Detail View Screen with MapView

To work with a map, you need to include the MapKit framework. There are frameworks included automatically with a new IOS XCode project. They are UIKit, Foundation and CoreGraphics. You have probably noticed the import statement for UIKit in the header for MainViewController and DetailViewController.

In XCode 4 a group called Frameworks contains the frameworks you include with your project.

Typical Frameworks Group

It is a good practice to assure any new ones you add are in that group for easy reference.

Source Download

  1. Starting XCode 4 Project. This is the lesson 7 project completed.
  2. PHP and CSV Files. Script to read data file and selects by elevation and returns XML. See Lesson 2.
  3. Completed XCode 4 Project

[ad name=”Google Adsense”]

Step 1: Add the MapKit Framework
Download and uncompress the Starting XCode Project file and open in XCode.

In the project explorer select the top node.

Select Project Node

In the center of XCode follow these steps:

Steps to Open Frameworks and Libraries Dialog

Type map into the search text field and you should see the list narrow down to the MapKit.framework choice and then select the Add button.

Frameworks and Libraries Dialog

Locate the MapKit.framework file in the project explorer and drag it into the Frameworks group. You could leave MapKit.framework where it was grouped, but keeping the frameworks together makes sense.

Drag MapKit Framework To Frameworks Group

Step 2: DetailViewController.h – Replace TextView with MapView

Open the DetailViewController.h file in the project explorer.

You are going to replace the UITextView with a MKMapView. Lines that are being replaced are included here for convenience.

#import &amp;lt;UIKit/UIKit.h&amp;gt;
#import "MountainItem.h"

@interface DetailViewController : UIViewController {
    UITextView *mountainInfoTextView;

    MountainItem *mountainItem;
}
@property (nonatomic, retain) IBOutlet UITextView *mountainInfoTextView;

@property (nonatomic, retain) MountainItem *mountainItem;
@end

Line 2 below show the inclusion of MapKit in this class.

Lines 6 and 11 give you an IBOutlet to the MapView you add later to the DetailViewController.xib.

#import &amp;lt;UIKit/UIKit.h&amp;gt;
#import &amp;lt;MapKit/Mapkit.h&amp;gt;
#import "MountainItem.h"

@interface DetailViewController : UIViewController &amp;lt;MKMapViewDelegate&amp;gt;{
    MKMapView *mapView;

    MountainItem *mountainItem;
}

@property (nonatomic, retain) IBOutlet MKMapView *mapView;

@property (nonatomic, retain) MountainItem *mountainItem;

@end

Step 3: DetailViewController.m – Add mapView Property to the Implementation

Open the DetailViewController.m file in the project explorer.

These are the standard lines to include the mapView property to the implementation file.

You need to remove the mountainInfoTextView property and for convenience the lines are shown here.

#import "DetailViewController.h"

@implementation DetailViewController
@synthesize mountainInfoTextView;
@synthesize mountainItem;
- (id)initWithNibName:(NSString *)nibNameOrNil bundle:(NSBundle *)nibBundleOrNil
{
    self = [super initWithNibName:nibNameOrNil bundle:nibBundleOrNil];
    if (self) {
        // Custom initialization
    }
    return self;
}

- (void)dealloc
{
    [mountainInfoTextView dealloc];
    [mountainItem dealloc];
    [super dealloc];
}

- (void)didReceiveMemoryWarning
{
    // Releases the view if it doesn't have a superview.
    [super didReceiveMemoryWarning];

    // Release any cached data, images, etc that aren't in use.
}

#pragma mark - View lifecycle

- (void)viewDidLoad
{
    [super viewDidLoad];
    // Do any additional setup after loading the view from its nib.

}

- (void)viewDidUnload
{
    [super viewDidUnload];
    // Release any retained subviews of the main view.
    // e.g. self.myOutlet = nil;
    self.mountainInfoTextView = nil;
}

- (BOOL)shouldAutorotateToInterfaceOrientation:(UIInterfaceOrientation)interfaceOrientation
{
    // Return YES for supported orientations
    return (interfaceOrientation == UIInterfaceOrientationPortrait);
}

Include the lines below to add the mapView object.

#import "DetailViewController.h"

@implementation DetailViewController
@synthesize mapView;
@synthesize mountainItem;
- (id)initWithNibName:(NSString *)nibNameOrNil bundle:(NSBundle *)nibBundleOrNil
{
    self = [super initWithNibName:nibNameOrNil bundle:nibBundleOrNil];
    if (self) {
        // Custom initialization
    }
    return self;
}

- (void)dealloc
{
    [mapView dealloc];
    [mountainItem dealloc];
    [super dealloc];
}

- (void)didReceiveMemoryWarning
{
    // Releases the view if it doesn't have a superview.
    [super didReceiveMemoryWarning];

    // Release any cached data, images, etc that aren't in use.
}

#pragma mark - View lifecycle

- (void)viewDidLoad
{
    [super viewDidLoad];
    // Do any additional setup after loading the view from its nib.

}

- (void)viewDidUnload
{
    [super viewDidUnload];
    // Release any retained subviews of the main view.
    // e.g. self.myOutlet = nil;
    self.mapView = nil;

}

- (BOOL)shouldAutorotateToInterfaceOrientation:(UIInterfaceOrientation)interfaceOrientation
{
    // Return YES for supported orientations
    return (interfaceOrientation == UIInterfaceOrientationPortrait);
}

[ad name=”Google Adsense”]
Step 4: DetailViewController.m – Show the Mountain’s Location on the Map

Remove line 58 because you are replacing the mountainInfoTextView with the coding for the mapView.

-(void)viewWillAppear:(BOOL)animated
{
    [super viewWillAppear:animated];
    [self setTitle:mountainItem.name];

    mountainInfoTextView.text = [NSString stringWithFormat: @"Name: %@\nElevation: %f\nLatitude: %f\nLongitude: %f",mountainItem.name, [mountainItem.elevation floatValue],  [mountainItem.latitude floatValue], [mountainItem.longitude floatValue]]; 

}
@end

Add the highlighted lines in the next code view.

The standard map type is set on line 59. You could also use MKMapTypeSatellite and MKMapTypeHybrid if you want to experiment.

Lines 60 and 61 are self explanatory.

The zoom and center point of the map is done on lines 62 to 67. Then center point is the longitude and latitude data passed into the class in the mountainItem object.

The span is an offset for the zoom. You can experiment with positive float numbers such as .01 which will zoom in tight. Because many of the mountains do not have any feature in standard map view, the value of 1 seems to show enough map details to keep from being disoriented.

-(void)viewWillAppear:(BOOL)animated
{
    [super viewWillAppear:animated];
    [self.navigationController setNavigationBarHidden:NO animated:YES];
    [self setTitle:mountainItem.name];

    [mapView setMapType:MKMapTypeStandard];
    [mapView setZoomEnabled:YES];
    [mapView setScrollEnabled:YES];
    MKCoordinateRegion region = { {0.0, 0.0 }, { 0.0, 0.0 } };
    region.center.latitude = [mountainItem.latitude doubleValue] ;
    region.center.longitude = [mountainItem.longitude doubleValue] ;
    region.span.longitudeDelta = 1.0f;
    region.span.latitudeDelta = 1.0f;
    [mapView setRegion:region animated:YES];

}

@end

Step 5: DetailViewController.xib – Replace the TextView with the MapView

Open the DetailViewController.xib.

Delete the TextView in the design window.

Delete TextView

Drag the MapView from the Objects panel to the view in the design window and fill the view.

Drag MapView

With the MapView still selected open the Connections Inspector and drag a “New Referencing Outlet” to the File’s Owner and when you release the mouse select mapView, the name your are using in our DetailViewController to control the MapView. The Connections Inspector should look as follows:

Connections Inspector For MapView

Then finally as a double check select the File’s Owner and the Connections Inspector should appear as follows:

Connections Inspector for File’s Owner

You should be good to check this out in the Simulator. Remember you need to hold down the Option button and drag the mouse to get the multi touch over the map for zooming. Scroll the map by dragging the mouse.

<== Lesson 7 || Overview || Lesson 9 ==>

Categories
Articles

XCode 4 IPhone Mountains of the USA Tutorial: Lesson 7 – Add Detail View


<== Lesson 6 || Overview || Lesson 8 ==>

In Lesson 5 you added touch interaction with the table view and displayed an alert popup. In this lesson you will refactor that to open a second screen in the hierarchy of the NavigationController you set up in Lesson 1.

Detail View Screen

For now you can just use a TextView to display some information about the mountain the user selected. In a later lesson you will redesign that to include a map view showing the mountain’s location.

You have much of the basic structure in place. For instance you need to pass mountain data to the second view. You have the MountainItem objects stored in the NSMutableArray supporting the table. So you can pass the selected table row’s MountainItem object to the detail view.

Source Download

  1. Starting XCode 4 Project. This is the lesson 6 project completed.
  2. PHP and CSV Files. Script to read data file and selects by elevation and returns XML. See Lesson 2.
  3. Completed XCode 4 Project

[ad name=”Google Adsense”]

Step 1: Create The DetailViewController
Download and uncompress the Starting XCode Project file and open in XCode.

The first task is to add a controller with a view attached.

Select File->New File

New File

Select the UIViewController subclass and select Next.

Choose File Template

Verify that “Targeted for IPad” is unchecked and “With XIB for user interface” is checked. Then select Next.

Choose Options

If you are using the starter file, then this screen should match up. All you need to do is type the file name “DetailViewController” and select Save.

You have options here that are XCode related such as groups for files, the testing target and even the project to contain the file.
Save File

You now have three new files you can see in the XCode Project explorer.

DetailViewContoller Files Created

Step 2: DetailViewController.h – Add TextView and MountainItem Objects
Open the DetailViewController.h file and add the highlighted code.

Lines 2, 7 and 11 include a MountainItem object to hold the data your MainViewController will pass into this class.

Lines 5 and 9 are a UITextView that is used to display some of the data in the MountainItem object.

#import <UIKit/UIKit.h>
#import "MountainItem.h"

@interface DetailViewController : UIViewController {
    UITextView *mountainInfoTextView;
    
    MountainItem *mountainItem;
}
@property (nonatomic, retain) IBOutlet UITextView *mountainInfoTextView;

@property (nonatomic, retain) MountainItem *mountainItem;
@end

[ad name=”Google Adsense”]

Step 3: DetailViewController.m – Include TextView and MountainItem Objects

Open the DetailViewController.m file and add the highlighted code.

This is the routine step to include the header file properties and to handle memory management.

#import "DetailViewController.h"


@implementation DetailViewController
@synthesize mountainInfoTextView;
@synthesize mountainItem;
- (id)initWithNibName:(NSString *)nibNameOrNil bundle:(NSBundle *)nibBundleOrNil
{
    self = [super initWithNibName:nibNameOrNil bundle:nibBundleOrNil];
    if (self) {
        // Custom initialization
    }
    return self;
}

- (void)dealloc
{
    [mountainInfoTextView dealloc];
    [mountainItem dealloc];
    [super dealloc];
}

- (void)didReceiveMemoryWarning
{
    // Releases the view if it doesn't have a superview.
    [super didReceiveMemoryWarning];
    
    // Release any cached data, images, etc that aren't in use.
}

#pragma mark - View lifecycle

- (void)viewDidLoad
{
    [super viewDidLoad];
    // Do any additional setup after loading the view from its nib.
    
}

- (void)viewDidUnload
{
    [super viewDidUnload];
    // Release any retained subviews of the main view.
    // e.g. self.myOutlet = nil;
    self.mountainInfoTextView = nil;
}

- (BOOL)shouldAutorotateToInterfaceOrientation:(UIInterfaceOrientation)interfaceOrientation
{
    // Return YES for supported orientations
    return (interfaceOrientation == UIInterfaceOrientationPortrait);
}

Step 4: DetailViewController.m – Set the DetailViewController UI Data

This step overrides the UIViewController viewWillAppear:animated method.

This allows us to set the NavigationBar title and the UITextview mountainInfoTextView text property with data that you will pass from the MainViewController in a later step.

The viewDidLoad method was not used because it is only called once unless the DetailViewController’s view is removed from the NavigationController navController stack of views. Thus on subsequent mountain choices the view would show the same data from the first time it was added to the NavigationController navController. The NavigationController navController is set up in the application delegate USAMountainsTutorial07AppDelegate.

The viewWillAppear method is called when the view needs to show on the display area.

Line 54 assures the superclass viewWillAppear is executed.

Line 55 sets the title using the MountainItem data received from the MainViewController.

Line 56 places some of the MountainItem data received into the UITextView mountainInfoTextView text property. Nothing fancy is needed here as this is temporary.

-(void)viewWillAppear:(BOOL)animated
{
    [super viewWillAppear:animated];
    [self setTitle:mountainItem.name];
     
    mountainInfoTextView.text = [NSString stringWithFormat: @"Name: %@\nElevation: %f\nLatitude: %f\nLongitude: %f",mountainItem.name, [mountainItem.elevation floatValue],  [mountainItem.latitude floatValue], [mountainItem.longitude floatValue]]; 

}
@end

Step 5: DetailViewController.xib – Set up the TextView and View

Open the DetailViewController.xib in the project explorer.

Select the View and then the Property Inspector. Set the Top Bar property to Navigation Bar.

View Property Inspector

Next in the Objects panel in the lower right drag a TextView object to the View. Size it to fill the screen.

TextView in Objects

This is how the design area should appear:

Text View in Design Layout

With the TextView selected open the Connection Inspector. Drag a “New Referencing Outlet” to the File’s Owner icon. When you release the mouse, select mountainInfoTextView from the popup menu over the File’s Owner Icon. Here is the result:

Text View Connection Inspector

To check your work, keep the Connections Inspector open and select the File’s Owner icon and you should see the following:

File's Owner Connection Inspector

Step 5: MainViewController.h – Add the DetailViewController

Open the MainViewController.h file.

Update line 1 with your server URL.

Add the highlighted lines 4, 21 and 37.

These lines make a DetailViewController object for this class.

#define kTextURL    @"http://YOUR_DOMAIN/PATH_IF_ANY_TO_SCRIPT/PHP_SCRIPT_OR_XML_FILE"

#import <UIKit/UIKit.h>
#import "DetailViewController.h"

@interface MainViewController : UIViewController <NSXMLParserDelegate, UITableViewDelegate, UITableViewDataSource>
{
    UIButton                *searchButton;
    UIActivityIndicatorView *activityIndicator;
    UITableView             *resultsTableView;
    UILabel                 *elevationLabel;
    UISlider                *elevationSlider;
    
    NSURLConnection         *urlConnection;
    NSMutableData           *receivedData;
    
    NSXMLParser             *xmlParser;
    
    NSMutableArray          *mountainData;
    
    DetailViewController    *detailView;

}
@property (nonatomic, retain) IBOutlet UIButton                 *searchButton;
@property (nonatomic, retain) IBOutlet UIActivityIndicatorView  *activityIndicator;
@property (nonatomic, retain) IBOutlet UITableView              *resultTableView;
@property (nonatomic, retain) IBOutlet UILabel                  *elevationLabel;
@property (nonatomic, retain) IBOutlet UISlider                 *elevationSlider;

@property (nonatomic, retain) NSURLConnection *urlConnection;
@property (nonatomic, retain) NSMutableData *receivedData;

@property (nonatomic, retain) NSXMLParser *xmlParser;

@property (nonatomic, retain) NSMutableArray *mountainData;

@property (nonatomic, retain) DetailViewController *detailView;

-(IBAction) startSearch:(id)sender;
- (void) setUIState:(int)uiState;
- (IBAction)sliderChanged:(id)sender;

-(NSString *) getCommaSeparatedFromStringContainingNumber:(NSString *)stringWithNumber;
@end

[ad name=”Google Adsense”]

Step 6: MainViewController.m – Include the DetailViewController Object

Open the MainViewController.m file and add the highlighted lines.

These lines include the DetailViewController detailView object for this class to manage.

#import "MainViewController.h"
#import "MountainItem.h"

@implementation MainViewController
@synthesize searchButton;
@synthesize activityIndicator;
@synthesize resultTableView;
@synthesize elevationLabel;
@synthesize elevationSlider;

@synthesize urlConnection;
@synthesize receivedData;

@synthesize xmlParser;

@synthesize mountainData;

@synthesize detailView;


// State is loading data. Used to set view.
static const int LOADING_STATE = 1;
// State is active. Used to set view.
static const int ACTIVE_STATE = 0;


- (id)initWithNibName:(NSString *)nibNameOrNil bundle:(NSBundle *)nibBundleOrNil
{
    self = [super initWithNibName:nibNameOrNil bundle:nibBundleOrNil];
    if (self) {
        // Custom initialization
    }
    return self;
}

- (void)dealloc
{
    [searchButton release];
    [activityIndicator release];
    [resultTableView release];
    [elevationLabel release];
    [elevationSlider release];
    [urlConnection release];
    [receivedData release];
    [xmlParser release];
    [mountainData release];
    [detailView release];
    [super dealloc];
}

- (void)didReceiveMemoryWarning
{
    // Releases the view if it doesn't have a superview.
    [super didReceiveMemoryWarning];
    
    // Release any cached data, images, etc that aren't in use.
}

#pragma mark - View lifecycle

- (void)viewDidLoad
{
    [super viewDidLoad];
    // Do any additional setup after loading the view from its nib.
    mountainData = [[NSMutableArray alloc] init];
    [mountainData retain];

    [self setTitle:@"USA Mountains Lesson 7"];
    UIBarButtonItem *newBarButtonItem = [[UIBarButtonItem alloc] init];
	newBarButtonItem.title = @"Return";
	self.navigationItem.backBarButtonItem = newBarButtonItem;
	[newBarButtonItem release];
}

- (void)viewDidUnload
{
    [super viewDidUnload];
    // Release any retained subviews of the main view.
    // e.g. self.myOutlet = nil;
    self.searchButton = nil;
    self.activityIndicator = nil;
    self.resultTableView = nil;
    self.elevationLabel = nil;
    self.elevationSlider = nil;
    self.detailView = nil;
}

- (BOOL)shouldAutorotateToInterfaceOrientation:(UIInterfaceOrientation)interfaceOrientation
{
    // Return YES for supported orientations
    return (interfaceOrientation == UIInterfaceOrientationPortrait);
}

The following code does not change and is included here for online reference:

#pragma mark - UI Interface
- (IBAction)sliderChanged:(id)sender
{
    NSNumberFormatter *numberFormatter = [[NSNumberFormatter alloc] init];
    [numberFormatter setPositiveFormat:@"###,##0"];
    NSString *formattedNumberString = [numberFormatter stringFromNumber:[NSNumber numberWithFloat:elevationSlider.value]];
    elevationLabel.text = [[NSString alloc] initWithFormat:@"Elevation %@ feet",formattedNumberString];
    
    [numberFormatter release];
}
-(IBAction) startSearch:(id)sender
{
    NSLog(@"startSearch");
     // Change UI to loading state
    [self setUIState:LOADING_STATE];
    // Convert the NSSlider elevationValue_ui value to a string
    NSString *elevation = [[NSString alloc ] initWithFormat:@"%.0f", elevationSlider.value]; 
    // Create the URL which would be http://YOUR_DOMAIN_NAME/PATH_IF_ANY_TO/get_usa_mountain_data.php?elevation=12000
    NSString *urlAsString = [NSString stringWithFormat:
                             @"%@%s%@", kTextURL , "?elevation_min=", elevation];

    //NSLog(@"urlAsString: %@",urlAsString );
    NSURLRequest *req = [[NSURLRequest alloc] initWithURL:[NSURL URLWithString:urlAsString]];
    // Create the NSURLConnection con object with the NSURLRequest req object 
    // and make this MountainsEx01ViewController the delegate.
    urlConnection = [[NSURLConnection alloc] initWithRequest:req delegate:self];
    // Connection successful
    if (urlConnection) {
        NSMutableData *data = [[NSMutableData alloc] init];
        self.receivedData=data;
        [data release];
    } 
    // Bad news, connection failed.
    else 
    {
        UIAlertView *alert = [
                              [UIAlertView alloc] 
                              initWithTitle:NSLocalizedString(@"Error", @"Error")
                              message:NSLocalizedString(@"Error connecting to remote server", @"Error connecting to remote server")
                              delegate:self 
                              cancelButtonTitle:NSLocalizedString(@"Bummer", @"Bummer")
                              otherButtonTitles:nil
                              ];
        [alert show];
        [alert release];
    }
    [req release];
    [elevation release];
    
}
-(void) setUIState:(int)uiState;
{
    // Set view state to animating.
    if (uiState == LOADING_STATE)
    {
        searchButton.enabled = false;
        searchButton.alpha = 0.5f;
        [activityIndicator startAnimating];
        
    }
    // Set view state to not animating.
    else if (uiState == ACTIVE_STATE)
    {
        searchButton.enabled = true;
        searchButton.alpha = 1.0f;
        [activityIndicator stopAnimating];
    }
}

#pragma mark - NSURLConnection Callbacks
- (void)connection:(NSURLConnection *)connection didReceiveResponse:(NSURLResponse *)response 
{
    [receivedData setLength:0];
}
- (void)connection:(NSURLConnection *)connection didReceiveData:(NSData *)data 
{
    [receivedData appendData:data];
}
- (void)connection:(NSURLConnection *)connection didFailWithError:(NSError *)error 
{
    [connection release];
    self.receivedData = nil; 
    
    UIAlertView *alert = [[UIAlertView alloc] 
                          initWithTitle:@"Error"
                          message:[NSString stringWithFormat:@"Connection failed! Error - %@ (URL: %@)", [error localizedDescription],[[error userInfo] objectForKey:NSURLErrorFailingURLStringErrorKey]] 
                          delegate:self
                          cancelButtonTitle:@"Bummer"
                          otherButtonTitles:nil];
    [alert show];
    [alert release];
    // Change UI to active state
    [self setUIState:ACTIVE_STATE];
}
- (void)connectionDidFinishLoading:(NSURLConnection *)connection 
{
    [mountainData removeAllObjects];
    // Convert receivedData to NSString.
    
    xmlParser = [[NSXMLParser alloc] initWithData:receivedData];
    [xmlParser setDelegate:self]; 
    [xmlParser parse];

    [self.resultTableView reloadData];

    // Connection resources release.
    [connection release];
    self.receivedData = nil;
    // Change UI to active state
    [self setUIState:ACTIVE_STATE];
}

#pragma mark - NSXMLParser Callbacks
- (void)parser:(NSXMLParser *)parser didStartElement:(NSString *)elementName namespaceURI:(NSString *)namespaceURI 
 qualifiedName:(NSString *)qName attributes:(NSDictionary *)attributeDict
{
    //Is a mountain_item node
    if ([elementName isEqualToString:@"mountain_item"])
    {
        MountainItem *mountainItem = [[MountainItem alloc] init];
        mountainItem.name = [attributeDict objectForKey:@"name"];
        mountainItem.elevation = [attributeDict objectForKey:@"elevation"];
        mountainItem.elevationAsString = [self getCommaSeparatedFromStringContainingNumber:[attributeDict objectForKey:@"elevation"]];
        mountainItem.latitude = [attributeDict objectForKey:@"lat"];
        mountainItem.longitude = [attributeDict objectForKey:@"lon"];
        
        [mountainData addObject:mountainItem];

        [mountainItem release];
        mountainItem = nil;
        
    }
    
}
#pragma mark - Table View Data Source Methods
- (NSInteger)tableView:(UITableView *)tableView numberOfRowsInSection:(NSInteger)section 
{
    return [self.mountainData count];
}

- (UITableViewCell *)tableView:(UITableView *)tableView cellForRowAtIndexPath:(NSIndexPath *)indexPath 
{
    static NSString *SimpleTableIdentifier = @"SimpleTableIdentifier";
    UITableViewCell *cell = [tableView dequeueReusableCellWithIdentifier:
							 SimpleTableIdentifier];
    // UITableViewCell cell needs creating for this UITableView row.
    if (cell == nil) 
    {
        cell = [[[UITableViewCell alloc]
				 initWithStyle:UITableViewCellStyleDefault
				 reuseIdentifier:SimpleTableIdentifier] autorelease];
    }
    NSUInteger row = [indexPath row];
    if ([mountainData count] - 1 >= row)
    {
        // Create a MountainItem object from the NSMutableArray mountainData
        MountainItem *mountainItemData = [mountainData objectAtIndex:row];
        // Compose a NSString to show UITableViewCell cell as Mountain Name - nn,nnnn 
        NSString *rowText = [[NSString alloc ] initWithFormat:@"%@ - %@ feet",mountainItemData.name, mountainItemData.elevationAsString];
        // Set UITableViewCell cell
        cell.textLabel.text = rowText;
        cell.textLabel.font = [UIFont boldSystemFontOfSize:14];
        // Release alloc vars
        [rowText release];
    }
    return cell;
}

Step 7: MainViewController.m – Modify the didSelectRowAtIndexPath to Open the DetailViewController

The lines you need to remove are highlighted here for your convenience:

#pragma mark - Table Delegate Methods
- (void)tableView:(UITableView *)tableView didSelectRowAtIndexPath:(NSIndexPath *)indexPath 
{
    //NSLog(@"%s", __FUNCTION__);

     
     NSUInteger row = [indexPath row];
     MountainItem *mountainItemData = [mountainData objectAtIndex:row];
     
     NSString *message = [[NSString alloc] initWithFormat:
                          @"Coordinates\nLatitude: %f\nLongitude: %f", [mountainItemData.latitude floatValue], [mountainItemData.longitude floatValue]];
     UIAlertView *alert = [[UIAlertView alloc]
         initWithTitle:mountainItemData.name
         message:message
         delegate:nil
         cancelButtonTitle:@"Close"
         otherButtonTitles:nil];
     [alert show];
     
     [message release];
     [alert release];
     [tableView deselectRowAtIndexPath:indexPath animated:YES];
     
}

Line 278 is optional to remove if do not want to show the selected mountain when the first screen is shown.

Now add the highlighted lines.

Lines 265 to 272 initialize the DetailViewController. Line 265 checks to see if the DetailViewController detailView object is initialized. If not, the method scoped DetailViewController detailViewTemp object is created from the DetailViewController.xib file on line 269. One line 271 detailViewTemp is set to the class DetailViewController detailView property and then detailViewTemp is released on line 272.

The mountainItemData extracted from the NSMutableArray mountainData is assigned to the detailView mountainItemProperty on line 276.

The last line, 277, pushes the detailView into the NavigationController stack and that causes the detailView to appear.

#pragma mark - Table Delegate Methods
- (void)tableView:(UITableView *)tableView didSelectRowAtIndexPath:(NSIndexPath *)indexPath 
{
     // Row number in the table.
     NSUInteger row = [indexPath row];
     // Data for that row
     MountainItem *mountainItemData = [mountainData objectAtIndex:row];
    // DetailViewController not initialized.
    if (self.detailView == nil)
    {
        // Create a temporary local method variable for DetailViewController
        DetailViewController *detailViewTemp = [[DetailViewController alloc] initWithNibName:@"DetailViewController" bundle:nil];
        // Assign local DetailViewController variable to class instance detailView
        self.detailView = detailViewTemp;
        [detailViewTemp release];
    }
     
    // Pass the selected data to the detailView
    detailView.mountainItem = mountainItemData;
    // Add the detailView to the navigation stack
    [self.navigationController pushViewController:detailView animated:YES];
     
}

The remainder of the MainViewController.m file is included here for online reference.

#pragma mark - Utilities
-(NSString *) getCommaSeparatedFromStringContainingNumber:(NSString *)stringWithNumber
{
    // Convert the MountainItem.elevation as a NSString to a NSNumber
    NSNumberFormatter * elevationToNumber = [[NSNumberFormatter alloc] init];
    [elevationToNumber setNumberStyle:NSNumberFormatterDecimalStyle];
    NSString *elevation = stringWithNumber;
    NSNumber *myNumber = [elevationToNumber numberFromString:elevation];
    [elevationToNumber release];
    
    // Format elevation as a NSNumber to a comma separated NSString
    NSNumberFormatter *numberFormatter = [[NSNumberFormatter alloc] init];
    [numberFormatter setPositiveFormat:@"###,##0"];
    NSString *formattedNumberString = [numberFormatter stringFromNumber:myNumber];
    [numberFormatter release];
    return formattedNumberString;
}

@end

Try it out in the IPhone simulator.

<== Lesson 6 || Overview || Lesson 8 ==>

Categories
Articles

XCode 4 IPhone Mountains of the USA Tutorial: Lesson 6 – Add Slider to Search By Elevation


<== Lesson 5 || Overview || Lesson 7 ==>

This lesson takes advantage of the server script to select mountains based on their elevation.The script returns mountains that exceed an elevation value you provide as part of the URL request made to the web server.

Slider Search By Elevation

This means you cannot use a static XML file for the UI and code that is added in this section. If you cannot provide a server, you could proceed by skipping this lesson and ignoring the code and UI added. But the code and UI will appear in all future lessons and may serve to confuse you. Best approach is to put the provided PHP script and data file in a folder on a web server and continue with these. These files are included as a part of all the lesson downloads since lesson 2.

The tasks in this lesson are more in adding the UI to provide the user with suitable information to understand what to do with very little screen space. This example choose to use a bit more screen space to help make the selection of an elevation more informative.

Source Download

  1. Starting XCode 4 Project. This is the lesson 5 project completed.
  2. PHP and CSV Files. Script to read data file and selects by elevation and returns XML. See Lesson 2.
  3. Completed XCode 4 Project

[ad name=”Google Adsense”]
Step 1: MainViewController.h – Add the Slider and Slider Label

Download and uncompress the Starting XCode Project file and open in XCode.

Open the MainViewController.h in the project navigator window.

Lines 13 and 27 are the UILabel that will appear above the slider. The label shows the value in the slider. You will change the label as the slider is changed.

Lines 14 and 28 are the UISlider.

Line 39 is a IBAction method you link up in the UI to receive messages when the slider is changed.

Remember to change line 4 to include your url.

//
//
//
#define kTextURL    @"http://YOUR_DOMAIN/PATH_IF_ANY_TO_SCRIPT/PHP_SCRIPT_OR_XML_FILE"

#import &amp;lt;UIKit/UIKit.h&amp;gt;

@interface MainViewController : UIViewController &amp;lt;NSXMLParserDelegate, UITableViewDelegate, UITableViewDataSource&amp;gt;
{
    UIButton                *searchButton;
    UIActivityIndicatorView *activityIndicator;
    UITableView             *resultsTableView;
    UILabel                 *elevationLabel;
    UISlider                *elevationSlider;

    NSURLConnection         *urlConnection;
    NSMutableData           *receivedData;

    NSXMLParser             *xmlParser;

    NSMutableArray          *mountainData;

}
@property (nonatomic, retain) IBOutlet UIButton                 *searchButton;
@property (nonatomic, retain) IBOutlet UIActivityIndicatorView  *activityIndicator;
@property (nonatomic, retain) IBOutlet UITableView              *resultTableView;
@property (nonatomic, retain) IBOutlet UILabel                  *elevationLabel;
@property (nonatomic, retain) IBOutlet UISlider                 *elevationSlider;

@property (nonatomic, retain) NSURLConnection *urlConnection;
@property (nonatomic, retain) NSMutableData *receivedData;

@property (nonatomic, retain) NSXMLParser *xmlParser;

@property (nonatomic, retain) NSMutableArray *mountainData;

-(IBAction) startSearch:(id)sender;
- (void) setUIState:(int)uiState;
- (IBAction)sliderChanged:(id)sender;

-(NSString *) getCommaSeparatedFromStringContainingNumber:(NSString *)stringWithNumber;
@end

Step 2: MainViewController.m – Add the Slider, Slider Label and Change Navbar Title
Open the MainViewController.m file in the project explorer.

This step is pretty routine.

You need to add in the new UI variables shown on the highlighted lines 11, 12, 40, 41, 77 and 78. These include them in the class and also take care of memory management.

Line 66 is the NavigationBar title you can change.

//
//
//
#import "MainViewController.h"
#import "MountainItem.h"

@implementation MainViewController
@synthesize searchButton;
@synthesize activityIndicator;
@synthesize resultTableView;
@synthesize elevationLabel;
@synthesize elevationSlider;

@synthesize urlConnection;
@synthesize receivedData;

@synthesize xmlParser;

@synthesize mountainData;

// State is loading data. Used to set view.
static const int LOADING_STATE = 1;
// State is active. Used to set view.
static const int ACTIVE_STATE = 0;

- (id)initWithNibName:(NSString *)nibNameOrNil bundle:(NSBundle *)nibBundleOrNil
{
    self = [super initWithNibName:nibNameOrNil bundle:nibBundleOrNil];
    if (self) {
        // Custom initialization
    }
    return self;
}

- (void)dealloc
{
    [searchButton release];
    [activityIndicator release];
    [resultTableView release];
    [elevationLabel release];
    [elevationSlider release];
    [urlConnection release];
    [receivedData release];
    [xmlParser release];
    [mountainData release];
    [super dealloc];
}

- (void)didReceiveMemoryWarning
{
    // Releases the view if it doesn't have a superview.
    [super didReceiveMemoryWarning];

    // Release any cached data, images, etc that aren't in use.
}

#pragma mark - View lifecycle

- (void)viewDidLoad
{
    [super viewDidLoad];
    // Do any additional setup after loading the view from its nib.
    mountainData = [[NSMutableArray alloc] init];
    [mountainData retain];

    [self setTitle:@"USA Mountains Lesson 6"];
}

- (void)viewDidUnload
{
    [super viewDidUnload];
    // Release any retained subviews of the main view.
    // e.g. self.myOutlet = nil;
    self.searchButton = nil;
    self.activityIndicator = nil;
    self.resultTableView = nil;
    self.elevationLabel = nil;
    self.elevationSlider = nil;
}

- (BOOL)shouldAutorotateToInterfaceOrientation:(UIInterfaceOrientation)interfaceOrientation
{
    // Return YES for supported orientations
    return (interfaceOrientation == UIInterfaceOrientationPortrait);
}

Step 3: MainViewController.m – Add the sliderChanged Method.

Add all the code below in the UI Interface section just before the -(IBAction) startSearch:(id)sender method.

When the user changes the slider, you are updating a label that shows the slider value with a comma separated number. For example Elevation 10,000 feet.

[ad name=”Google Adsense”]

You can see at the end of line 91 the NSNumber value property provided by the UISlider: elevationSlider.value. Lines 89 to 91 converting that to a NSString formatted with commas to create NSString *formattedNumberString.

Line 92 assembles NSString *formattedNumberString with the words Elevation and feet and updates the UILabel elevationLabel text property.

You end with the cleanup of the NSNumberFormatter used in the process.

#pragma mark - UI Interface
- (IBAction)sliderChanged:(id)sender
{
    NSNumberFormatter *numberFormatter = [[NSNumberFormatter alloc] init];
    [numberFormatter setPositiveFormat:@"###,##0"];
    NSString *formattedNumberString = [numberFormatter stringFromNumber:[NSNumber numberWithFloat:elevationSlider.value]];
    elevationLabel.text = [[NSString alloc] initWithFormat:@"Elevation %@ feet",formattedNumberString];
    [numberFormatter release];
}

Step 4: MainViewController.m – Modify the URL to Send the Elevation

You need to add a URL query for example: ?elevation_min=10000. This is needed for the PHP script. You do not need to know how to program PHP but it is included here for reference with a few key lines highlighted to illustrate.

&amp;lt;?php
header("Expires: Mon, 26 Jul 1997 05:00:00 GMT" );
header("Last-Modified: " . gmdate( "D, d M Y H:i:s" ) . "GMT" );
header("Cache-Control: no-cache, must-revalidate" );
header("Pragma: no-cache" );
header("Content-Type: text/xml; charset=utf-8");
// XML to return.
$xml = '';
// Counter for number of mountains returned.
$mountain_count = 0;
// Filter mountains equal to or above this value.
$elevation_min = 12000;
// Check for elevation parameter as a integer.
if ($_REQUEST['elevation_min'] &amp;amp;&amp;amp; intval($_REQUEST['elevation_min']))
{
	$elevation_min = intval( $_REQUEST['elevation_min']);
}
// Each element contains data for one mountain.
$mountains = array();
// Read a CVS file containing mountain data.
$mountain_data_lines = file('mountain_data.csv');
// Each line read .
foreach($mountain_data_lines as $line)
{
	// Strip newline at end of line and break line by comma delimiter and
	// append to $mountains.
	$mountains[] = explode( ',', rtrim($line));
}
// Each mountain.
foreach ($mountains as $value)
{
	// Mountain elevation equals or exceeds the filter value.
	if ( intval($value[1]) &amp;gt;= $elevation_min  )
	{
		$mountain_count++;
		// Create the mountain_item node.
		$xml .= '&amp;lt;mountain_item ';
		$xml .= 'id = "' . $mountain_count . '" ';
		$xml .= 'name = "' . $value[0] . '" ';
		$xml .= 'elevation = "' . $value[1] . '" ';
		$xml .= 'lat = "' . $value[2] . '" ';
		$xml .= 'lon = "' . $value[3] . '" ';
		$xml .= '/&amp;gt;';

	}
}
// Add mountains close node.
$xml .= '&amp;lt;/mountains&amp;gt;';
// Create mountains open node.
$xml_mountains = '&amp;lt;mountains ';
$xml_mountains .= 'source = "http://en.wikipedia.org/wiki/Table_of_the_highest_major_summits_of_the_United_States" ' ;
$xml_mountains .= 'elevation_min = "' . $elevation_min . '" ';
$xml_mountains .= 'count = "' . $mountain_count . '" ';
$xml_mountains .= '&amp;gt;';
// Add mountains open node.
$xml = $xml_mountains . $xml;
// Return xml
echo $xml;
?&amp;gt;

The PHP script provided looks for the elevation_min parameter on lines 14 and 16, absorbs it to the $elevation_min variable and uses $elevation_min on line 33 to filter the returned mountains that have an elevation at or above that value.

A slight modification to the MainViewController.m startSearch method will send the elevation_min parameter to the PHP script.

Line 102 is added to take the slider value and convert to a number.

The single line of code shown on 104 and 105 adds the URL query needed by the PHP script.

-(IBAction) startSearch:(id)sender
{
    //NSLog(@"startSearch");

     // Change UI to loading state
    [self setUIState:LOADING_STATE];
    // Convert the NSSlider elevationValue_ui value to a string
    NSString *elevation = [[NSString alloc ] initWithFormat:@"%.0f", elevationSlider.value];
    // Create the URL which would be http://YOUR_DOMAIN_NAME/PATH_IF_ANY_TO/get_usa_mountain_data.php?elevation=12000
    NSString *urlAsString = [NSString stringWithFormat:
                             @"%@%s%@", kTextURL , "?elevation_min=", elevation];

    //NSLog(@"urlAsString: %@",urlAsString );
    NSURLRequest *req = [[NSURLRequest alloc] initWithURL:[NSURL URLWithString:urlAsString]];
    // Create the NSURLConnection con object with the NSURLRequest req object
    // and make this MountainsEx01ViewController the delegate.
    urlConnection = [[NSURLConnection alloc] initWithRequest:req delegate:self];
    // Connection successful
    if (urlConnection) {
        NSMutableData *data = [[NSMutableData alloc] init];
        self.receivedData=data;
        [data release];
    }
    // Bad news, connection failed.
    else
    {
        UIAlertView *alert = [
                              [UIAlertView alloc]
                              initWithTitle:NSLocalizedString(@"Error", @"Error")
                              message:NSLocalizedString(@"Error connecting to remote server", @"Error connecting to remote server")
                              delegate:self
                              cancelButtonTitle:NSLocalizedString(@"Bummer", @"Bummer")
                              otherButtonTitles:nil
                              ];
        [alert show];
        [alert release];
    }
    [req release];
    [elevation release];
}

The remainder of the code is unchanged and is included here for reference:

-(void) setUIState:(int)uiState;
{
    // Set view state to animating.
    if (uiState == LOADING_STATE)
    {
        searchButton.enabled = false;
        searchButton.alpha = 0.5f;
        [activityIndicator startAnimating];

    }
    // Set view state to not animating.
    else if (uiState == ACTIVE_STATE)
    {
        searchButton.enabled = true;
        searchButton.alpha = 1.0f;
        [activityIndicator stopAnimating];
    }
}

#pragma mark - NSURLConnection Callbacks
- (void)connection:(NSURLConnection *)connection didReceiveResponse:(NSURLResponse *)response
{
    [receivedData setLength:0];
}
- (void)connection:(NSURLConnection *)connection didReceiveData:(NSData *)data
{
    [receivedData appendData:data];
}
- (void)connection:(NSURLConnection *)connection didFailWithError:(NSError *)error
{
    [connection release];
    self.receivedData = nil; 

    UIAlertView *alert = [[UIAlertView alloc]
                          initWithTitle:@"Error"
                          message:[NSString stringWithFormat:@"Connection failed! Error - %@ (URL: %@)", [error localizedDescription],[[error userInfo] objectForKey:NSURLErrorFailingURLStringErrorKey]]
                          delegate:self
                          cancelButtonTitle:@"Bummer"
                          otherButtonTitles:nil];
    [alert show];
    [alert release];
    // Change UI to active state
    [self setUIState:ACTIVE_STATE];
}
- (void)connectionDidFinishLoading:(NSURLConnection *)connection
{
    [mountainData removeAllObjects];
    // Convert receivedData to NSString.

    xmlParser = [[NSXMLParser alloc] initWithData:receivedData];
    [xmlParser setDelegate:self];
    [xmlParser parse];

    [self.resultTableView reloadData];

    // Connection resources release.
    [connection release];
    self.receivedData = nil;
    // Change UI to active state
    [self setUIState:ACTIVE_STATE];
}

#pragma mark - NSXMLParser Callbacks
- (void)parser:(NSXMLParser *)parser didStartElement:(NSString *)elementName namespaceURI:(NSString *)namespaceURI
 qualifiedName:(NSString *)qName attributes:(NSDictionary *)attributeDict
{
    //Is a mountain_item node
    if ([elementName isEqualToString:@"mountain_item"])
    {
        MountainItem *mountainItem = [[MountainItem alloc] init];
        mountainItem.name = [attributeDict objectForKey:@"name"];
        mountainItem.elevation = [attributeDict objectForKey:@"elevation"];
        mountainItem.elevationAsString = [self getCommaSeparatedFromStringContainingNumber:[attributeDict objectForKey:@"elevation"]];
        mountainItem.latitude = [attributeDict objectForKey:@"lat"];
        mountainItem.longitude = [attributeDict objectForKey:@"lon"];

        [mountainData addObject:mountainItem];

        [mountainItem release];
        mountainItem = nil;

    }

}
#pragma mark - Table View Data Source Methods
- (NSInteger)tableView:(UITableView *)tableView numberOfRowsInSection:(NSInteger)section
{
    return [self.mountainData count];
}

- (UITableViewCell *)tableView:(UITableView *)tableView cellForRowAtIndexPath:(NSIndexPath *)indexPath
{
    static NSString *SimpleTableIdentifier = @"SimpleTableIdentifier";
    UITableViewCell *cell = [tableView dequeueReusableCellWithIdentifier:
							 SimpleTableIdentifier];
    // UITableViewCell cell needs creating for this UITableView row.
    if (cell == nil)
    {
        cell = [[[UITableViewCell alloc]
				 initWithStyle:UITableViewCellStyleDefault
				 reuseIdentifier:SimpleTableIdentifier] autorelease];
    }
    NSUInteger row = [indexPath row];
    if ([mountainData count] - 1 &amp;gt;= row)
    {
        // Create a MountainItem object from the NSMutableArray mountainData
        MountainItem *mountainItemData = [mountainData objectAtIndex:row];
        // Compose a NSString to show UITableViewCell cell as Mountain Name - nn,nnnn
        NSString *rowText = [[NSString alloc ] initWithFormat:@"%@ - %@ feet",mountainItemData.name, mountainItemData.elevationAsString];
        // Set UITableViewCell cell
        cell.textLabel.text = rowText;
        cell.textLabel.font = [UIFont boldSystemFontOfSize:14];
        // Release alloc vars
        [rowText release];
    }
    return cell;
}
#pragma mark - Table Delegate Methods
- (void)tableView:(UITableView *)tableView didSelectRowAtIndexPath:(NSIndexPath *)indexPath
{
    //NSLog(@"%s", __FUNCTION__);

     NSUInteger row = [indexPath row];
     MountainItem *mountainItemData = [mountainData objectAtIndex:row];

     NSString *message = [[NSString alloc] initWithFormat:
                          @"Coordinates\nLatitude: %f\nLongitude: %f", [mountainItemData.latitude floatValue], [mountainItemData.longitude floatValue]];
     UIAlertView *alert = [[UIAlertView alloc]
         initWithTitle:mountainItemData.name
         message:message
         delegate:nil
         cancelButtonTitle:@"Close"
         otherButtonTitles:nil];
     [alert show];

     [message release];
     [alert release];
     [tableView deselectRowAtIndexPath:indexPath animated:YES];

}
#pragma mark - Utilities
-(NSString *) getCommaSeparatedFromStringContainingNumber:(NSString *)stringWithNumber
{
    // Convert the MountainItem.elevation as a NSString to a NSNumber
    NSNumberFormatter * elevationToNumber = [[NSNumberFormatter alloc] init];
    [elevationToNumber setNumberStyle:NSNumberFormatterDecimalStyle];
    NSString *elevation = stringWithNumber;
    NSNumber *myNumber = [elevationToNumber numberFromString:elevation];
    [elevationToNumber release];

    // Format elevation as a NSNumber to a comma separated NSString
    NSNumberFormatter *numberFormatter = [[NSNumberFormatter alloc] init];
    [numberFormatter setPositiveFormat:@"###,##0"];
    NSString *formattedNumberString = [numberFormatter stringFromNumber:myNumber];
    [numberFormatter release];
    return formattedNumberString;
}

@end

Step 5: MainViewController.xib – Add in the UISlider

Now you can move on to the UI. Refer to the screen shot at the top of the post to keep you on track with the goal of the changes.

Keep in mind, you can do this generally after you have the header definitions in place. You need those so that the Interface Builder part of XCode can display the names of methods and UI components you choose in code. These lessons choose to complete the implementation in the code before moving to UI just to keep the zig zag back and forth that XCode often creates for tutorials. As you get faster, you might want to do the UI right after you do the header files.

Drag a Slider from the Objects library in the bottom right to place it above the Search button.

Slider

Fine tune the position and size to match the tutorial:

Slider Size Inspector

Then you need to wire the MainViewController to the UISlider elevationSlider property defined in step 1 for the MainViewController header and you need to wire the UISlider valueChanged send event to the sliderChanged method you also defined in step 1.

[ad name=”Google Adsense”]

You can use the Properties Inspector to get this done. With the Slider you placed in the design window selected open the Property Inspector. Drag from the “Value Changed” Send Event to the File’s Owner and when you release you can select the sliderChanged in the popped menu above the File’s Owner.

Repeat for the “New Referencing Outlet” and when you release the mouse over the File’s Owner icon select elevationSlider.

Another process you see is to control drag from the Slider in the design window to the File’s Owner in the Related Files panel on left and release mouse. You should see sliderChanged appear in a small menu popped over the File’s Owner. Click and select. Then you can repeat the process in the opposite direction and when you release over the Slider, you should see elevationSlider as a menu choice in the popped menu above the Slider.

The end result is shown here:

Slider Connections Inspector

There are some tweaks needed to make the slider provide the range of elevations and a starting elevation. The range is to match the data available and a starting value to avoid automatic downloads of all the data every time.

So modify the Slider’s Property Inspector as follows:

Slider Property Inspector

Step 6: MainViewController.xib – Add in the UILabel Displaying the Slider Value

Next is a Label above the Slider to show the value of the Slider when it changes.

Drag a Label from the Objects library in the bottom right to place it above the Slider.

Slider

Fine tune the position and size to match the tutorial:

Slider Size Inspector

Set the properties. Note the hard coded match up to display the starting value in the slider.

Slider Property Inspector

Finally you got to wire this label so you can update it in the code. In code you are using the elevationLabel property defined in step 1. Open the Connections Inspector with this Label selected. Drag the New Referencing Outlet to the File’s Owner and after you release the mouse select elevationLabel in the menu popped over the File’s Owner.

Here is the result:

Slider Connections Inspector

Step 7: MainViewController.xib – Add the Minimum and Maximum Labels

This step you add a Label on the left and a Label on the right of the Slider to give the range of elevation values possible. These Labels are static and do not need to be wired to the code.

Drag a Label to the left side of the Slider in the design window:

Left Slider Label

Tweak size and position as follows:

Left Slider Label Property Inspector

The text property for this Label is 12,000 ft. You need to tweak the font size to make the text fit.

The properties as set:

Left Slider Label Size Inspector

Drag a Label to the right side of the Slider in the design window:

Right Slider Label

Tweak size and position as follows:

Right Slider Label Property Inspector

The text property for this Label is 12,000 ft. You need to tweak the font size to make the text fit.

The properties as set:

Right Slider Label Size Inspector

Now try it out in the Simulator.

<== Lesson 5 || Overview || Lesson 7 ==>

Categories
Articles

XCode 4 IPhone Mountains of the USA Tutorial: Lesson 5 – Table Touch Interaction


<== Lesson 4 || Overview || Lesson 6 ==>
In the last lesson we added the TableView. In this lesson you handle the event when the user selects an item in the table and popup an UIAlert view. Also in this lesson you add a custom method that comma separates numbers.

Table Touch Alert

You need a UITableViewDelegate class to handle user interaction with the table. You can use the MainViewController class as a UITableViewDelegate by adding the protocol to the MainViewController.h header.

MainViewController will receive messages when the user interacts with the TableView. The particular method you will implement is didSelectRowAtIndexPath. It will receive messages when a user selects a row, called a cell, in the TableView.

In this app you have the mountain elevations that go into the thousands of feet. In the data source the elevation might be 20320 feet for Mount McKinley for example. To display the number it is easier to read with a comma separation as 20,320.

There are a number of steps needed to accomplish this with the data source in this app. To avoid having the steps in the code whereever you need to format a number with comma separators, you can write a method to handle the work. The method will use NSNumber, NSNumberFormatter and NSNumberFormatterDecimalStyle to complete the work.

There are a number of approaches to where to deploy this new method. For example you could use it just before anytime an elevation is displayed. To simplify the code, you are going to create the comma separated elevation one time and store it as a separate item in the MountainItem objects in the NSMutableArray used to populate the table view.

Source Download

  1. Starting XCode 4 Project. This is the lesson 4 project completed.
  2. PHP and CSV Files. Script to read data file and selects by elevation and returns XML. See Lesson 2.
  3. Mountain XML Data. Alternative to hosting PHP script – See Lesson 2.
  4. Completed XCode 4 Project

[ad name=”Google Adsense”]
Step 1: MountainItem.h – Add the elevationAsString Property

Download and uncompress the Starting XCode Project file and open in XCode.

Open the MountainItem.h in the project navigator window.

The NSString version of the elevation variable is being changed to NSNumber. Actually it could be eliminated since the tutorial lessons planned at this point will not perform math or sorting on the elevation.

Memory is a premium in an IPhone, so if there is no need for a variable, remove it. Storing for each mountain uses more memory, but not enough to be of concern for this app. More of a concern is the amount of data loaded from the server and using lazy loading is a technique to handle that issue but unfortunately outside the scope of the tutorial.

We are adding a variable to hold the comma separated version of the elevation on line 7. One line 6 you are changing the elevation variable from NSString to NSNumber.

Lines 13 and 14 add the properties for these two class members.

#import &amp;lt;Foundation/Foundation.h&amp;gt;

@interface MountainItem : NSObject
{
    NSString *name;
    NSNumber *elevation;
    NSString *elevationAsString;
    NSNumber *latitude;
    NSNumber *longitude;

}
@property (nonatomic, retain) NSString *name;
@property (nonatomic, retain) NSNumber *elevation;
@property (nonatomic, retain) NSString *elevationAsString;
@property (nonatomic, retain) NSNumber *latitude;
@property (nonatomic, retain) NSNumber *longitude;

@end

Step 2: MountainItem.m – Add the elevationAsString Property

Open the MountainItem.h in the project navigator window and update for the elevation and elevationAsString properties.

#import "MountainItem.h"

@implementation MountainItem
@synthesize name, elevation, elevationAsString, latitude, longitude;

@end

Step 3: MainViewController.h – Add the getCommaSeparatedFromStringContainingNumber Method

Open the MainViewController.h in the project navigator window.

You want to make this class receive messages when the user interacts with the table. Line 8 you need to include the UITableViewDelegate protocol and then you can implement methods and receive messages for that protocol in the MainViewController.m implementation.

Add line 36 highlighted below. The method will expect a NSString containing an unformatted number as input and return a NSString with a comma separated number.

Finally be sure to change line 4 to include your url.

//
//
//
#define kTextURL    @"http://YOUR_DOMAIN/PATH_IF_ANY_TO_SCRIPT/PHP_SCRIPT_OR_XML_FILE"

#import &amp;lt;UIKit/UIKit.h&amp;gt;

@interface MainViewController : UIViewController &amp;lt;NSXMLParserDelegate, UITableViewDelegate, UITableViewDataSource&amp;gt;
{
    UIButton                *searchButton;
    UIActivityIndicatorView *activityIndicator;
    UITableView             *resultsTableView;

    NSURLConnection         *urlConnection;
    NSMutableData           *receivedData;

    NSXMLParser             *xmlParser;

    NSMutableArray          *mountainData;

}
@property (nonatomic, retain) IBOutlet UIButton                 *searchButton;
@property (nonatomic, retain) IBOutlet UIActivityIndicatorView  *activityIndicator;
@property (nonatomic, retain) IBOutlet UITableView              *resultTableView;

@property (nonatomic, retain) NSURLConnection *urlConnection;
@property (nonatomic, retain) NSMutableData *receivedData;

@property (nonatomic, retain) NSXMLParser *xmlParser;

@property (nonatomic, retain) NSMutableArray *mountainData;

-(IBAction) startSearch:(id)sender;
- (void) setUIState:(int)uiState;

-(NSString *) getCommaSeparatedFromStringContainingNumber:(NSString *)stringWithNumber;
@end

[ad name=”Google Adsense”]
Step 4: MainViewController.m – Update Navigation Bar Title

This step sets the title.

Open the MainViewController.m in the project navigator window.

The beginning part of the code is unchanged, and included here for reference.

#import "MainViewController.h"
#import "MountainItem.h"

@implementation MainViewController
@synthesize searchButton;
@synthesize activityIndicator;
@synthesize resultTableView;

@synthesize urlConnection;
@synthesize receivedData;

@synthesize xmlParser;

@synthesize mountainData;

// State is loading data. Used to set view.
static const int LOADING_STATE = 1;
// State is active. Used to set view.
static const int ACTIVE_STATE = 0;

- (id)initWithNibName:(NSString *)nibNameOrNil bundle:(NSBundle *)nibBundleOrNil
{
    self = [super initWithNibName:nibNameOrNil bundle:nibBundleOrNil];
    if (self) {
        // Custom initialization
    }
    return self;
}

- (void)dealloc
{
    [searchButton release];
    [activityIndicator release];
    [resultTableView release];
    [urlConnection release];
    [receivedData release];
    [xmlParser release];
    [mountainData release];
    [super dealloc];
}

- (void)didReceiveMemoryWarning
{
    // Releases the view if it doesn't have a superview.
    [super didReceiveMemoryWarning];

    // Release any cached data, images, etc that aren't in use.
}

Here you can change the navigation bar title shown on line 58.

#pragma mark - View lifecycle

- (void)viewDidLoad
{
    [super viewDidLoad];
    // Do any additional setup after loading the view from its nib.
    mountainData = [[NSMutableArray alloc] init];
    [mountainData retain];

    [self setTitle:@"USA Mountains Lesson 5"];
}

There are no further changes until you parse the data.

Remaining code up to parsing data is unchanged and included here for reference.

- (void)viewDidUnload
{
    [super viewDidUnload];
    // Release any retained subviews of the main view.
    // e.g. self.myOutlet = nil;
    self.searchButton = nil;
    self.activityIndicator = nil;
    self.resultTableView = nil;
}

- (BOOL)shouldAutorotateToInterfaceOrientation:(UIInterfaceOrientation)interfaceOrientation
{
    // Return YES for supported orientations
    return (interfaceOrientation == UIInterfaceOrientationPortrait);
}

#pragma mark - UI Interface
-(IBAction) startSearch:(id)sender
{
    NSLog(@"startSearch");
     // Change UI to loading state
    [self setUIState:LOADING_STATE];
    // Create the URL which would be http://YOUR_DOMAIN_NAME/PATH_IF_ANY_TO/get_usa_mountain_data.php?elevation=12000
    NSString *urlAsString = [NSString stringWithFormat:@"%@", kTextURL ];

    NSLog(@"urlAsString: %@",urlAsString );
    NSURLRequest *req = [[NSURLRequest alloc] initWithURL:[NSURL URLWithString:urlAsString]];
    // Create the NSURLConnection con object with the NSURLRequest req object
    // and make this MountainsEx01ViewController the delegate.
    urlConnection = [[NSURLConnection alloc] initWithRequest:req delegate:self];
    // Connection successful
    if (urlConnection) {
        NSMutableData *data = [[NSMutableData alloc] init];
        self.receivedData=data;
        [data release];
    }
    // Bad news, connection failed.
    else
    {
        UIAlertView *alert = [
                              [UIAlertView alloc]
                              initWithTitle:NSLocalizedString(@"Error", @"Error")
                              message:NSLocalizedString(@"Error connecting to remote server", @"Error connecting to remote server")
                              delegate:self
                              cancelButtonTitle:NSLocalizedString(@"Bummer", @"Bummer")
                              otherButtonTitles:nil
                              ];
        [alert show];
        [alert release];
    }
    [req release];

}
-(void) setUIState:(int)uiState;
{
    // Set view state to animating.
    if (uiState == LOADING_STATE)
    {
        searchButton.enabled = false;
        searchButton.alpha = 0.5f;
        [activityIndicator startAnimating];

    }
    // Set view state to not animating.
    else if (uiState == ACTIVE_STATE)
    {
        searchButton.enabled = true;
        searchButton.alpha = 1.0f;
        [activityIndicator stopAnimating];
    }
}

#pragma mark - NSURLConnection Callbacks
- (void)connection:(NSURLConnection *)connection didReceiveResponse:(NSURLResponse *)response
{
    [receivedData setLength:0];
}
- (void)connection:(NSURLConnection *)connection didReceiveData:(NSData *)data
{
    [receivedData appendData:data];
}
- (void)connection:(NSURLConnection *)connection didFailWithError:(NSError *)error
{
    [connection release];
    self.receivedData = nil; 

    UIAlertView *alert = [[UIAlertView alloc]
                          initWithTitle:@"Error"
                          message:[NSString stringWithFormat:@"Connection failed! Error - %@ (URL: %@)", [error localizedDescription],[[error userInfo] objectForKey:NSURLErrorFailingURLStringErrorKey]]
                          delegate:self
                          cancelButtonTitle:@"Bummer"
                          otherButtonTitles:nil];
    [alert show];
    [alert release];
    // Change UI to active state
    [self setUIState:ACTIVE_STATE];
}
- (void)connectionDidFinishLoading:(NSURLConnection *)connection
{
    [mountainData removeAllObjects];
    // Convert receivedData to NSString.

    xmlParser = [[NSXMLParser alloc] initWithData:receivedData];
    [xmlParser setDelegate:self];
    [xmlParser parse];

    [self.resultTableView reloadData];

    // Connection resources release.
    [connection release];
    self.receivedData = nil;
    // Change UI to active state
    [self setUIState:ACTIVE_STATE];
}

Step 5: MainViewController.m – Create the elevationAsString Value when Parsing XML

The original line 183 remains unchanged.

Add line 184 to create the elevationAsString value. The getCommaSeparatedFromStringContainingNumber method will return the NSString with a comma separated elevation.

#pragma mark - NSXMLParser Callbacks
- (void)parser:(NSXMLParser *)parser didStartElement:(NSString *)elementName namespaceURI:(NSString *)namespaceURI
 qualifiedName:(NSString *)qName attributes:(NSDictionary *)attributeDict
{
    //Is a mountain_item node
    if ([elementName isEqualToString:@"mountain_item"])
    {
        MountainItem *mountainItem = [[MountainItem alloc] init];
        mountainItem.name = [attributeDict objectForKey:@"name"];
        mountainItem.elevation = [attributeDict objectForKey:@"elevation"];
        mountainItem.elevationAsString = [self getCommaSeparatedFromStringContainingNumber:[attributeDict objectForKey:@"elevation"]];
        mountainItem.latitude = [attributeDict objectForKey:@"lat"];
        mountainItem.longitude = [attributeDict objectForKey:@"lon"];

        [mountainData addObject:mountainItem];

        [mountainItem release];
        mountainItem = nil;

    }

}

There are no changes to the remaining code. It is added here for reference.

#pragma mark - Table View Data Source Methods
- (NSInteger)tableView:(UITableView *)tableView numberOfRowsInSection:(NSInteger)section
{
    return [self.mountainData count];
}

- (UITableViewCell *)tableView:(UITableView *)tableView cellForRowAtIndexPath:(NSIndexPath *)indexPath
{
    static NSString *SimpleTableIdentifier = @"SimpleTableIdentifier";
    UITableViewCell *cell = [tableView dequeueReusableCellWithIdentifier:
							 SimpleTableIdentifier];
    // UITableViewCell cell needs creating for this UITableView row.
    if (cell == nil)
    {
        cell = [[[UITableViewCell alloc]
				 initWithStyle:UITableViewCellStyleDefault
				 reuseIdentifier:SimpleTableIdentifier] autorelease];
    }
    NSUInteger row = [indexPath row];
    if ([mountainData count] - 1 &amp;gt;= row)
    {
        // Create a MountainItem object from the NSMutableArray mountainData
        MountainItem *mountainItemData = [mountainData objectAtIndex:row];
        // Compose a NSString to show UITableViewCell cell as Mountain Name - nn,nnnn
        NSString *rowText = [[NSString alloc ] initWithFormat:@"%@ - %@ feet",mountainItemData.name, mountainItemData.elevationAsString];
        // Set UITableViewCell cell
        cell.textLabel.text = rowText;
        cell.textLabel.font = [UIFont boldSystemFontOfSize:14];
        // Release alloc vars
        [rowText release];
    }
    return cell;
}

Step 6: MainViewController.m – Add the didSelectRowAtIndexPath

This method is called when the user selects a row on the table. Remember you have a MountainItem object stored in each item in the MSMutableArray mountainData. The method passes an NSIndexPath indexPath variable that contains the row number in the table the user selected. Line 234 ans 235 extract the MountainItem record.

Lines 237 to 248 create a popup UIAlertView that shows the longitude, latitude and the mountain name. In a future lesson, you will open a new detail view for the mountain selected.

Line 249 is optional. The default behavior when the user selects a row in the table is the row show a selected view. So its really a design choice if you want to remove the highlight once the row is selected. Try with line 249 commented and not commented so you can see both.

#pragma mark - Table Delegate Methods
- (void)tableView:(UITableView *)tableView didSelectRowAtIndexPath:(NSIndexPath *)indexPath
{
    //NSLog(@"%s", __FUNCTION__);

     NSUInteger row = [indexPath row];
     MountainItem *mountainItemData = [mountainData objectAtIndex:row];

     NSString *message = [[NSString alloc] initWithFormat:
                          @"Coordinates\nLatitude: %f\nLongitude: %f", [mountainItemData.latitude floatValue], [mountainItemData.longitude floatValue]];
     UIAlertView *alert = [[UIAlertView alloc]
         initWithTitle:mountainItemData.name
         message:message
         delegate:nil
         cancelButtonTitle:@"Close"
         otherButtonTitles:nil];
     [alert show];

     [message release];
     [alert release];
     [tableView deselectRowAtIndexPath:indexPath animated:YES];

}

Step 7: MainViewController.m – Add the getCommaSeparatedFromStringContainingNumber Method

This is the getCommaSeparatedFromStringContainingNumber method implementation.

The first part of the method, 255 to 260, converts the incoming stringWithNumber to a NSNumber.

Lines 256 and 257 create a NSNumberFormatter elevationToNumber variable and sets the style to NSNumberFormatterDecimalStyle.

[ad name=”Google Adsense”]

Then line 259 makes the conversion from NSString to NSNumber myNumber using the NSNumberFormatter numberFromString message. The NSNumber myNumber is used in the second section of the method.

The second part of the method, lines 263 to 267, convert the NSNumber myNumber variable, created in the first part, to a NSString formatted as shown on line 264. It starts out with a second NSNumberFormatter on line 264 that uses the NSNumberFormatter stringFromNumber message to convert the myNumber variable to the return variable formattedNumberString on line 265.

#pragma mark - Utilities
-(NSString *) getCommaSeparatedFromStringContainingNumber:(NSString *)stringWithNumber
{
    // Convert the MountainItem.elevation as a NSString to a NSNumber
    NSNumberFormatter * elevationToNumber = [[NSNumberFormatter alloc] init];
    [elevationToNumber setNumberStyle:NSNumberFormatterDecimalStyle];
    NSString *elevation = stringWithNumber;
    NSNumber *myNumber = [elevationToNumber numberFromString:elevation];
    [elevationToNumber release];

    // Format elevation as a NSNumber to a comma separated NSString
    NSNumberFormatter *numberFormatter = [[NSNumberFormatter alloc] init];
    [numberFormatter setPositiveFormat:@"###,##0"];
    NSString *formattedNumberString = [numberFormatter stringFromNumber:myNumber];
    [numberFormatter release];
    return formattedNumberString;
}

@end

<== Lesson 4 || Overview || Lesson 6 ==>