Categories
Articles

Creating a Simple PHP Debug Library


By Lon Hosford
I like to have a plan for debugging from the start. That usually means a debugging library. Debugging libraries can be simple and can be complex.

Blog post icon for Creating a Simple Debugging Library
They can be procedural and they can be object oriented. No matter which approach, having something that is generic to your applications you can drop in is the minimum before coding. In particular a debugging library is handy when you inherit another PHP project where there is no breadcrumb on how testing and debugging was handled.

This is an example of a minimalist framework for a debugging library and testing dashboard. It is great for those first learning to program in PHP. I like to use it for teaching PHP.

There is a lot we can add to the library such as routing log messages to the UI or to a log file of your choice. But you can build these features onto this library by adding constants, functions and if needed global space variables.

Source Files: Download

[iframe https://www.youtube.com/embed/rxdI86JakFU 640 360]

The Debug Common Library – debug_common.inc.php

This is the minimal debug library.

<?php
/**
 *	Debugging configuration.
 *	
 *	Search all source files for **PRODUCTION SETTING** for production settings
 *  @author Lon Hosford 
 *  @link www.lonhosford.com 
 *	@copyright 2014 Alonzo Hosford
 *  @license GPL 
*/
/**
 *	Send runtime errors to stdout(1) vs stderr (0)
 *	**PRODUCTION SETTING** = 0
 */
ini_set('display_errors', 1);
/**
 *	Send startup errors to stdout(1) vs stderr (0)
 *	**PRODUCTION SETTING** = 0
 */
ini_set('display_startup_errors', 1);
/**
 *	PHP levels of error reporting
 *   0 = off
 *   E_ERROR | E_WARNING | E_PARSE = simple running errors
 *   E_ERROR | E_WARNING | E_PARSE | E_NOTICE = E_NOTICE adds uninitialized variables or catch variable name misspellings
 *   -1 or E_ALL = all errors
 *	**PRODUCTION SETTING** = 0
 */
error_reporting(E_ALL);
?>

The first important item to notice is the use of the search tag, **PRODUCTION SETTING**. It is important for documenting code changes necessary for moving code to other environments such as staging, pre-production and production.

 *	**PRODUCTION SETTING** = 0

You use a file search for **PRODUCTION SETTING** and examine the documentation for changing code to necessary values. If you have something different from production you can create other ways such as a separate search tag for each environment or a generic search tag that will document each environment.

Line 15 allows the override to the PHP configuration property display_errors for displaying errors with the PHP output.

ini_set('display_errors', 1);

The PHP ini_set function sets PHP runtime configuration values and takes the name of the configuration property as the first parameter and the value as the second parameter.

In this case any error messages from PHP are included in the output from PHP. This is regardless of the output format. So if it is a web page, the errors are mixed into the page. You may or may not see them as they could be stuck in the page header section. And this also means if the output is JSON, XML, NVP or any format, the errors ride along often spoiling the parser receiving the output.

Line 20 includes any errors that are generated from PHP starting. This is less common on a well tested hosting site running PHP. But I included just in case as if the error is not in your code it may show here.

ini_set('display_startup_errors', 1);

The final item is to filter the category levels of PHP errors. The usual choices are 0 for off and the constant E_ALL for all levels.

error_reporting(E_ALL);

You can include bitwise operations to combine the other constants listed in the comments. You may find that helpful when inheriting code with many errors to filter out key errors to flesh out, third party code or you have created an error that cascaded a multitude of errors. Avoid that latter situation with test often and in small code units.

468X60
Application Common Library – lib_common.inc.php
<?php
/**
 *	Library for common database configuration, data and initalizations.
 *
 *	Include before running other scripts.
 *	Search all files for **PRODUCTION SETTING** for production settings
 *	@author Lon Hosford 
 *  @link www.lonhosford.com 
 *	@copyright 2014 Alonzo Hosford
 *  @license GPL 
 */
/**
 *	Include debugging configuration
 *
 *	@see debug_common.inc.php
 */
include_once "debug_common.inc.php";
/**
 *	Initialize use of session tracking and the PHP $_SESSION var.
 */
session_start();
/**
 *	Set the timezone.
 */
date_default_timezone_set('America/New_York');
/**
 *	Required PHP version
 */
const VERSION_PHP = "5.3.1";
?>

Your PHP applications should have a common code block for application level variables, constants and functions. This could be a singleton OOP class or a simple procedural file.

The main point is to have the first loaded coded here and keep it clean of debugging specific code.

Also this is where I document code search tags used to set values when moving code between environments.

 *	Search all files for **PRODUCTION SETTING** for production settings

The debugging library is hooked into this file as early as possible. Generally you can leave this line of code for other environments but if you want to comment it for those environments, add your search tag in the comments with the instructions for doing that.

include_once "debug_common.inc.php";

[/code]
An advantage to a one line addition of a debugging library is you can have multiple versions of the debugging library and swap them here.

The session_start line has no impact on debugging. It shown as a common first line of code in a common library.

session_start();

Same situation with date_default_timezone_set function. This is just making it clear the server running PHP should use that specific time zone for handling date and time computations.

date_default_timezone_set('America/New_York');

I prefer to include all the constants for library versions in the common application library starting with the PHP version. Here I use VERSION_PHP and just prefix all the version constant names with VERSION_PHP.

const VERSION_PHP = "5.3.1";

You may want similar constants for other libraries such as MySQL, PHPMailer or a PayPal library.

At the minimum you can use these constants in a debug test to see if the versions are correct. Also you can use them in application code to take action if they are not correct.

[ad name=”Google Adsense”]

Debugging and Testing Dashboard – debug_dashboard.php
<?php
/**
 *	The debug library demonstration and testing.
 *
 *  @author Lon Hosford 
 *  @link www.lonhosford.com 
 *	@copyright 2014 Alonzo Hosford
 *  @license GPL 
*/
include_once "lib_common.inc.php";
?>
<!doctype html>
<html>
<head>
	<meta charset="UTF-8">
	<title>Testing and Debugging Dashboard | lonhosford.com</title>
	<style>
	body{ font-family:"Gill Sans", "Gill Sans MT", "Myriad Pro", "DejaVu Sans Condensed", Helvetica, Arial, sans-serif}
	pre {
	 white-space: pre-wrap;       /* css-3 */
	 white-space: -moz-pre-wrap;  /* Mozilla, since 1999 */
	 white-space: -pre-wrap;      /* Opera 4-6 */
	 white-space: -o-pre-wrap;    /* Opera 7 */
	 word-wrap: break-word;       /* Internet Explorer 5.5+ */
	}
	.mono-space{font-family:monospace;}
	table,td {border:solid 1px #000;}
	</style>
</head>
<body>
<h2>Testing and Debugging Dashboard </h2>
<h4><a href="<?php echo $_SERVER['PHP_SELF'];?>"><?php echo basename(__FILE__);?></a></h4>
<hr>
<pre>
<?php 
echo "PHP Version Required: " . VERSION_PHP . "\n";
echo "PHP Version Detected: " . phpversion() . "\n";
echo "PHP Version is <strong>" . (version_compare(phpversion(), VERSION_PHP, '>=') ? "": "IN") . "VALID</strong>." . "\n";
echo "Display date/time: " .  date('m/d/Y h:i:s a', time()) . "\n";
echo "Display display_errors: " . ini_get("display_errors") . "\n";
echo "Display display_startup_errors: " . ini_get("display_startup_errors") . "\n";
echo "Display error_reporting(): " . error_reporting() . "\n";
?>
</pre>
</body>
</html>

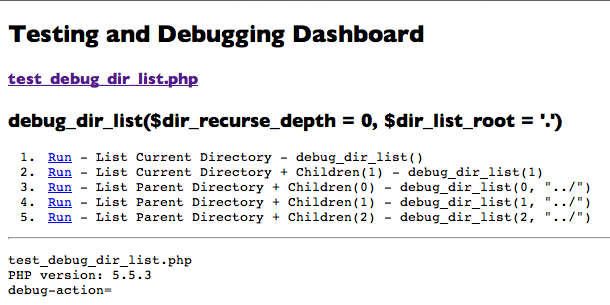
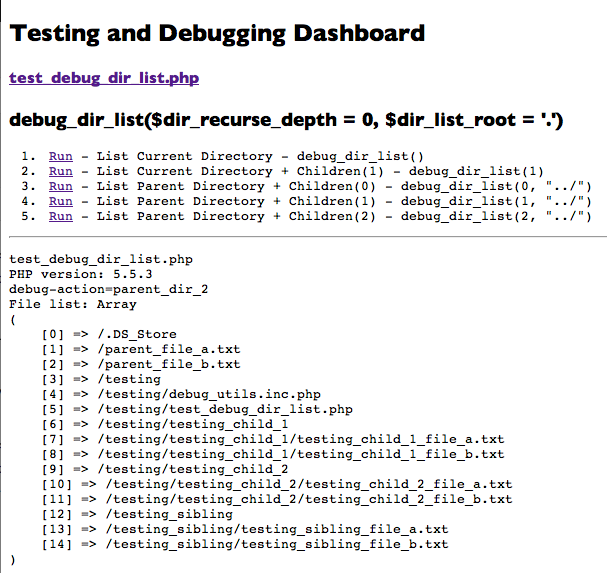
This last file is really a simple testing and debugging script. There are various levels of sophistication for testing in all programming languages.

At the minimum, you should have a script or scripts that can run independently from your application, which means these scripts are loaded separately, and perform tests. If you an automate them, the better. They will include your code of course and by doing so you will start on your way to unit testing or at least testing smaller parts of your code and thus forced to write your code in more modular units.

I did not include any examples of testing application code here, but there is a hint of a permutation in the video. I often have several files all included into this file. The separate files target testing a specific part of the code. All tests lean towards unit testing.

Also this is a great place for general debugging information.

Here I am showing the PHP version,

echo "PHP Version Required: " . VERSION_PHP . "\n";
echo "PHP Version Detected: " . phpversion() . "\n";
echo "PHP Version is <strong>" . (version_compare(phpversion(), VERSION_PHP, '>=') ? "": "IN") . "VALID</strong>." . "\n";

timezone information.

echo "Display date/time: " .  date('m/d/Y h:i:s a', time()) . "\n";

and debugging library settings.

echo "Display display_errors: " . ini_get("display_errors") . "\n";
echo "Display display_startup_errors: " . ini_get("display_startup_errors") . "\n";
echo "Display error_reporting(): " . error_reporting() . "\n";
?>

In the end, the running of this script highlights key settings that everyone scrambles to check before or worse after moving code to another environment. So running this script becomes a check list item before making those moves.

[ad name=”Google Adsense”]


Categories
Articles

How to Recursively Traverse File Directories with PHP RecursiveDirectoryIterator


By Lon Hosford
You can avoid writing recursive function to traverse through tree structures like you server file system. PHP has several Iterator classes starting with version 5. PHP Logo with  RecursiveDirectoryIterator

In this article we will look at the RecursiveDirectoryIterator class. We will build a utility function to use the RecursiveDirectoryIterator class to provide a text listing of the path and file names in one or more directories.

Although we are just displaying paths to the files, you can also access the file information such as modification date, creation date, size, permissions and a variety of properties through the parent classes of RecursiveDirectoryIterator. Those classes include in order of inheritance: FilesystemIterator, DirectoryIterator and SplFileInfo. SplFileInfo provides many of the global file functions in PHP such as isDir, is_readable is_writeable and is_real for example.

Source Files: Download

Video Tutorial:

[iframe https://www.youtube.com/embed/jtqVJ3-95m4 640 360]

The User Interface – test_debug_dir_list.php

There is a simple hybrid HTML PHP script, test_debug_dir_list.php, to demonstrate. It has five tests using a customized function for RecursiveDirectoryIterator.

test_debug_dir_list.php in browser no links chosen
This is the first test showing all the file and directories in the folder that test_debug_dir_list.php is in.

test_debug_current_dir in browser first test link chosen

[ad name=”Google Adsense”]

The second test showing all the file and directories in the folder that test_debug_dir_list.php and of all its child directories.

test_debug_current_dir_1 in browser second test link chosen

The third links shows the files and directories of the parent directory for test_debug_dir_list.php.

test_debug_parent_dir in browser third test link chosen

This fourth test link is like the third but includes the first level of children directories for the parent directory.

test_debug_parent_dir_1 in browser third test link chosen

This fifth link test one more child directory level than the fourth.

test_debug_parent_dir_2 in browser third test link chosen

Custom Function debug_dir_list Using RecursiveDirectoryIterator

The function parameters on line 17 are the depth levels for recursing file system directories and the starting file system directory.

The default file system directory is the running script that might include debug_utils.inc.php contain our function. You can use the standard file system notation to express parent directories and paths.

The depth levels are the exact values for the RecursiveIteratorIterator class instance created on line 23. A negative one recurses to the last lowest level. Be careful with that on a big file system where the second argument is the root or near it. The debug_dir_list default value is zero which confines the RecursiveIteratorIterator instance to the starting files system directory.

debug_utils.inc.php – parameters

function debug_dir_list($dir_recurse_depth = 0, $dir_list_root = '.'){

Lines 19 to 21 creates the RecursiveDirectoryIterator instance. It has to arguments. The first, on line 20, is the starting directory and we use the debug_dir_list function’s second parameter without change. The second RecursiveDirectoryIterator instance parameter is a set of flags. We are using the flag to suppress showing the single and double dot files.

debug_utils.inc.php – The RecursiveDirectoryIterator Instance

	// Create a recursive file system directory iterator.
	$dir_iter = new RecursiveDirectoryIterator(
		$dir_list_root,
		RecursiveDirectoryIterator::SKIP_DOTS) ;// Skips dot files (. and ..)

Lines 23 to 27 create the RecursiveIteratorIterator class instance. Its first parameter on line 24 requires a class with a traversal iterator class and RecursiveDirectoryIterator implements the RecursiveIterator interface to meet that requirement.

The second argument on line 25 for the RecursiveIteratorIterator constructor is called mode. There are three modes that are constants to the class.

  • RecursiveIteratorIterator::LEAVES_ONLY – The default. Lists only leaves in iteration.
  • RecursiveIteratorIterator::SELF_FIRST – Lists leaves and parents in iteration with parents coming first.
  • RecursiveIteratorIterator::CHILD_FIRST – Lists leaves and parents in iteration with leaves coming first.

The RecursiveIteratorIterator constructor’s third argument on line 26 is called modes. It is optional and currently only has its own RecursiveIteratorIterator::CATCH_GET_CHILD as a possible value which will then ignore exceptions thrown such as denied file permissions.

Line 29 passed the recursion depth through the RecursiveIteratorIterator class setMaxDepth method. Here to the debug_dir_list function’s parameter is passed unchanged.

debug_utils.inc.php – The RecursiveIteratorIterator Instance

	// Create a recursive iterator.
	$iter = new RecursiveIteratorIterator(
		$dir_iter,
		RecursiveIteratorIterator::SELF_FIRST, // Lists leaves and parents in iteration with parents coming first.
		RecursiveIteratorIterator::CATCH_GET_CHILD // Ignore exceptions such as "Permission denied"
		);
	// The maximum recursive path.
	$iter-&amp;gt;setMaxDepth($dir_recurse_depth);

The rest of the function uses the RecursiveIteratorIterator to iterate its objects which have a base class of SplFileInfo. These objects resolve as the path string. But also you can see on line 33, they have the method isDir which is like the standalone is_file function. If you explore the SplFileInfo class you can see all the other methods for file system objects. Line 31 is really just adding for visual purposes a trailing slash to objects that are a directory and not the starting directory.

Line 34 pushes that $path string onto the $paths array which is returned from the debug_dir_list function.

debug_utils.inc.php

	// List of paths Include current paths
	$path = array($dir_list_root);
	foreach ($iter as $path =&amp;gt; $dir) {
		if ($dir_recurse_depth == 0 &amp;amp;&amp;amp; $dir-&amp;gt;isDir()) $path .= "/";
		$paths[] = substr($path,2);
	}
	return $paths;

debug_utils.inc.php – full listing

&amp;lt;?php
/**
 *	Utilitites to help in debugging.
 *
 *	@author Lon Hosford
 *	@link www.lonhosford.com
*/
/**
 *	Create an array of files and directory names, Requires PHP 5 &amp;gt;= 5.3.1.
 *
 *	Directories without contents have a slash appended or at the $dir_recurse_depth regardless if they have contents. Hidden files and folders are included.
 *	@link http://stackoverflow.com/questions/14304935/php-listing-all-directories-and-sub-directories-recursively-in-drop-down-menu This code is based on this Stackoverflow post.
 *	@param int $dir_recurse_depth recurse depth. 0 for $dir_list_root. Add 1 for each child level.  -1 is used for any depth.
 *	@param string $dir_list_root recurse depth. Starting folder path. Files in this directory are included. Default is current directory.
 *	@return string[] List of folders and files found.
 */
function debug_dir_list($dir_recurse_depth = 0, $dir_list_root = '.'){
	// Create a recursive file system directory iterator.
	$dir_iter = new RecursiveDirectoryIterator(
		$dir_list_root,
		RecursiveDirectoryIterator::SKIP_DOTS) ;// Skips dot files (. and ..)
	// Create a recursive iterator.
	$iter = new RecursiveIteratorIterator(
		$dir_iter,
		RecursiveIteratorIterator::SELF_FIRST, // Lists leaves and parents in iteration with parents coming first.
		RecursiveIteratorIterator::CATCH_GET_CHILD // Ignore exceptions such as "Permission denied"
		);
	// The maximum recursive path.
	$iter-&amp;gt;setMaxDepth($dir_recurse_depth);
	// List of paths Include current paths
	$path = array($dir_list_root);
	foreach ($iter as $path =&amp;gt; $dir) {
		if ($dir_recurse_depth == 0 &amp;amp;&amp;amp; $dir-&amp;gt;isDir()) $path .= "/";
		$paths[] = substr($path,2);
	}
	return $paths;
}
?&amp;gt;
The User Interface – Exploring the source of test_debug_dir_list.php

For the UI script line 10 imports our debug_dir_list function.

test_debug_dir_list.php

include_once "debug_utils.inc.php";

Line 32 and lines 35 to 40 provide a url link back to test_debug_dir_list.php. Lines 35 to 40 provide a NVP (Name Value Pair) for the URL query and line 32 omits that. The NVP name is debug-action and the values current_dir, current_dir_1, parent_dir, parent_dir_1 and parent_dir_2.

test_debug_dir_list.php

&amp;lt;h3&amp;gt;debug_dir_list($dir_recurse_depth = 0, $dir_list_root = '.')&amp;lt;/h3&amp;gt;
&amp;lt;ol class = 'mono-space'&amp;gt;
	&amp;lt;li&amp;gt;&amp;lt;a href="&amp;lt;?php echo $_SERVER['PHP_SELF'] . '?debug-action=current_dir';?&amp;gt;"&amp;gt;Run&amp;lt;/a&amp;gt; - List Current Directory - debug_dir_list()&amp;lt;/li&amp;gt;
	&amp;lt;li&amp;gt;&amp;lt;a href="&amp;lt;?php echo $_SERVER['PHP_SELF'] . '?debug-action=current_dir_1';?&amp;gt;"&amp;gt;Run&amp;lt;/a&amp;gt; - List Current Directory + Children(1) - debug_dir_list(1)&amp;lt;/li&amp;gt;
	&amp;lt;li&amp;gt;&amp;lt;a href="&amp;lt;?php echo $_SERVER['PHP_SELF'] . '?debug-action=parent_dir';?&amp;gt;"&amp;gt;Run&amp;lt;/a&amp;gt; - List Parent Directory  + Children(0) - debug_dir_list(0, "../")&amp;lt;/li&amp;gt;
	&amp;lt;li&amp;gt;&amp;lt;a href="&amp;lt;?php echo $_SERVER['PHP_SELF'] . '?debug-action=parent_dir_1';?&amp;gt;"&amp;gt;Run&amp;lt;/a&amp;gt; - List Parent Directory + Children(1) - debug_dir_list(1, "../")&amp;lt;/li&amp;gt;
	&amp;lt;li&amp;gt;&amp;lt;a href="&amp;lt;?php echo $_SERVER['PHP_SELF'] . '?debug-action=parent_dir_2';?&amp;gt;"&amp;gt;Run&amp;lt;/a&amp;gt; - List Parent Directory + Children(2) - debug_dir_list(2, "../")&amp;lt;/li&amp;gt;
&amp;lt;/ol&amp;gt;

Lines 44 to 48 interrogate the super global $_GET variable for the debug-action key and sets the $get_action variable either as an empty string or the value in the $_GET['debug-action'] variable. There is no need to sanitize here as this is for internal development and testing and not a production script.

test_debug_dir_list.php

&amp;lt;?php
if ( !isset($_GET["debug-action"]) ){
	$get_action = "";
}else{
	$get_action = $_GET["debug-action"];
}

Lines 52 to 68 a switch block sets out each of the debug-action values and echoes the results of the debug_dir_list function with parameters to meet the desired results.

test_debug_dir_list.php

switch($get_action){
	case 'current_dir':
		echo "File list: " . print_r(debug_dir_list(), true);
	break;
	case 'current_dir_1':
		echo "File list: " . print_r(debug_dir_list(1), true);
	break;
	case 'parent_dir':
		echo "File list : " . print_r(debug_dir_list(0, "../"), true);
	break;
	case 'parent_dir_1':
		echo "File list: " . print_r(debug_dir_list(1, "../"), true);
	break;
	case 'parent_dir_2':
		echo "File list: " . print_r(debug_dir_list(2, "../"), true);
	break;
}

Worth a mention are lines 49 to 51. They help debug the debugging. The file name is helpful on line 49 when you are bleary eyed and not sure which testing script you are running. The basename function passed the magic constant __FILE__ provides the file name of this script. In face you might want to add a line use display the magic constant __FILE__. Testing scripts can get spread around and copied when the coding battle to finish gets wild.

Along with that heat of the battle information is the PHP version in front of your eyes. Line 50 does that. There is always the situation that a “temporary” server is needed to run some tests and no one bothers to check the PHP version installed. The phpversion function is just the ticket.

Then to check this debugging program is passing the expected debug-action value, we throw that out on line 51.

test_debug_dir_list.php

echo basename(__FILE__) . "\n";
echo "PHP version: " . phpversion() . "\n";
echo "debug-action=" . $get_action . "\n";

test_debug_dir_list.php – full listing

&amp;lt;?php
/**
 *	The debugging dashboard for testing and development.
 *
 *  @author Lon Hosford
 *  @link www.lonhosford.com
 *	@copyright 2014 Alonzo Hosford
 *  @license GPL
*/
include_once "debug_utils.inc.php";
?&amp;gt;
&amp;lt;!doctype html&amp;gt;
&amp;lt;html&amp;gt;
&amp;lt;head&amp;gt;
	&amp;lt;meta charset="UTF-8"&amp;gt;
	&amp;lt;title&amp;gt;Testing and Debugging Dashboard | lonhosford.com&amp;lt;/title&amp;gt;
	&amp;lt;style&amp;gt;
	body{ font-family:"Gill Sans", "Gill Sans MT", "Myriad Pro", "DejaVu Sans Condensed", Helvetica, Arial, sans-serif}
	pre {
	 white-space: pre-wrap;       /* css-3 */
	 white-space: -moz-pre-wrap;  /* Mozilla, since 1999 */
	 white-space: -pre-wrap;      /* Opera 4-6 */
	 white-space: -o-pre-wrap;    /* Opera 7 */
	 word-wrap: break-word;       /* Internet Explorer 5.5+ */
	}
	.mono-space{font-family:monospace;}
	table,td {border:solid 1px #000;}
	&amp;lt;/style&amp;gt;
&amp;lt;/head&amp;gt;
&amp;lt;body&amp;gt;
&amp;lt;h2&amp;gt;Testing and Debugging Dashboard&amp;lt;/h2&amp;gt;
&amp;lt;h4&amp;gt;&amp;lt;a href="&amp;lt;?php echo $_SERVER['PHP_SELF'];?&amp;gt;"&amp;gt;&amp;lt;?php echo basename(__FILE__);?&amp;gt;&amp;lt;/a&amp;gt;&amp;lt;/h4&amp;gt;
&amp;lt;h3&amp;gt;debug_dir_list($dir_recurse_depth = 0, $dir_list_root = '.')&amp;lt;/h3&amp;gt;
&amp;lt;ol class = 'mono-space'&amp;gt;
	&amp;lt;li&amp;gt;&amp;lt;a href="&amp;lt;?php echo $_SERVER['PHP_SELF'] . '?debug-action=current_dir';?&amp;gt;"&amp;gt;Run&amp;lt;/a&amp;gt; - List Current Directory - debug_dir_list()&amp;lt;/li&amp;gt;
	&amp;lt;li&amp;gt;&amp;lt;a href="&amp;lt;?php echo $_SERVER['PHP_SELF'] . '?debug-action=current_dir_1';?&amp;gt;"&amp;gt;Run&amp;lt;/a&amp;gt; - List Current Directory + Children(1) - debug_dir_list(1)&amp;lt;/li&amp;gt;
	&amp;lt;li&amp;gt;&amp;lt;a href="&amp;lt;?php echo $_SERVER['PHP_SELF'] . '?debug-action=parent_dir';?&amp;gt;"&amp;gt;Run&amp;lt;/a&amp;gt; - List Parent Directory  + Children(0) - debug_dir_list(0, "../")&amp;lt;/li&amp;gt;
	&amp;lt;li&amp;gt;&amp;lt;a href="&amp;lt;?php echo $_SERVER['PHP_SELF'] . '?debug-action=parent_dir_1';?&amp;gt;"&amp;gt;Run&amp;lt;/a&amp;gt; - List Parent Directory + Children(1) - debug_dir_list(1, "../")&amp;lt;/li&amp;gt;
	&amp;lt;li&amp;gt;&amp;lt;a href="&amp;lt;?php echo $_SERVER['PHP_SELF'] . '?debug-action=parent_dir_2';?&amp;gt;"&amp;gt;Run&amp;lt;/a&amp;gt; - List Parent Directory + Children(2) - debug_dir_list(2, "../")&amp;lt;/li&amp;gt;
&amp;lt;/ol&amp;gt;
&amp;lt;hr&amp;gt;
&amp;lt;pre&amp;gt;
&amp;lt;?php
if ( !isset($_GET["debug-action"]) ){
	$get_action = "";
}else{
	$get_action = $_GET["debug-action"];
}
echo basename(__FILE__) . "\n";
echo "PHP version: " . phpversion() . "\n";
echo "debug-action=" . $get_action . "\n";
switch($get_action){
	case 'current_dir':
		echo "File list: " . print_r(debug_dir_list(), true);
	break;
	case 'current_dir_1':
		echo "File list: " . print_r(debug_dir_list(1), true);
	break;
	case 'parent_dir':
		echo "File list : " . print_r(debug_dir_list(0, "../"), true);
	break;
	case 'parent_dir_1':
		echo "File list: " . print_r(debug_dir_list(1, "../"), true);
	break;
	case 'parent_dir_2':
		echo "File list: " . print_r(debug_dir_list(2, "../"), true);
	break;
}
?&amp;gt;
&amp;lt;/pre&amp;gt;
&amp;lt;/body&amp;gt;
&amp;lt;/html&amp;gt;

[ad name=”Google Adsense”]


Categories
Articles

JQuery Ajax PHP Dynamic Content Loading


By Lon Hosford
This example shows how to dynamically load HTML content from PHP into an HTML element using JQuery and AJAX.jq_php_logos_900_544

You might want to do this when the main page content has all the needed SEO material but there is a lot of additional content such as course or code files that can be loaded on visitor demand. For example a course page or tutorial page where you have all the summary and details about the course or tutorial that would satisfy SEO. Then you can have the user load the particular items they want.

This example provides the basic elements in JQuery, HTML, AJAX and PHP for a potential architecture to do that and then build upon further.

[ad name=”Google Adsense”]

Source Files: Download

[iframe https://www.youtube.com/embed/GhDZpphiDII 640 360]

The User Interface

This example has three buttons.

UI Before Buttons Are Clicked

Two are for loading content and one for clearing so we can play a bit while testing. Do not expect the user will need to clear the data.

UI After  Buttons Are Clicked

The User Interface Code

The first file to look at is the HTML document.

Full listing of ui_view_content.php

<!doctype html>
<html>
<head>
<meta charset="UTF-8">
<script src="http://code.jquery.com/jquery-1.10.1.min.js"></script>
<script src="ajax.js">
</script><link rel="stylesheet" type="text/css" href="site.css">
<title>JQ Dynamic Load Content | lonhosford.com</title>
<script>
	$(document).ready(function(e) {
        // Click handler for content_button class
		$(".content-button").click(function(e) {
            //console.log(".content-button.click");
            //console.log($(this).attr("data-content-id"));
			contentId = $(this).attr("data-content-id");
			sendServiceRequest(
				"content-id=" + contentId,
				function(data, status){
					//console.log("SUCCESS!");
					//console.log(contentId);
					//console.log(data);
					ele = "#" + contentId;
					$(ele).html(data);
				},
				function(data, status, error){
					//console.log("FAIL!");				
				});			
        });
		 // Click handler clear button
		$("#clear-content-button").click(function(e) {
			//console.log("#clear-content_button.click");
			$(".content").html("");
		});
   });
</script>
</head>
<body>
<div id ="wrapper">
    <header>
		<h2>JQ Dynamic Load Content</h2>
    </header>
    <div>
        <p><input id="clear-content-button" type="button" value="Clear All"></p>
        <div>
            <p><input class="content-button" type="button" data-content-id="content01" value="Load 1"></p>
			<p id="content01" class="content"></p>
		</div>
        <div>
            <p><input class="content-button" type="button" data-content-id="content02" value="Load 2"></p>
     		<p id="content02" class="content"></p>
		</div>
    </div>
</div>
</body>
</html>

Examine lines 45 and 49. You see they share the class attribute content-button.

            <p><input class="content-button" type="button" data-content-id="content01" value="Load 1"></p>
			<p id="content01" class="content"></p>
		</div>
        <div>
            <p><input class="content-button" type="button" data-content-id="content02" value="Load2"></p> 

We have on line 12 the JQuery click method calling a function for the content-button class. So both buttons call this same function when clicked.

	$(document).ready(function(e) {
        // Click handler for content_button class
		$(".content-button").click(function(e) {

Lines 45 and 49 are using the element attribute data-content-id. The values of the data-content-id are content01 and content02 respectively.

            <p><input class="content-button" type="button" data-content-id="content01" value="Load 1"></p>
			<p id="content01" class="content"></p>
		</div>
        <div>
            <p><input class="content-button" type="button" data-content-id="content02" value="Load2"></p> 

On line 15 we extract the data-content-id values and they are then sent on to PHP to return the needed content. All that is handled in the external ajax.js file we will look at when we get to the ajax.js code listing.

	$(document).ready(function(e) {
        // Click handler for content_button class
		$(".content-button").click(function(e) {
            //console.log(".content-button.click");
            //console.log($(this).attr("data-content-id"));
			contentId = $(this).attr("data-content-id");
			sendServiceRequest(
				"content-id=" + contentId,
				function(data, status){
					//console.log("SUCCESS!");
					//console.log(contentId);
					//console.log(data);
					ele = "#" + contentId;
					$(ele).html(data);
				},
				function(data, status, error){
					//console.log("FAIL!");				
				});			
        });

The ajax.js has a sendServiceRequest function which accepts a NVP (Name Value Pair). The server is expecting the name to be content-id.

Its second argument is the call back function for successful network send and receive. The third argument is if something horribly goes wrong on the network or the server and it is either not reached, never responds or it returns unexpected data formats. The data format returned is simple text containing HTML markup.

In the success function starting on line 18 we take the contentId variable that is available via closure and prepend the hash character on line 22 to create an id for JQuery to find. We thus get the same values for the two button data-content-id attributes which will be content01 and content02. On line 23 we call the JQuery html function to replace the content of the element having that id.

Lines 46 and 50 have the two possible elements with the ids of content01 and content02.

            <p><input class="content-button" type="button" data-content-id="content01" value="Load 1"></p>
			<p id="content01" class="content"></p>
		</div>
        <div>
            <p><input class="content-button" type="button" data-content-id="content02" value="Load 2"></p>
     		<p id="content02" class="content"></p>

So they are updated in line the Javascript on line 18.

Then so we can play a bit a clear button was added on line 43.

        <p><input id="clear-content-button" type="button" value="Clear All"></p>

And the click handler is on line 30. On line 32 all elements with the class attribute value of content have their HTML removed.

		 // Click handler clear button
		$("#clear-content-button").click(function(e) {
			console.log("#clear-content_button.click");
			$(".content").html("");
		});

And the two elements are the same we are loading from the server seen here on lines 46 and 50.

        <div>
            <p><input class="content-button" type="button" data-content-id="content01" value="Load 1"></p>
			<p id="content01" class="content"></p>
		</div>
        <div>
            <p><input class="content-button" type="button" data-content-id="content02" value="Load 2"></p>
     		<p id="content02" class="content"></p>
		</div>

The article is not about styling so you see it is simple and designed to fit this blog width.

These are the CSS files if you need to explore. The site.css file has the style selectors particular to the web page. We first import the Meyer reset.css to create the basic uniform styling to build up.

You could get more elegant with JQuery how the content opens with saw a collapsible approach making the buttons full width and having them slide the content down once it is loaded.

site.css

/* Meyer CSS Reset */
@import 'reset.css';
body{
	font-family:"Lucida Grande", "Lucida Sans Unicode", "Lucida Sans", "DejaVu Sans", Verdana, sans-serif
	}
div{
	padding: 5px;	
}
header > h2 {
	font-size:2em;
	text-align:center;}
/* Content container */
#wrapper{
	margin:0 auto;
	width:590px;
}
/* Content containers */
.content{
	border:solid 1px; #000000;
	height:70px;
	margin-bottom:5px;
	min-height:25px;
	overflow:auto;
	padding:7px;
}

reset.css

/* http://meyerweb.com/eric/tools/css/reset/ 
   v2.0 | 20110126
   License: none (public domain)
*/

html, body, div, span, applet, object, iframe,
h1, h2, h3, h4, h5, h6, p, blockquote, pre,
a, abbr, acronym, address, big, cite, code,
del, dfn, em, img, ins, kbd, q, s, samp,
small, strike, strong, sub, sup, tt, var,
b, u, i, center,
dl, dt, dd, ol, ul, li,
fieldset, form, label, legend,
table, caption, tbody, tfoot, thead, tr, th, td,
article, aside, canvas, details, embed, 
figure, figcaption, footer, header, hgroup, 
menu, nav, output, ruby, section, summary,
time, mark, audio, video {
	margin: 0;
	padding: 0;
	border: 0;
	font-size: 100%;
	font: inherit;
	vertical-align: baseline;
}
/* HTML5 display-role reset for older browsers */
article, aside, details, figcaption, figure, 
footer, header, hgroup, menu, nav, section {
	display: block;
}
body {
	line-height: 1;
}
ol, ul {
	list-style: none;
}
blockquote, q {
	quotes: none;
}
blockquote:before, blockquote:after,
q:before, q:after {
	content: '';
	content: none;
}
table {
	border-collapse: collapse;
	border-spacing: 0;
}

[ad name=”Google Adsense”]

Client Side Network Handling

Nothing particularly special about using the JQuery ajax method. It is just modified to sent a NVP, receive HTML and call a success or fail function.

The ajax.js file has the sendServiceRequest generic function makes on lines 5 to 10 an ajax call to the get_content.php script. It passes in its nvpSendData parameter to the get_content.php script using POST and expects and HTML return.

Lines 11 to 16 have the successful network handler which simply called the passed in function reference.

Same for the network failure on lines 17 to 22.

ajax.js

// Generic AJAX call to POST NVP formatted data to server PHP and receive HTML
function sendServiceRequest(nvpSendData, successCallback, failCallBack){
	//console.log("sendServiceRequest");
	//console.log(JSON.stringify(nvpSendData));
	$.ajax({
		type: "POST",
		url: "get_content.php",
		data : nvpSendData,
		dataType : 'html'
	})
	.success(function(data, status){
		//console.log(".done");
		//console.log("success data: " + JSON.stringify(data));
		//console.log("Return AJAX status: " + status);
		successCallback(data, status);
	})
	.fail(function(data, status, error) {
		//console.log(".fail");
		//console.log("Return data: " + JSON.stringify(data));
		//console.log("Return AJAX status: " + status);
		failCallBack(data, status, error);	
	}); 
}
Server Side Network Response

The first file is a stripped down controller for PHP that only returns HTML. You see the headers on lines 10 through 13 which are depending on how you want caching handled.

Line 17 sanitizes the POST content-id value we are receiving and places it into the $content_id variable. If the sanitzing fails then $content_id is false and we are returning a paragraph with a hard space on line 23. This is all we need for the demo. We could also return nothing.

If the $content_id variable is a string then we include the content.inc.php file.

get_content.php

<?php
/**
 *  Process network data received and return html content matching content-id.
 *  @author Lon Hosford 
 *  @link www.lonhosford.com 
*/
/**
 *  Standard headers to avoid caching
*/
	header('Cache-Control: no-cache, must-revalidate');
	header('Expires: Mon, 26 Jul 1997 05:00:00 GMT');
	header('Pragma: no-cache'); // HTTP 1.0.
	header('Expires: 0'); // Proxies.	
/**
 *  Validate and capture content-id 
*/
$content_id = filter_var($_POST['content-id'], FILTER_SANITIZE_STRING);
/**
 *  Return content based on content-id
*/
// Invalid content-id format received
if ($content_id == false){
	echo '<p>&nbsp;</p>';
// Valid content-id format received
}else{
	include_once "content.inc.php";
}
?>

The content.inc.php file is designed to return to standard out. It uses a switch statement to choose the $content_id variable on l one 7 which has the value passed in from the client. Lines 8 and and 11 have the corresponding content to return. Line 13 handles an invalid $content_id value.

There are many ways to return HTML from the server with PHP including storing it in a database. So you can do as you wish and even use another data format such as JSON or XML for the standard in and standard out.

content.inc.php

<?php
/**
 *  Std-out html content matching content-id from client.
 *  @author Lon Hosford 
 *  @link www.lonhosford.com 
*/
switch ($content_id){?>
<?php case 'content01':?>
<p>Lorem ipsum dolor sit amet, consectetuer adipiscing elit, sed diam nonummy nibh euismod tincidunt ut <strong>laoreet dolore magna aliquam</strong> erat volutpat. Ut wisi enim ad minim veniam, quis nostrud exerci tation ullamcorper suscipit lobortis nisl ut aliquip ex ea commodo consequat. Duis autem vel eum iriure dolor in hendrerit in vulputate velit esse molestie consequat, vel illum dolore eu feugiat nulla facilisis at vero eros et accumsan et iusto odio dignissim qui blandit praesent luptatum zzril delenit augue duis dolore te feugait nulla facilisi. Nam liber tempor cum soluta nobis eleifend option congue nihil imperdiet doming id quod mazim placerat facer possim assum. </p>
	
<?php break;case 'content02':?>
<p>Claritas est etiam processus dynamicus, qui sequitur mutationem consuetudium lectorum. Mirum est notare quam littera gothica, quam nunc putamus parum claram, anteposuerit litterarum formas humanitatis per seacula quarta decima et quinta decima. Eodem modo typi, qui nunc nobis videntur parum clari, fiant sollemnes in futurum.</p>
<?php break;default:?>
	
<p>&nbsp;</p>
	
<?php break;
}?>

[ad name=”Google Adsense”]


Categories
Articles

Best 3 Personal LAMP Web Servers


By Lon Hosford
Static web pages can be loaded from your local hard drive and viewed in a web browser.

xampp wamp mamp logosHowever to send and receive data from a web server such as in processing a form, you need to place your files on a web server. Actually you might find some plugins that require user authentication may require an http web browser address line. Placing your files on a web server allows you to test exactly using http urls and to use a server database.

However using a public web server like BlueHost is just that public. Generally this is your production version of your web site and you do not want to be experimenting with changes that could render your site unusable. You could create a practice domain and host it but still you have the inconvenience of having to FTP your file changes to the server each change you make. It is more convenient to see the changes as soon as you save them without the step to move them to the web server.

For beginners all you need is a private web server. When you are ready to go live, then you need a public web server such as BlueHost.

Popular web servers are called the LAMP stack or Linux web hosting. LAMP stands for Linux (Operating System), Apache, MySQL and PHP. You can install the AMP part of LAMP on most computers. They are generally intended for local development work and not for public web hosting. But security and performance is constantly improved making them useful for in house web servers. Here are popular free versions.

XAMPP (Windows, Mac, Linux and Solaris)
xampp logo
XAMPP is an easy to install Apache distribution containing MySQL, PHP and Perl. It has versions for Windows, MacOS Solaris and Linux. XAMPP is really very easy to install and to use – just download, extract and start. Free of Charge. It comes with PHPMyAdmin and ProFTPD.

MAMP (Mac OS only)
mamp logo
MAMP installs a local server environment in a matter of seconds on your Mac OS X computer, be it MacBook or iMac. MAMP is free of charge however there is a PRO version that has a fee.

WampServer
wampp logo
WampServer is a Windows web development environment. It allows you to create web applications with Apache2, PHP and a MySQL database. Alongside, PhpMyAdmin allows you to manage easily your databases.

[ad name=”Google Adsense”]


Categories
Articles

How to Send Email From XAMPP using localhost on a Mac and your Gmail Account


By Lon Hosford

This is sample code for using SMTP and your Google GMail account with XAMPP installed on a Mac and PHPMailer.xampp_in_envelope_150x96
Often you want to send mail from your web site to yourself from a user form or even to others. But you may be using XAMPP as a local host and want to test that without having to upload to a public server. This script shows how you can do that with PHPMailer.

Step 1: Install XAMPP MacOS

Step 2: Download PHPMailer [ad name=”Google Adsense”]

Step 3: Create a testing php file shown below. Be sure you have the correct paths to class.phpmailer.php and class.smtp.php on lines 3 and 4 that you downloaded with PHPMailer.

<!--?php 
include("class.phpmailer.php"); 
include("class.smtp.php"); 
function test_gmail_smtp_basic() {
 	// Uncomment as needed for debugging
 	//error_reporting(E_ALL);
  	//error_reporting(E_STRICT);
 	// Set as needed
	date_default_timezone_set('America/New_York');
	$mail = new PHPMailer(); 
	// Optionally get email body from external file
 	$body = file_get_contents('contents.html');
 	$body = eregi_replace("[\]",'',$body);
  	$mail->IsSMTP();                            // telling the class to use SMTP
	$mail->Host       = "smtp.gmail.com";       // SMTP server
	$mail->SMTPDebug  = 2;                      // enables SMTP debug information (for testing)
                                                    // 0 default no debugging messages
                                                    // 1 = errors and messages
                                                    // 2 = messages only
	$mail->SMTPAuth   = true;                   // enable SMTP authentication
	//$mail->SMTPSecure = 'ssl';                // Not supported
	$mail->SMTPSecure = 'tls';                  // Supported
	$mail->Host       = "smtp.gmail.com";       // sets the SMTP server
	$mail->Port       = 587;                    // set the SMTP port for the GMAIL server
	$mail->Username   = "me@gmail.com";         // SMTP account username (how you login at gmail)
	$mail->Password   = "mygmailpassword";      // SMTP account password (how you login at gmail)

	$mail->setFrom('mememe@gmail.com', 'Joe Dirt');

	$mail->addReplyTo('mememe@gmail.com', 'Joe Dirt");

	$mail->Subject    = "PHPMailer Test Subject via smtp, basic with authentication";

	$mail->AltBody    = "To view the message, please use an HTML compatible email viewer!"; // optional, comment out and test

	$mail->msgHTML($body);

	$address = "someone-else@their-email-domain.com";
	$mail->addAddress($address, "Miss Piggy");
	// if you have attachments
	$mail->addAttachment("phpmailer.gif");      // attachment 
	$mail->addAttachment("phpmailer_mini.gif"); // attachment

	if(!$mail->Send()) {
	  echo "Mailer Error: " . $mail->ErrorInfo;
	} else {
	  echo "Message sent!";
	}
}
// Test the connection
test_gmail_smtp_basic();
?>

What you may find is an issue with many examples heretofore is that SMTPSecure shown on line 25 needs to be TLS (Transport Layer Security) instead of SSL (Secure Sockets Layer). The other item is the port number is 587 as you see on line 29. You can disable line 29 once you have this fully debugged. Use with care. 

These images come with PHPMailer and are included here for your convenience.

phpmailer.gif

phpmailer.gif

Optional external html file for the body content. See line 12 in the code above.

<body style="margin: 10px;">
<div style="width: 640px; font-family: Arial, Helvetica, sans-serif; font-size: 11px;">
<div align="center"><img style="height: 90px; width: 340px;" alt="" src="phpmailer.gif" /></div><br>
<br>
&nbsp;This is a test of PHPMailer.<br>
<br>
This particular example uses <strong>HTML</strong>, with a <div> tag and inline<br>
styles.<br>
<br>
Also note the use of the PHPMailer logo above with no specific code to handle
including it.<br />
Included are two attachments:<br />
phpmailer.gif is an attachment and used inline as a graphic (above)<br />
phpmailer_mini.gif is an attachment<br />
<br />
PHPMailer:<br />
Author: Lon Hosford (somebody@no.net)
</div>
</body>

[ad name=”Google Adsense”]


Categories
Articles

XCode 4 IPhone Mountains of the USA Tutorial: Lesson 6 – Add Slider to Search By Elevation


<== Lesson 5 || Overview || Lesson 7 ==>

This lesson takes advantage of the server script to select mountains based on their elevation.
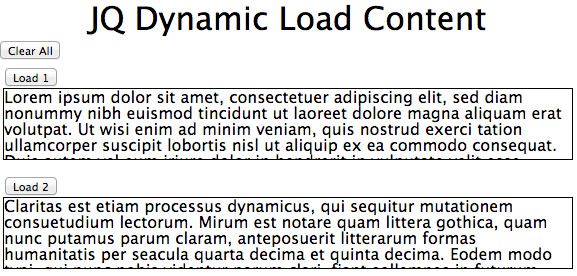
The script returns mountains that exceed an elevation value you provide as part of the URL request made to the web server.

Slider Search By Elevation

This means you cannot use a static XML file for the UI and code that is added in this section. If you cannot provide a server, you could proceed by skipping this lesson and ignoring the code and UI added. But the code and UI will appear in all future lessons and may serve to confuse you. Best approach is to put the provided PHP script and data file in a folder on a web server and continue with these. These files are included as a part of all the lesson downloads since lesson 2.

The tasks in this lesson are more in adding the UI to provide the user with suitable information to understand what to do with very little screen space. This example choose to use a bit more screen space to help make the selection of an elevation more informative.

Source Download

  1. Starting XCode 4 Project. This is the lesson 5 project completed.
  2. PHP and CSV Files. Script to read data file and selects by elevation and returns XML. See Lesson 2.
  3. Completed XCode 4 Project

[ad name=”Google Adsense”]
Step 1: MainViewController.h – Add the Slider and Slider Label

Download and uncompress the Starting XCode Project file and open in XCode.

Open the MainViewController.h in the project navigator window.

Lines 13 and 27 are the UILabel that will appear above the slider. The label shows the value in the slider. You will change the label as the slider is changed.

Lines 14 and 28 are the UISlider.

Line 39 is a IBAction method you link up in the UI to receive messages when the slider is changed.

Remember to change line 4 to include your url.

//
//
//
#define kTextURL    @"http://YOUR_DOMAIN/PATH_IF_ANY_TO_SCRIPT/PHP_SCRIPT_OR_XML_FILE"

#import &amp;lt;UIKit/UIKit.h&amp;gt;

@interface MainViewController : UIViewController &amp;lt;NSXMLParserDelegate, UITableViewDelegate, UITableViewDataSource&amp;gt;
{
    UIButton                *searchButton;
    UIActivityIndicatorView *activityIndicator;
    UITableView             *resultsTableView;
    UILabel                 *elevationLabel;
    UISlider                *elevationSlider;

    NSURLConnection         *urlConnection;
    NSMutableData           *receivedData;

    NSXMLParser             *xmlParser;

    NSMutableArray          *mountainData;

}
@property (nonatomic, retain) IBOutlet UIButton                 *searchButton;
@property (nonatomic, retain) IBOutlet UIActivityIndicatorView  *activityIndicator;
@property (nonatomic, retain) IBOutlet UITableView              *resultTableView;
@property (nonatomic, retain) IBOutlet UILabel                  *elevationLabel;
@property (nonatomic, retain) IBOutlet UISlider                 *elevationSlider;

@property (nonatomic, retain) NSURLConnection *urlConnection;
@property (nonatomic, retain) NSMutableData *receivedData;

@property (nonatomic, retain) NSXMLParser *xmlParser;

@property (nonatomic, retain) NSMutableArray *mountainData;

-(IBAction) startSearch:(id)sender;
- (void) setUIState:(int)uiState;
- (IBAction)sliderChanged:(id)sender;

-(NSString *) getCommaSeparatedFromStringContainingNumber:(NSString *)stringWithNumber;
@end

Step 2: MainViewController.m – Add the Slider, Slider Label and Change Navbar Title
Open the MainViewController.m file in the project explorer.

This step is pretty routine.

You need to add in the new UI variables shown on the highlighted lines 11, 12, 40, 41, 77 and 78. These include them in the class and also take care of memory management.

Line 66 is the NavigationBar title you can change.

//
//
//
#import "MainViewController.h"
#import "MountainItem.h"

@implementation MainViewController
@synthesize searchButton;
@synthesize activityIndicator;
@synthesize resultTableView;
@synthesize elevationLabel;
@synthesize elevationSlider;

@synthesize urlConnection;
@synthesize receivedData;

@synthesize xmlParser;

@synthesize mountainData;

// State is loading data. Used to set view.
static const int LOADING_STATE = 1;
// State is active. Used to set view.
static const int ACTIVE_STATE = 0;

- (id)initWithNibName:(NSString *)nibNameOrNil bundle:(NSBundle *)nibBundleOrNil
{
    self = [super initWithNibName:nibNameOrNil bundle:nibBundleOrNil];
    if (self) {
        // Custom initialization
    }
    return self;
}

- (void)dealloc
{
    [searchButton release];
    [activityIndicator release];
    [resultTableView release];
    [elevationLabel release];
    [elevationSlider release];
    [urlConnection release];
    [receivedData release];
    [xmlParser release];
    [mountainData release];
    [super dealloc];
}

- (void)didReceiveMemoryWarning
{
    // Releases the view if it doesn't have a superview.
    [super didReceiveMemoryWarning];

    // Release any cached data, images, etc that aren't in use.
}

#pragma mark - View lifecycle

- (void)viewDidLoad
{
    [super viewDidLoad];
    // Do any additional setup after loading the view from its nib.
    mountainData = [[NSMutableArray alloc] init];
    [mountainData retain];

    [self setTitle:@"USA Mountains Lesson 6"];
}

- (void)viewDidUnload
{
    [super viewDidUnload];
    // Release any retained subviews of the main view.
    // e.g. self.myOutlet = nil;
    self.searchButton = nil;
    self.activityIndicator = nil;
    self.resultTableView = nil;
    self.elevationLabel = nil;
    self.elevationSlider = nil;
}

- (BOOL)shouldAutorotateToInterfaceOrientation:(UIInterfaceOrientation)interfaceOrientation
{
    // Return YES for supported orientations
    return (interfaceOrientation == UIInterfaceOrientationPortrait);
}

Step 3: MainViewController.m – Add the sliderChanged Method.

Add all the code below in the UI Interface section just before the -(IBAction) startSearch:(id)sender method.

When the user changes the slider, you are updating a label that shows the slider value with a comma separated number. For example Elevation 10,000 feet.

[ad name=”Google Adsense”]

You can see at the end of line 91 the NSNumber value property provided by the UISlider: elevationSlider.value. Lines 89 to 91 converting that to a NSString formatted with commas to create NSString *formattedNumberString.

Line 92 assembles NSString *formattedNumberString with the words Elevation and feet and updates the UILabel elevationLabel text property.

You end with the cleanup of the NSNumberFormatter used in the process.

#pragma mark - UI Interface
- (IBAction)sliderChanged:(id)sender
{
    NSNumberFormatter *numberFormatter = [[NSNumberFormatter alloc] init];
    [numberFormatter setPositiveFormat:@"###,##0"];
    NSString *formattedNumberString = [numberFormatter stringFromNumber:[NSNumber numberWithFloat:elevationSlider.value]];
    elevationLabel.text = [[NSString alloc] initWithFormat:@"Elevation %@ feet",formattedNumberString];
    [numberFormatter release];
}

Step 4: MainViewController.m – Modify the URL to Send the Elevation

You need to add a URL query for example: ?elevation_min=10000. This is needed for the PHP script. You do not need to know how to program PHP but it is included here for reference with a few key lines highlighted to illustrate.

&amp;lt;?php
header("Expires: Mon, 26 Jul 1997 05:00:00 GMT" );
header("Last-Modified: " . gmdate( "D, d M Y H:i:s" ) . "GMT" );
header("Cache-Control: no-cache, must-revalidate" );
header("Pragma: no-cache" );
header("Content-Type: text/xml; charset=utf-8");
// XML to return.
$xml = '';
// Counter for number of mountains returned.
$mountain_count = 0;
// Filter mountains equal to or above this value.
$elevation_min = 12000;
// Check for elevation parameter as a integer.
if ($_REQUEST['elevation_min'] &amp;amp;&amp;amp; intval($_REQUEST['elevation_min']))
{
	$elevation_min = intval( $_REQUEST['elevation_min']);
}
// Each element contains data for one mountain.
$mountains = array();
// Read a CVS file containing mountain data.
$mountain_data_lines = file('mountain_data.csv');
// Each line read .
foreach($mountain_data_lines as $line)
{
	// Strip newline at end of line and break line by comma delimiter and
	// append to $mountains.
	$mountains[] = explode( ',', rtrim($line));
}
// Each mountain.
foreach ($mountains as $value)
{
	// Mountain elevation equals or exceeds the filter value.
	if ( intval($value[1]) &amp;gt;= $elevation_min  )
	{
		$mountain_count++;
		// Create the mountain_item node.
		$xml .= '&amp;lt;mountain_item ';
		$xml .= 'id = "' . $mountain_count . '" ';
		$xml .= 'name = "' . $value[0] . '" ';
		$xml .= 'elevation = "' . $value[1] . '" ';
		$xml .= 'lat = "' . $value[2] . '" ';
		$xml .= 'lon = "' . $value[3] . '" ';
		$xml .= '/&amp;gt;';

	}
}
// Add mountains close node.
$xml .= '&amp;lt;/mountains&amp;gt;';
// Create mountains open node.
$xml_mountains = '&amp;lt;mountains ';
$xml_mountains .= 'source = "http://en.wikipedia.org/wiki/Table_of_the_highest_major_summits_of_the_United_States" ' ;
$xml_mountains .= 'elevation_min = "' . $elevation_min . '" ';
$xml_mountains .= 'count = "' . $mountain_count . '" ';
$xml_mountains .= '&amp;gt;';
// Add mountains open node.
$xml = $xml_mountains . $xml;
// Return xml
echo $xml;
?&amp;gt;

The PHP script provided looks for the elevation_min parameter on lines 14 and 16, absorbs it to the $elevation_min variable and uses $elevation_min on line 33 to filter the returned mountains that have an elevation at or above that value.

A slight modification to the MainViewController.m startSearch method will send the elevation_min parameter to the PHP script.

Line 102 is added to take the slider value and convert to a number.

The single line of code shown on 104 and 105 adds the URL query needed by the PHP script.

-(IBAction) startSearch:(id)sender
{
    //NSLog(@"startSearch");

     // Change UI to loading state
    [self setUIState:LOADING_STATE];
    // Convert the NSSlider elevationValue_ui value to a string
    NSString *elevation = [[NSString alloc ] initWithFormat:@"%.0f", elevationSlider.value];
    // Create the URL which would be http://YOUR_DOMAIN_NAME/PATH_IF_ANY_TO/get_usa_mountain_data.php?elevation=12000
    NSString *urlAsString = [NSString stringWithFormat:
                             @"%@%s%@", kTextURL , "?elevation_min=", elevation];

    //NSLog(@"urlAsString: %@",urlAsString );
    NSURLRequest *req = [[NSURLRequest alloc] initWithURL:[NSURL URLWithString:urlAsString]];
    // Create the NSURLConnection con object with the NSURLRequest req object
    // and make this MountainsEx01ViewController the delegate.
    urlConnection = [[NSURLConnection alloc] initWithRequest:req delegate:self];
    // Connection successful
    if (urlConnection) {
        NSMutableData *data = [[NSMutableData alloc] init];
        self.receivedData=data;
        [data release];
    }
    // Bad news, connection failed.
    else
    {
        UIAlertView *alert = [
                              [UIAlertView alloc]
                              initWithTitle:NSLocalizedString(@"Error", @"Error")
                              message:NSLocalizedString(@"Error connecting to remote server", @"Error connecting to remote server")
                              delegate:self
                              cancelButtonTitle:NSLocalizedString(@"Bummer", @"Bummer")
                              otherButtonTitles:nil
                              ];
        [alert show];
        [alert release];
    }
    [req release];
    [elevation release];
}

The remainder of the code is unchanged and is included here for reference:

-(void) setUIState:(int)uiState;
{
    // Set view state to animating.
    if (uiState == LOADING_STATE)
    {
        searchButton.enabled = false;
        searchButton.alpha = 0.5f;
        [activityIndicator startAnimating];

    }
    // Set view state to not animating.
    else if (uiState == ACTIVE_STATE)
    {
        searchButton.enabled = true;
        searchButton.alpha = 1.0f;
        [activityIndicator stopAnimating];
    }
}

#pragma mark - NSURLConnection Callbacks
- (void)connection:(NSURLConnection *)connection didReceiveResponse:(NSURLResponse *)response
{
    [receivedData setLength:0];
}
- (void)connection:(NSURLConnection *)connection didReceiveData:(NSData *)data
{
    [receivedData appendData:data];
}
- (void)connection:(NSURLConnection *)connection didFailWithError:(NSError *)error
{
    [connection release];
    self.receivedData = nil; 

    UIAlertView *alert = [[UIAlertView alloc]
                          initWithTitle:@"Error"
                          message:[NSString stringWithFormat:@"Connection failed! Error - %@ (URL: %@)", [error localizedDescription],[[error userInfo] objectForKey:NSURLErrorFailingURLStringErrorKey]]
                          delegate:self
                          cancelButtonTitle:@"Bummer"
                          otherButtonTitles:nil];
    [alert show];
    [alert release];
    // Change UI to active state
    [self setUIState:ACTIVE_STATE];
}
- (void)connectionDidFinishLoading:(NSURLConnection *)connection
{
    [mountainData removeAllObjects];
    // Convert receivedData to NSString.

    xmlParser = [[NSXMLParser alloc] initWithData:receivedData];
    [xmlParser setDelegate:self];
    [xmlParser parse];

    [self.resultTableView reloadData];

    // Connection resources release.
    [connection release];
    self.receivedData = nil;
    // Change UI to active state
    [self setUIState:ACTIVE_STATE];
}

#pragma mark - NSXMLParser Callbacks
- (void)parser:(NSXMLParser *)parser didStartElement:(NSString *)elementName namespaceURI:(NSString *)namespaceURI
 qualifiedName:(NSString *)qName attributes:(NSDictionary *)attributeDict
{
    //Is a mountain_item node
    if ([elementName isEqualToString:@"mountain_item"])
    {
        MountainItem *mountainItem = [[MountainItem alloc] init];
        mountainItem.name = [attributeDict objectForKey:@"name"];
        mountainItem.elevation = [attributeDict objectForKey:@"elevation"];
        mountainItem.elevationAsString = [self getCommaSeparatedFromStringContainingNumber:[attributeDict objectForKey:@"elevation"]];
        mountainItem.latitude = [attributeDict objectForKey:@"lat"];
        mountainItem.longitude = [attributeDict objectForKey:@"lon"];

        [mountainData addObject:mountainItem];

        [mountainItem release];
        mountainItem = nil;

    }

}
#pragma mark - Table View Data Source Methods
- (NSInteger)tableView:(UITableView *)tableView numberOfRowsInSection:(NSInteger)section
{
    return [self.mountainData count];
}

- (UITableViewCell *)tableView:(UITableView *)tableView cellForRowAtIndexPath:(NSIndexPath *)indexPath
{
    static NSString *SimpleTableIdentifier = @"SimpleTableIdentifier";
    UITableViewCell *cell = [tableView dequeueReusableCellWithIdentifier:
							 SimpleTableIdentifier];
    // UITableViewCell cell needs creating for this UITableView row.
    if (cell == nil)
    {
        cell = [[[UITableViewCell alloc]
				 initWithStyle:UITableViewCellStyleDefault
				 reuseIdentifier:SimpleTableIdentifier] autorelease];
    }
    NSUInteger row = [indexPath row];
    if ([mountainData count] - 1 &amp;gt;= row)
    {
        // Create a MountainItem object from the NSMutableArray mountainData
        MountainItem *mountainItemData = [mountainData objectAtIndex:row];
        // Compose a NSString to show UITableViewCell cell as Mountain Name - nn,nnnn
        NSString *rowText = [[NSString alloc ] initWithFormat:@"%@ - %@ feet",mountainItemData.name, mountainItemData.elevationAsString];
        // Set UITableViewCell cell
        cell.textLabel.text = rowText;
        cell.textLabel.font = [UIFont boldSystemFontOfSize:14];
        // Release alloc vars
        [rowText release];
    }
    return cell;
}
#pragma mark - Table Delegate Methods
- (void)tableView:(UITableView *)tableView didSelectRowAtIndexPath:(NSIndexPath *)indexPath
{
    //NSLog(@"%s", __FUNCTION__);

     NSUInteger row = [indexPath row];
     MountainItem *mountainItemData = [mountainData objectAtIndex:row];

     NSString *message = [[NSString alloc] initWithFormat:
                          @"Coordinates\nLatitude: %f\nLongitude: %f", [mountainItemData.latitude floatValue], [mountainItemData.longitude floatValue]];
     UIAlertView *alert = [[UIAlertView alloc]
         initWithTitle:mountainItemData.name
         message:message
         delegate:nil
         cancelButtonTitle:@"Close"
         otherButtonTitles:nil];
     [alert show];

     [message release];
     [alert release];
     [tableView deselectRowAtIndexPath:indexPath animated:YES];

}
#pragma mark - Utilities
-(NSString *) getCommaSeparatedFromStringContainingNumber:(NSString *)stringWithNumber
{
    // Convert the MountainItem.elevation as a NSString to a NSNumber
    NSNumberFormatter * elevationToNumber = [[NSNumberFormatter alloc] init];
    [elevationToNumber setNumberStyle:NSNumberFormatterDecimalStyle];
    NSString *elevation = stringWithNumber;
    NSNumber *myNumber = [elevationToNumber numberFromString:elevation];
    [elevationToNumber release];

    // Format elevation as a NSNumber to a comma separated NSString
    NSNumberFormatter *numberFormatter = [[NSNumberFormatter alloc] init];
    [numberFormatter setPositiveFormat:@"###,##0"];
    NSString *formattedNumberString = [numberFormatter stringFromNumber:myNumber];
    [numberFormatter release];
    return formattedNumberString;
}

@end

Step 5: MainViewController.xib – Add in the UISlider

Now you can move on to the UI. Refer to the screen shot at the top of the post to keep you on track with the goal of the changes.

Keep in mind, you can do this generally after you have the header definitions in place. You need those so that the Interface Builder part of XCode can display the names of methods and UI components you choose in code. These lessons choose to complete the implementation in the code before moving to UI just to keep the zig zag back and forth that XCode often creates for tutorials. As you get faster, you might want to do the UI right after you do the header files.

Drag a Slider from the Objects library in the bottom right to place it above the Search button.

Slider

Fine tune the position and size to match the tutorial:

Slider Size Inspector

Then you need to wire the MainViewController to the UISlider elevationSlider property defined in step 1 for the MainViewController header and you need to wire the UISlider valueChanged send event to the sliderChanged method you also defined in step 1.

[ad name=”Google Adsense”]

You can use the Properties Inspector to get this done. With the Slider you placed in the design window selected open the Property Inspector. Drag from the “Value Changed” Send Event to the File’s Owner and when you release you can select the sliderChanged in the popped menu above the File’s Owner.

Repeat for the “New Referencing Outlet” and when you release the mouse over the File’s Owner icon select elevationSlider.

Another process you see is to control drag from the Slider in the design window to the File’s Owner in the Related Files panel on left and release mouse. You should see sliderChanged appear in a small menu popped over the File’s Owner. Click and select. Then you can repeat the process in the opposite direction and when you release over the Slider, you should see elevationSlider as a menu choice in the popped menu above the Slider.

The end result is shown here:

Slider Connections Inspector

There are some tweaks needed to make the slider provide the range of elevations and a starting elevation. The range is to match the data available and a starting value to avoid automatic downloads of all the data every time.

So modify the Slider’s Property Inspector as follows:

Slider Property Inspector

Step 6: MainViewController.xib – Add in the UILabel Displaying the Slider Value

Next is a Label above the Slider to show the value of the Slider when it changes.

Drag a Label from the Objects library in the bottom right to place it above the Slider.

Slider

Fine tune the position and size to match the tutorial:

Slider Size Inspector

Set the properties. Note the hard coded match up to display the starting value in the slider.

Slider Property Inspector

Finally you got to wire this label so you can update it in the code. In code you are using the elevationLabel property defined in step 1. Open the Connections Inspector with this Label selected. Drag the New Referencing Outlet to the File’s Owner and after you release the mouse select elevationLabel in the menu popped over the File’s Owner.

Here is the result:

Slider Connections Inspector

Step 7: MainViewController.xib – Add the Minimum and Maximum Labels

This step you add a Label on the left and a Label on the right of the Slider to give the range of elevation values possible. These Labels are static and do not need to be wired to the code.

Drag a Label to the left side of the Slider in the design window:

Left Slider Label

Tweak size and position as follows:

Left Slider Label Property Inspector

The text property for this Label is 12,000 ft. You need to tweak the font size to make the text fit.

The properties as set:

Left Slider Label Size Inspector

Drag a Label to the right side of the Slider in the design window:

Right Slider Label

Tweak size and position as follows:

Right Slider Label Property Inspector

The text property for this Label is 12,000 ft. You need to tweak the font size to make the text fit.

The properties as set:

Right Slider Label Size Inspector

Now try it out in the Simulator.

<== Lesson 5 || Overview || Lesson 7 ==>

Categories
Articles

XCode 4 IPhone Mountains of the USA Tutorial: Lesson 2 – Load XML Data

<== Lesson 1 || Overview || Lesson 3 ==>

In this lesson you will make a requests for the Mountain data from a web site. The data is returned in an XML format. Then for testing you will display the raw XML on the phone screen and also display the XML data in the XCode console.

Screen With XML Loaded From Web

The main goal is to learn to use the NSURL, NSURLRequest, NSURLConnection and NSMutableData classes.

NSURL defines a URL for XCode. NSURLConnection establishes a connection to a server and manages the data to and from that server. NSURLRequest defines a network request along with data to send. NSMutableData stores any returning data.

When you load data from the web or any indeterminate process, you will want to include an activity indicator. So we will add a UIActivityIndicatorView that is the common activity indicator for Mac applications.

To see the data on the phone screen, we will use the UITextView which is a scrollable text component. In future lessons, we will replace the UITextView with a scrolling list of mountains in the XML data we receive.

You will need a web server to complete this and all future lessons in this tutorial. The tutorials use a web server with PHP that reads a comma delimited file containing the mountain data. The XML that the PHP script returns is included in this post should you not have PHP on your server. I will show you how to use that instead of the provided PHP script. However in future lessons we will want to ask the server for just partial data and we need a program to do that. Keep in mind you can also put the mountain data into a database on the server.

Source Download

  1. Starting XCode Project. This is the lesson 1 project completed.
  2. PHP and CSV Files. Script to read data file and selects by elevation and returns XML.
  3. Mountain XML Data. Alternative to hosting PHP script.
  4. Completed XCode 4 Project

[ad name=”Google Adsense”]

Step 1: MainViewController.h – Define properties and methods.

Download and uncompress the Starting XCode Project file and open in XCode.

Select the MainViewController.h in the project navigation window on the left and add the highlighted lines.

Line 4 is a constant for the URL to the PHP script or the XML file if you choose not to host the PHP script. More on these choices in this post when we get to those files.

The app will enable and disable the UIButton searchButton, so we need to include it for reference in code.

The UIActivityIndicatorView and UITextView are being added and are also referenced from our UI. The UIActivityIndicatorView will need to be hidden and revealed when we are not and are loading data from the server as well starting and ending its animation. So we need to make it an IBOutlet.

The UITextView will be updated with data coming in from the server and so it also needs to be an IBOutlet.

The MSMutableData is needed to capture the data coming in from the server in a raw format.

Your implementation code will call for disabling and enabling the search button and hiding and unhiding the activity indicator in more than one place in the code. Line 26 defines a method you will use so you do not have to repeat this UI state changing code in more than one place. The method receives an int parameter to define the state of the UI components. You will define their values in the implementation code.

//
//
//
#define kTextURL    @"http://YOUR_DOMAIN/PATH_IF_ANY_TO_SCRIPT/PHP_SCRIPT_OR_XML_FILE"

#import &lt;uikit uikit.h=""&gt;&lt;/uikit&gt;

@interface MainViewController : UIViewController
{
    UIButton                *searchButton;
    UIActivityIndicatorView *activityIndicator;
    UITextView              *resultsTextView;

    NSURLConnection         *urlConnection;
    NSMutableData           *receivedData;

}
@property (nonatomic, retain) IBOutlet UIButton                 *searchButton;
@property (nonatomic, retain) IBOutlet UIActivityIndicatorView  *activityIndicator;
@property (nonatomic, retain) IBOutlet UITextView               *resultsTextView;

@property (nonatomic, retain) NSURLConnection *urlConnection;
@property (nonatomic, retain) NSMutableData *receivedData;

-(IBAction) startSearch:(id)sender;
- (void) setUIState:(int)uiState;
@end

Step 2: MainViewController.m – Add Properties and Constants

This step basically is the implementation housekeeping prerequisites.

You add the getter and setters for the properties on lines 4 to 9 using synthesize.

Lines 12 and 14 provide constants for states of the view that are used in the setUIState method we defined in the last step. Those places in the code can make the code more readable when calling the setUIState.

#import "MainViewController.h"

@implementation MainViewController
@synthesize searchButton;
@synthesize activityIndicator;
@synthesize resultsTextView;

@synthesize urlConnection;
@synthesize receivedData;

// State is loading data. Used to set view.
static const int LOADING_STATE = 1;
// State is active. Used to set view.
static const int ACTIVE_STATE = 0;

Step 3: MainViewController.m – Memory Management Housekeeping

Add the memory release for the searchButton, activityIndicator, activityIndicator, resultsTextView, urlConnection and receivedData in the dealloc method.


- (id)initWithNibName:(NSString *)nibNameOrNil bundle:(NSBundle *)nibBundleOrNil
{
    self = [super initWithNibName:nibNameOrNil bundle:nibBundleOrNil];
    if (self) {
        // Custom initialization
    }
    return self;
}

- (void)dealloc
{
    [searchButton release];
    [activityIndicator release];
    [resultsTextView release];
    [urlConnection release];
    [receivedData release];
    [super dealloc];
}

- (void)didReceiveMemoryWarning
{
    // Releases the view if it doesn't have a superview.
    [super didReceiveMemoryWarning];

    // Release any cached data, images, etc that aren't in use.
}

Step 4: MainViewController.m – Navigation Top Bar Title Updated

On line 47 you might want to update the title so you are not confused when viewing the app.

#pragma mark - View lifecycle

- (void)viewDidLoad
{
    [super viewDidLoad];
    // Do any additional setup after loading the view from its nib.
    [self setTitle:@"USA Mountains Lesson 2"];
}

Step 5: MainViewController.m – More Memory Management

In the viewDidUnload method add these lines to release the subviews you are going to link to this view in the UI.

- (void)viewDidUnload
{
    [super viewDidUnload];
    // Release any retained subviews of the main view.
    // e.g. self.myOutlet = nil;
    self.searchButton = nil;
    self.activityIndicator = nil;
    self.resultsTextView = nil;
}

- (BOOL)shouldAutorotateToInterfaceOrientation:(UIInterfaceOrientation)interfaceOrientation
{
    // Return YES for supported orientations
    return (interfaceOrientation == UIInterfaceOrientationPortrait);
}

Step 6: MainViewController.m – Update the startSearch Method to Fetch Server Data

The startSearch method is already linked to our searchButton from the last tutorial. You have the code below to get the UI in the state for loading in progress, to make a request to the data source on the server and take needed steps based on the success or failure of that connection.

Line 69 is calling a method you will add in the next step to set the UI state. Your constant LOADING_STATE was defined in the last step.

Line 71 creates a NSString for the URL. In a future lesson you are going to concatenate a parameter to send along with the URL and now this line is ready for that.

[ad name=”Google Adsense”]

The NSURLRequest object named req is created on line 74.

The instance object named urlConnection on line 77 is your NSURLConnection. It does all the work for communicating with the server.

You see on line 77 it is using our NSURLRequest req object and also sending the delegate message to make this class, self, its delegate. That means urlConnection can call NSURLConnection methods you add to this class to take action needed to handle notifications such as successful completion or failure.

For this lesson you need to add four methods to handle the NSURLConnection messages didReceiveResponse, didReceiveData, didFailWithError and connectionDidFinishLoading. You will do that just after creating our setUIState method.

Lines 79 to 83 handle a successful connection. A NSMutableData object is created and assigned to the class receivedData NSMutableData object that in later code you will convert to readable XML for display.

Should the connection fail, lines 85 to 97 display a UIAlertView with the error information. Generally you will want to change that to something more meaningful to the user.

#pragma mark - UI Interface
-(IBAction) startSearch:(id)sender
{
    NSLog(@"startSearch");
     // Change UI to loading state
    [self setUIState:LOADING_STATE];
    // Create the URL which would be http://YOUR_DOMAIN_NAME/PATH_IF_ANY_TO/get_usa_mountain_data.php?elevation=12000
    NSString *urlAsString = [NSString stringWithFormat:@"%@", kTextURL ];

    NSLog(@"urlAsString: %@",urlAsString );
    NSURLRequest *req = [[NSURLRequest alloc] initWithURL:[NSURL URLWithString:urlAsString]];
    // Create the NSURLConnection con object with the NSURLRequest req object
    // and make this MountainsEx01ViewController the delegate.
    urlConnection = [[NSURLConnection alloc] initWithRequest:req delegate:self];
    // Connection successful
    if (urlConnection) {
        NSMutableData *data = [[NSMutableData alloc] init];
        self.receivedData=data;
        [data release];
    }
    // Bad news, connection failed.
    else
    {
        UIAlertView *alert = [
                              [UIAlertView alloc]
                              initWithTitle:NSLocalizedString(@"Error", @"Error")
                              message:NSLocalizedString(@"Error connecting to remote server", @"Error connecting to remote server")
                              delegate:self
                              cancelButtonTitle:NSLocalizedString(@"Bummer", @"Bummer")
                              otherButtonTitles:nil
                              ];
        [alert show];
        [alert release];
    }
    [req release];

}

Step 7: MainViewController.m – Create the UI State Setting Method setUIState

This is your custom method to set the states of the UI components.

The UIButton has an alpha and enabled property. For your UIButton searchButtonobject, the alpha value is toggled between 50% and 100% and its enabled state is also toggled between true and false.

The UIActivityIndicatorView has methods on lines 108 and 116 for starting and stopping their animation. There is also a property hidesWhenStopped that you will set in the UI design that handles the hiding and showing of our UIActivityIndicator.

-(void) setUIState:(int)uiState;
{
    // Set view state to animating.
    if (uiState == LOADING_STATE)
    {
        searchButton.enabled = false;
        searchButton.alpha = 0.5f;
        [activityIndicator startAnimating];

    }
    // Set view state to not animating.
    else if (uiState == ACTIVE_STATE)
    {
        searchButton.enabled = true;
        searchButton.alpha = 1.0f;
        [activityIndicator stopAnimating];
    }
}

Step 8: MainViewController.m – Clear Received Data When Connection Is Established

You learned about pragma marks in the last lesson. You have 4 NSURLConnection related methods to add and this mark on line 119 is an easy way in XCode to get to where you are placing them in the code.

The connection didReceiveResponse method occurs when a connection is established. When that happens, your data communication starts over. To be on the safe side of it occurring more than once, you clear the NSMutableData object from any previous incomplete attempts. Consider this a boilerplate block you always include in code.

#pragma mark - NSURLConnection Callbacks
- (void)connection:(NSURLConnection *)connection didReceiveResponse:(NSURLResponse *)response
{
    [receivedData setLength:0];
}

Step 9: MainViewController.m – Accumulate Data Being Received

The NSURLConnection calls the connection didReceiveData method as data arrives and is ready for use. This is called as often as needed depending on the amount of data. The code you need here is to append the data received to your NSMutableData object.

- (void)connection:(NSURLConnection *)connection didReceiveData:(NSData *)data
{
    [receivedData appendData:data];
}

Step 10: MainViewController.m – Handle Network Connection Failure

The connection didFailWithError NSURLConnection call back method is where you handled the failure of the data transmission. In your case the code displays a UIAlertView with information from the NSError class error object passed in for learning purposes. A better user error should be considered for a released app.

You can use the NSError class to take different action based on the type of error. This is over the scope of this tutorial.

[ad name=”Google Adsense”]

There is some housekeeping such as calling the connection object release method and terminating the NSMutableData receivedData property.

The last line of code calls the sertUIState method with the ACTIVE_STATE value so the UI again appears available for another search.

- (void)connection:(NSURLConnection *)connection didFailWithError:(NSError *)error
{
    [connection release];
    self.receivedData = nil; 

    UIAlertView *alert = [[UIAlertView alloc]
                          initWithTitle:@"Error"
                          message:[NSString stringWithFormat:@"Connection failed! Error - %@ (URL: %@)", [error localizedDescription],[[error userInfo] objectForKey:NSURLErrorFailingURLStringErrorKey]]
                          delegate:self
                          cancelButtonTitle:@"Bummer"
                          otherButtonTitles:nil];
    [alert show];
    [alert release];
    // Change UI to active state
    [self setUIState:ACTIVE_STATE];
}

Step 11: MainViewController.m – Handle Network Connection Successful Completion

This final method is called when all the data is successfully loaded. The NSMutableData receivedData object is converted to a NSString on line 147.

On line 151 the UITextView text property resultsTextView is set to the data as a NSString. One the previous line the same is displayed in the XCode console window.

After that the NSURLConnection connection variable is released and the receivedData NSMutable object is truncated.

Your last line has the same task of setting the UI back to a state that the user can search again.

- (void)connectionDidFinishLoading:(NSURLConnection *)connection
{
    // Convert receivedData to NSString.
    NSString *receivedDataAsString = [[NSString alloc] initWithData:receivedData encoding:NSUTF8StringEncoding];

    // Trace receivedData
    NSLog(@"%s - %@", __FUNCTION__, receivedDataAsString);
    resultsTextView.text = receivedDataAsString;
    [receivedDataAsString release];

    // Connection resources release.
    [connection release];
    self.receivedData = nil;
    // Change UI to active state
    [self setUIState:ACTIVE_STATE];
}

Step 12: MainViewController.xib – Add the Activity Indicator

Open the MainViewController.xib in the Project navigator and drag an Activity Indicator from the Objects library in the bottom right to place it under the button with the Search label.

Activity Indicator View

Be sure you keep the Activity Indicator you placed selected while completing the next three tasks.

Select the size panel in the top right and set the x and y values as shown here.

Activity Indicator Size Inspector

Select the Properties inspector and set the style to Large White and check the Behavior Hides When Stopped.

Activity Indicator Properties

In the Connections Inspector panel drag from the “New Referencing Outlet” in the “Referencing Outlets” group to the File Owner’s icon and release the mouse. Then select activityIndicator. You defined activityIndicator in your MainViewController code as a UIActivityIndicatorView.

Here is how the Connections Inspector will look when you are done.

Activity Indicator Connection Inspector

Step 13: MainViewController.xib – Add the TextView

You are adding a TextView that in a future tutorial you replace with a TableView. So there is no need to get heavily invested in how it looks.

Now drag a TextView from the Objects library in the bottom right to place it under the button with the Activity Indicator.

Text View

Keep the TextView you placed selected while completing the next two tasks.

Select the size panel in the top right and set the X, Y, Width and Height values as shown here.

Text View Size Inspector

In the Connections Inspector panel drag from the “New Referencing Outlet” in the “Referencing Outlets” group to the File Owner’s icon and release the mouse. Then select resultsTextView defined activityIndicator in your MainViewController code as a UITextView.

Your Connections Inspector should appear as follows.

Text View Connection Inspector

Step 14: MainViewController.xib – Review the Changes

First you can check the layout looking as follows.

MainViewController Design Window Complete

If you select the Connections inspector and then the File Owner’s icon you should see the following. If so you are good to go.

File Owner’s Connection Inspector

Step 15: PHP Server Script or XML File

This IPhone app loads XML data from a server. The Source Download includes an XML file you can use for this lesson.

However, the longer term of the Tutorial will request a query of the data from the server and at that point you can use the PHP script provided. I suggest you use that with this lesson so you are set up. But if you do not have a PHP script enabled server, you can use the XML file for a few more lessons.

Detailing how the PHP script works is beyond the scope of this tutorial. However what you should know it reads a CSV file. Here is a snippet of the file. The name used in the PHP script is mountain_data.csv.

Mount McKinley,20320, 63.0690,-151.00063
Mount Saint Elias,18008,60.2927,-140.9307
Mount Foraker,17400,62.9605,-151.3992

Then the PHP script returns XML. This is a snippet of what the XML data looks like when returned.

&lt;!--?xml version="1.0" encoding="UTF-8"?--&gt;
&lt;mountains source="http://en.wikipedia.org/wiki/Table_of_the_highest_major_summits_of_the_United_States" elevation_min="12000" count="100"&gt;
  &lt;mountain_item id="1" name="Mount McKinley" elevation="20320" lat=" 63.0690" lon="-151.00063"&gt;
  &lt;mountain_item id="2" name="Mount Saint Elias" elevation="18008" lat="60.2927" lon="-140.9307"&gt;
  &lt;mountain_item id="3" name="Mount Foraker" elevation="17400" lat="62.9605" lon="-151.3992"&gt;
&lt;/mountain_item&gt;&lt;/mountain_item&gt;&lt;/mountain_item&gt;&lt;/mountains&gt;

This XML you will learn to parse in a future tutorial.

This is the PHP script. The name I used for the script was get_mountain_data.php. You can name it what you like.

&lt;!--?php
header("Expires: Mon, 26 Jul 1997 05:00:00 GMT" );
header("Last-Modified: " . gmdate( "D, d M Y H:i:s" ) . "GMT" );
header("Cache-Control: no-cache, must-revalidate" );
header("Pragma: no-cache" );
header("Content-Type: text/xml; charset=utf-8");
// XML to return.
$xml = '';
// Counter for number of mountains returned.
$mountain_count = 0;
// Filter mountains equal to or above this value. 
$elevation_min = 12000;
// Check for elevation parameter as a integer.
if ($_REQUEST['elevation_min'] &amp;&amp; intval($_REQUEST['elevation_min']))
{
	$elevation_min = intval( $_REQUEST['elevation_min']);
}
// Each element contains data for one mountain.
$mountains = array();
// Read a CVS file containing mountain data.
$mountain_data_lines = file('mountain_data.csv');
// Each line read .
foreach($mountain_data_lines as $line) 
{
	// Strip newline at end of line and break line by comma delimiter and 
	// append to $mountains.
	$mountains[] = explode( ',', rtrim($line));
}
// Each mountain.
foreach ($mountains as $value)
{
	// Mountain elevation equals or exceeds the filter value.
	if ( intval($value[1]) --&gt;= $elevation_min  )
	{
		$mountain_count++;
		// Create the mountain_item node.
		$xml .= '&lt;mountain_item ';="" $xml="" .="id = &amp;quot;" $mountain_count="" '"="" $value[0]="" $value[1]="" $value[2]="" $value[3]="" ;&lt;="" p=""&gt;
&lt;/mountain_item&gt;

	}
}
// Add mountains close node.
$xml .= '';
// Create mountains open node.
$xml_mountains = '&lt;mountains ';="" $xml_mountains="" .="source = &amp;quot;http://en.wikipedia.org/wiki/Table_of_the_highest_major_summits_of_the_United_States&amp;quot; " ;="" $elevation_min="" '"="" $mountain_count="" ;&lt;br=""&gt;
// Add mountains open node.
$xml = $xml_mountains . $xml;
// Return xml
echo $xml;
?&amp;gt;

<== Lesson 1 || Overview || Lesson 3 ==>

Categories
Articles

PHP SimpleXML: Load XML File, Preserve CDATA, Remove Whitespace Between Nodes and Return JSON

I needed to create an indented easy to read and edit XML file that a novice web owner could edit. This entailed having the nodes nicely indented so the user could find them easily. The XML file required CDATA nodes. The CDATA nodes I wanted on a separate line again so the user could easily find them. Finally I needed to send the loaded XML data in JSON format to the client side.

I chose SimpleXML simplexml_load_file method to handle the XML file and data. The problem with simplexml_load_file is that it ignores CDATA nodes. This is not immediately clear when reading the documentation. You do find references to the CDATA issue in the user comments.

The documentation also provides a hint should you decide to explore the simplexml_load_file options argument. Here you see the LIBXML_NOCDATA value which includes this explanation: “Merge CDATA as text nodes.” Using this option value converts the node containing the CDATA node into a text node using the container node name. Thus

<info>
	<!&#91;CDATA&#91;<b>Help</b>&#93;&#93;>
</info>

becomes

<info>
	<b>Help</b>
</info>

This is fine since the data returning to the client is in JSON format. Here is how the solution would look:

$xml = simplexml_load_file($xml_filename, 'SimpleXMLElement', LIBXML_NOCDATA);

[ad name=”Google Adsense”]
This solution creates another problem. The tabs and new line characters between the CDATA containing node are added to the new text node when converting to JSON.

\n\t\t\t\t<b>help</b>

Clearly, information between nodes is NOT data. Since my goal was to have a nicely formatted XML file for a user to update manually, this created the need to strip the whitespace added.

The approach I selected was to use a regular expression to remove the whitespace characters before and after the < > tag delimters as follows:

'~\s*(<(&#91;^>]*)>[^<&#93;*</\2>|<&#91;^>]*>)\s*~','$1'

One caveat is that if you decide to include html in the cdata node, the regular expression removes the whitespace before and after those tags.

Also is this needs to be applied before converting to SimpleXML. So I used file_get_contents to load the xml data file, applied the regular expression and then converted to a SimpleXML object.

The completed PHP script is as follows:

<?php
// The XML data file with whitespace such as tabs
$xml_file = "user_formatted_xml_data.xml";
// Load xml data.
$xml = file_get_contents($xml_file);
// Strip whitespace between xml tags
$xml = preg_replace('~\s*(<(&#91;^>]*)>[^<&#93;*</\2>|<&#91;^>]*>)\s*~','$1',$xml);
// Convert CDATA into xml nodes.
$xml = simplexml_load_string($xml,'SimpleXMLElement', LIBXML_NOCDATA);
// Return JSON.
echo json_encode($xml);
?>

[ad name=”Google Adsense”]
Here is a sample data file to try.

<?xml version="1.0" encoding="UTF-8"?>
<news_items>
	<news_item>
		<title>
			<!&#91;CDATA&#91;News item title #1 with <br/>html added.&#93;&#93;>
		</title>
		<content>
			<!&#91;CDATA&#91;This is the <b>CDATA content</b> for news item<strong> #1 </strong> with some "html" included.&#93;&#93;>
		</content>
	</news_item>
	<news_item>
		<title>
			<!&#91;CDATA&#91;News item title #2 with <br/>html added.&#93;&#93;>
		</title>
		<content>
			<!&#91;CDATA&#91;This is the <b>CDATA content</b> for news item<strong> #2 </strong> with some "html" included.&#93;&#93;>
		</content>
	</news_item>
</news_items>