Categories
Articles

Actionscript 3 Animation Following the Mouse to Show Velocity at an Angle

By Lon (Alonzo) Hosford

See also the same done in HTML5 canvas HTML5 Canvas Based Animation Rotate Arrow To Mouse Position

In chapter 5 of Keith Peter’s Foundation Actionscript 3.0 Animation: Making Things Move velocity at an angle is explained. I took Keith’s mouse following example demonstrating velocity at an angle and punched it up a small notch.

Download files
[August 10 2010 – I updated this to an Actionscript project in Flex Builder 4. ]

You can build this with the free Flex SDK by using the code in the src folder. Same for Flash CS3 and later versions. You need to create a Flash Document in the src folder and set the document class to Chapter05_FollowMouse. For your convenience the Flash CS4 example download is included.

Keith Peters AS3 Animation
Learn More

This article shows the code for the Flex project. This Flex version is a spark implementation.

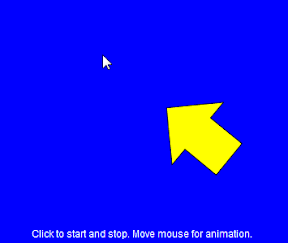
The arrow will follow the mouse around the stage. It will stop following when requested and start again with a mouse click on the stage. It also waits patiently when the mouse leaves the stage. The arrow gets real frustrated when you put the mouse over it. It always points towards the mouse when the mouse is over the stage.

Application Class – Chapter04_SprayPaint
I added user mouse click interaction to control the start and stop movement of the _arrow sprite. See line 40 and lines 48 to 51.

The movement also stops and starts when the mouse enters and leaves the stage. To accomplish that the stage needed to register a Event.MOUSE_LEAVE event to detect the mouse leaving the stage. The stage object is available when the applicationComplete(...) event occurs. The MouseEvent.MOUSE_MOVE sufficed to detect the mouse back over the stage. The _mouseOverStage variable carries the state of the mouse over the stage.

The rotation of the _arrow sprite is continuous. Gives it a mouse awareness state.

<?xml version="1.0" encoding="utf-8"?>
<!--
	Application class to demonstrate animation trigonometry to show velocity at an angle. 
    Mouse position determines the angle. 
	<p>Author: Lon Hosford https://www.lonhosford.com 908 996 3773</p>
    <p>Reference: Keith Peter's Actionscript 3.0 Animation Chapter 5</p>
	
-->
<s:Application xmlns:fx="http://ns.adobe.com/mxml/2009" 
			   xmlns:s="library://ns.adobe.com/flex/spark" 
			   xmlns:mx="library://ns.adobe.com/flex/mx" width="400" height="400"
			   applicationComplete="applicationCompleteHandler(event)"
			   viewSourceURL="srcview/index.html">
	<fx:Script>
		<![CDATA[
			import mx.events.FlexEvent;
			public static const backgroundColor:Number = 0x0000ff;
			public static const backgroundBorderColor:Number = 0x666666;
			public static const backgroundBorderWeight:Number = 2;
			
			private var _instructions_tf:TextField;						// Instructions for user
			[Bindable]
			private var _lang_instructions:String = "Click to start and stop. Move mouse for animation."
			private var _arrow:Arrow;									// Animated sprite is an Arrow 
			private var _speed:Number = 5;								// Movement speed
			private var _allowMoving:Boolean = false;					// Use allowing moving state
			private var _mouseOverStage:Boolean = true;					// Mouse on the stage state
			
			/**
			 * Handler for Application applicationComplete event
			 * */
			protected function applicationCompleteHandler(event:FlexEvent):void
			{
				// Create Arrow object and add to stage. This is animated.
				_arrow = new Arrow();
				arrowVisualElement.addChild(_arrow);
				_arrow.x = (width - _arrow.width ) / 2;
				_arrow.y = (height - _arrow.height ) / 2;
				
				
				stage.addEventListener(MouseEvent.CLICK, mouseClickEventHandler);
				stage.addEventListener(MouseEvent.MOUSE_MOVE, mouseMoveEventHandler);
				stage.addEventListener(Event.ENTER_FRAME, enterFrameEventHandler);
				stage.addEventListener(Event.MOUSE_LEAVE, mouseLeaveEventHandler);
			}
			/**
			 * MouseEvent.CLICK handler
			 * */
			private function mouseClickEventHandler(event:MouseEvent):void
			{
				_allowMoving = !_allowMoving;
			}
			/**
			 * MouseEvent.MOUSE_MOVE handler
			 * */
			private function mouseMoveEventHandler(event:MouseEvent):void
			{
				_mouseOverStage = true;
			}
			/**
			 * Event.MOUSE_LEAVE handler
			 * */
			private function mouseLeaveEventHandler(event:Event):void
			{
				_mouseOverStage = false;
			}
			
			/**
			 * Event.ENTER_FRAME handler
			 * */
			private function enterFrameEventHandler(event:Event):void
			{
				draw();
			}

[ad name=”Google Adsense”]
The draw() method on line 77 updates the animation. The dx and dy variables are the distance from the mouse to the registration point of the _arrow sprite. Radians for the angle are computed using the Math.atan2(...) method. The angle in radians is converted for Actionscript rotation property to degrees. These trigonometry formulas are covered in Keith’s book .

The state the user choose to have the mouse follow is tested and if true the moveTo() method on line 98 computes the velocity at an angle discussed in chapter 5.

The _arrow sprite is designed with a center registration point to facilitate the rotation. As a result the _arrow sprite will move until the mouse coordinates reach the registration point. I added the hitTestPoint(...) method on line 105 to adjust so that the movement stops at the edge of the pixels in the _arrow sprite. The result the _arrow sprite’s point comes very close to the mouse versus the center of the _arrow sprite.

			/**
			 * Draw
			 * */
			private function draw():void
			{		
				// Distance of arrow registration point from mouse
				var dx:Number = mouseX - _arrow.x ;
				var dy:Number = mouseY - _arrow.y ;
				
				// Get angle in radians
				var angle:Number = Math.atan2(dy, dx);
				// Rotate converting radians to degrees
				_arrow.rotation = angle * 180 / Math.PI;
				
				// Is in a mouse following state
				if (_allowMoving)
				{
					// Move based on angle
					moveTo(angle);
				}
			}
			/**
			 * Move arrow
			 * */
			private function moveTo(angle:Number):void
			{
				// Velocity based on angle
				var vx:Number = Math.cos(angle) * _speed;
				var vy:Number = Math.sin(angle) * _speed;
				
				// Mouse position overlaps shape and mouse is over a pixel in the object
				if (!_arrow.hitTestPoint(mouseX, mouseY, true) && _mouseOverStage)
				{
					// Add velocity to position
					_arrow.x += vx ;
					_arrow.y += vy ;
				}
			}
			/**
			 * Set any stage options per your needs
			 * */
			private function initStage():void 
			{
				stage.scaleMode = StageScaleMode.NO_SCALE;
			}
			/**
			 * Instructions for user
			 * */
			private function getInstructions_tf():TextField 
			{
				var tf:TextField = new TextField();
				tf.autoSize = TextFieldAutoSize.LEFT;			
				tf.background = true;
				var textFormat:TextFormat = new TextFormat();
				textFormat.font = "_typewriter";
				tf.defaultTextFormat = textFormat;
				tf.text = _lang_instructions;
				return tf;
			}
		]]>
	</fx:Script>

[ad name=”Google Adsense”]
This part of the application represents the Flex UI based in Spark components.

	<!--- 
	Background for app 
	--> 
	<s:BorderContainer id = "background_bc"
					   width="{width}" height = "{height}"
					   borderWeight="{backgroundBorderWeight}"
					   borderColor="{backgroundBorderColor}"
					   backgroundColor="{backgroundColor}">

		<!--- 
		Spark container for Sprite 
		--> 
		<s:SpriteVisualElement id="arrowVisualElement" />

	</s:BorderContainer>
	<!--- 
	Instructions 
	--> 
	<s:HGroup  horizontalAlign="center" x="0" y="378" width = "100%">
		<s:Label text="{_lang_instructions}" color="0xffffff"/>
	</s:HGroup>
					   
</s:Application>

[ad name=”Google Adsense”]

Categories
Articles

Actionscript 3 Spray Paint with BitmapData

By Lon (Alonzo) Hosford

This my own version of of Keith Peter’s Foundation Actionscript 3.0 Animation: Making Things Move chapter 4 use of the BitmapData class to create a spray paint example.

Download files
[August 10 2010 – I updated this to an Actionscript project in Flex Builder 4. ]

You can build this with the free Flex SDK by using the code in the src folder. Same for Flash CS3 and later versions. You need to create a Flash Document in the src folder and set the document class to Chapter04_SprayPaint. For your convenience the Flash CS4 example download is included.

Keith Peters AS3 Animation
Learn More

This article shows the code for the Flex project. This Flex version is a spark implementation.

Application Class – Chapter04_SprayPaint
The canvas instance of the BitmapData class is instantiated line 32. The BitmapData class setPixel32(...) method on line 83 is used to set the color and alpha transparency values of a single 32 bit pixel.

The overall user interaction is mouse down start the enter frame events that call the draw() method and also to select a random color.

<?xml version="1.0" encoding="utf-8"?>
<!--
	Application class to demonstrate use of the BitmapData class along with animation trigonometry. 
	<p>Author: Lon Hosford https://www.lonhosford.com 908 996 3773</p>
    <p>Reference: Keith Peter's Actionscript 3.0 Animation Chapter 4</p>
	
-->
<s:Application xmlns:fx="http://ns.adobe.com/mxml/2009" 
			   xmlns:s="library://ns.adobe.com/flex/spark" 
			   xmlns:mx="library://ns.adobe.com/flex/mx" width="400" height="400"
			   creationComplete="creationCompleteHandler(event)" 
			   viewSourceURL="srcview/index.html">
	<fx:Script>
		<![CDATA[
			import mx.events.FlexEvent;
			
			// Properties for background
			private static const backgroundColor:Number = 0xffffff;
			private static const backgroundBorderColor:Number = 0x666666;
			private static const backgroundBorderWeight:Number = 2;
			private var canvas:BitmapData;			// Pixel level access
			private var color:uint;					// Randomly generated spray brush colors
			private var size:Number = 20;			// Size of the spray brush
			private var density:Number = 50;		// Number of pixels sprayed per frame
			/**
			 * Handler for Application creationComplete event
			 * */
			protected function creationCompleteHandler(event:FlexEvent):void
			{
				
				// Create BitmapData object allowing use to work with pixels
				canvas = new BitmapData( background_bc.width,background_bc.height, true, 0x00000000);
				var bmp:Bitmap =  new Bitmap(canvas);
				
				// Add itmapData object to a SpriteVisualElement
				arrowVisualElement.addChild(bmp);
				// Handlers for mouse events to signal drawing.
				addEventListener(MouseEvent.MOUSE_DOWN, mouseDownEventHandler);
				addEventListener(MouseEvent.MOUSE_UP, mouseUpEventHandler);
			}
			/**
			 * Event handler for MouseEvent.MOUSE_DOWN
			 * */
			private function mouseDownEventHandler(event:Event):void 
			{
				// Random color from 0 to highest color value which is white
				// and then add alpha channel of opaque
				color = Math.random() * 0xffffff + 0xff000000;
				// Start enter frame events
				stage.addEventListener(Event.ENTER_FRAME, enterFrameEventHandler);
			}
			/**
			 * Event handler for MouseEvent.MOUSE_UP
			 * */
			private function mouseUpEventHandler(event:Event):void 
			{
				stage.removeEventListener(Event.ENTER_FRAME, enterFrameEventHandler);
			}
			/**
			 * Event handler for Event.ENTER_FRAME
			 * */
			private function enterFrameEventHandler(event:Event):void 
			{
				draw();
			}

[ad name=”Google Adsense”]
The draw method uses the density variable on line 72 to determine the number of pixels to color using randomization to compute an angle and a radius within the size of the brush.

Each pixel is basically a point on its own circle. The mouse is becomes a center point for a random circle with a diameter up to the size variable. Line 77 computes the radius for that circle.

Keith’s formulas for computing points on a circle math from chapter 3 are then used to compute the position of the pixel on lines 79 and 81.


			/**
			 * Draw
			 * */
			private function draw():void 
			{
				// Repeat for number of pixels - density.
				for (var i:int = 0; i < density; i++)
				{
					// Random angle 0 - 6.2832 radians  (0 - 360)
					var angle:Number = Math.random() * Math.PI * 2;
					// Radius is random percentage of maximum radius (size / 2)
					var radius:Number = Math.random() * size / 2;
					// Center is mouseX to compute the x point
					var xpos:Number = mouseX + Math.cos(angle) * radius;
					// Center is mouseY to compute the y point
					var ypos:Number = mouseY + Math.sin(angle) * radius;
					//Set the color and alpha transparency values of a single 32 bit pixel.
					canvas.setPixel32(xpos, ypos, color);
					
				}
			}

		]]>
	</fx:Script>

[ad name=”Google Adsense”]
The SpriteVisualElement component allows adding the canvas BitmapData object to the display list.

	<!--- 
	Background for app 
	--> 
	<s:BorderContainer id = "background_bc"
					   width="{width}" height = "{height}"
					   borderWeight="{backgroundBorderWeight}"
					   borderColor="{backgroundBorderColor}"
					   backgroundColor="{backgroundColor}">

		<!--- 
		Spark container for Sprite 
		--> 
		<s:SpriteVisualElement id="arrowVisualElement" />

	</s:BorderContainer>
	<!--- 
	Instructions 
	--> 
	<s:Label x="96" y="378" text="Click and drag mouse to spray paint."/>
					   
</s:Application>
Categories
Articles

Factory Design Pattern Actionscript 3 Print Center – Sanders & Cumaranatunge – Part 2 of 2

By Lon (Alonzo) Hosford

This is the expanded print center Factory design pattern from chapter 2 of William Sanders and Chandima Cumaranatunge Actionscript 3.0 Design Patterns.

Actionscript 3 Design Patterns Learn More

This is an ActionScript project created in Flex Builder and updated to Flex Builder 4. Download the example code. You can build this with the free Flex SDK by using the code in the src folder. Same for Flash CS3 and CS4. You need to create a Flash Document in the src folder and set the document class to Chapter02_Factory_PrintCenters. For your convenience you can download a Flash CS4 ready to go example.

This includes a basic Actionscript debugger console to display tracing statements on stage. Each class sends messages to the console to show their methods working. These messages help you follow the relationships in the Factory design pattern.

The classes that from part 1 are not repeated. Click here to review them.

Application Class – Chapter02_Factory_PrintCenters
This is the client class. It repeats the client class discussed in part 1 use or the PrintCenter classes. It also access the new HighVolPrinterCenter2 and LowVolPrinterCenter2 classes on line 48 and 54 respectively. These are subclasses of the new PrintCenter2. These are new creator classes that take parameters to determine which IPrintJob classes to select. The original PrintCenter subclasses HighVolPrinterCenter2 and LowVolPrinterCenter2 still remain and still work.

/**
 * Demonstrates a more concrete example of decoupling the client, this file, from the products.
 * In this case the products are print jobs on various printers. The print jobs are not coupled
 * to the client. This example uses parameters for the factory choices.
 * <p>
 * This is part two of the example. Additional IPrintJob classes are added along with a second creator
 * classes that take parameters for the type of printing.
 * </p>
 * */
package
{
	import com.lonhosford.util.debug.lite.DebugConsole;

	import flash.display.Sprite;

	import printcenters.HighVolPrinterCenter;
	import printcenters.HighVolPrinterCenter2;
	import printcenters.LowVolPrinterCenter;
	import printcenters.LowVolPrinterCenter2;
	import printcenters.PrintCenter;
	import printcenters.PrintCenter2;

	// {SET STAGE SIZE AND SPEED HERE}
	[SWF(width=500, height = 300, frameRate = 30)]
	public class Chapter02_Factory_PrintCenters extends Sprite
	{
		private var debugConsole:DebugConsole = DebugConsole.getInstance();
		public function Chapter02_Factory_PrintCenters()
		{
			stage.addChild(debugConsole);
			debugConsole.width = stage.stageWidth;
			debugConsole.height = stage.stageHeight;

			debugConsole.write("Actionscript 3.0 Design Patterns");
			debugConsole.write("William Sanders & Chandima Cumaranatunge");
			debugConsole.write("Chapter 2 Print Centers Example");
			debugConsole.write("\n");

			debugConsole.write("\nPrint LongThesis.doc to high volume printer.");
			var pcHighVol:PrintCenter = new HighVolPrinterCenter();
			pcHighVol.print("LongThesis.doc");

			debugConsole.write("\nPrint ShortVita.doc to low volume printer.");
			var pcLowVol:PrintCenter = new LowVolPrinterCenter();
			pcLowVol.print("ShortVita.doc");

			debugConsole.write("\nPrint LongThesis.doc to high volume BW printer.");
			var pc2HighVol:PrintCenter2 = new HighVolPrinterCenter2();
			pc2HighVol.print("LongThesis.doc", HighVolPrinterCenter2.BW);
			debugConsole.write("\nPrint SalesReport.doc to high volume COLOR printer.");
			pc2HighVol.print("SalesReport.doc", HighVolPrinterCenter2.COLOR);

			debugConsole.write("\nPrint LongThesis.doc to low volume BW printer.");
			var pc2LowVol:PrintCenter2 = new LowVolPrinterCenter2();
			pc2LowVol.print("LongThesis.doc", LowVolPrinterCenter2.BW);
			debugConsole.write("\nPrint SalesReport.doc to low volume COLOR printer.");
			pc2LowVol.print("SalesReport.doc", LowVolPrinterCenter2.COLOR);

		}
	}
}

PrintCenter2 Class
The main change over PrintCenter class is the printType parameter in the print() method on line 17 and the createPrintJob() factory method on line 27. Each PrintCenter2 subclass uses the printType parameter to determine which IPrintJob class to create. This expands the capability of unlimited new IPrintJob classes for any single PrintCenter2 creator class.

package printcenters
{
	import flash.errors.IllegalOperationError;
	/**
	 * Handles file printing. Paramatizes the type of print job.
	 * */
	public class PrintCenter2
	{
		public function PrintCenter2()
		{
		}
		/**
		 * Simulate printing a file.
		 * @param fileName Name of file to print.
		 * @param printType Name of file to print.
		 * */
		public function print(fileName:String, printType:uint):void
		{
			var printjob:IPrintJob = this.createPrintJob(printType);
			printjob.start(fileName);
		}
		/**
		 * Creates the IPrintJob products.
		 * @throws flash.errors.IllegalOperationError Must override in subclass.
		 * @param printType Name of file to print.
		 * */
		protected function createPrintJob(printType:uint):IPrintJob
		{
			throw new IllegalOperationError("PrintCenter2.createPrintJob() - override in subclass");
			return null;
		}
	}
}

HighVolPrintCenter2 Class
The key change over the HighVolPrintCenter class are the BW and COLOR constants on line 10 and 11 respectively. These are the printType parameter values for selecting the IPrintJob class to use.

The createPrintJob() function on line 23 uses the code>BW and COLOR constants to select the WorkgroupPrintJob and the new ColorLaserPrintJob product classes. Any other parameter throws an Error.

package printcenters
{
	import com.lonhosford.util.debug.lite.Debugger;
	/**
	 * HighVolPrinterCenter creator class
	 * */
	public class HighVolPrinterCenter2 extends PrintCenter2
	{
		private var debugger:Debugger = Debugger.getInstance();
		public static const BW:uint = 0;
		public static const COLOR:uint = 1;
		public function HighVolPrinterCenter2()
		{
			debugger.write("HighVolPrinterCenter2() - This is a creator.")
		
		}
		/**
		 * Create IPrintJob object.
		 * @param printType Name of file to print.
		 * @return ColorLaserPrintJob | WorkgroupPrintJob based on printType
		 * @throws Error When printType is not matched.
		 * */
		override protected function createPrintJob(printType:uint):IPrintJob
		{
			
			if (printType == BW)
			{
				debugger.write("HighVolPrinterCenter2.createPrintJob() - BW");
				return new WorkgroupPrintJob();
			}
			else if (printType == COLOR)
			{
				debugger.write("HighVolPrinterCenter2.createPrintJob() - COLOR");
				return new ColorLaserPrintJob();
				
			}
			else
			{
				throw new Error("HighVolPrinterCenter2.createPrintJob() - Invalid printer kind.");
				return null;
			}
			
		}
	}
}

LowVolPrintCenter2 Class
This mimics the HighVolPrintCenter2 class. The InkJetPrintJob and the new ColorInkjetPrintJob product classes are selected by the printerType parameter supplied to the createPrintJob(...) function on line 23. Lines 10 and 11 contain valid values for the printerType parameter.

package printcenters
{
	import com.lonhosford.util.debug.lite.Debugger;
	/**
	 * LowVolPrinterCenter creator class
	 * */
	public class LowVolPrinterCenter2 extends PrintCenter2
	{
		private var debugger:Debugger = Debugger.getInstance();
		public static const BW:uint = 0;
		public static const COLOR:uint = 1;
		public function LowVolPrinterCenter2()
		{
			debugger.write("LowVolPrinterCenter2() - This is a creator.")
		
		}
		/**
		 * Create IPrintJob object.
		 * @param printType Name of file to print.
		 * @return InkJetPrintJob | ColorInkjetPrintJob based on printType
		 * @throws Error When printType is not matched.
		 * */
		override protected function createPrintJob(printType:uint):IPrintJob
		{
			
			if (printType == BW)
			{
				debugger.write("LowVolPrinterCenter2.createPrintJob() - BW");
				return new InkJetPrintJob();
			}
			else if (printType == COLOR)
			{
				debugger.write("LowVolPrinterCenter2.createPrintJob() - COLOR");
				return new ColorInkjetPrintJob();
				
			}
			else
			{
				throw new Error("LowVolPrinterCenter2.createPrintJob() - Invalid low volume print type.");
				return null;
			}
			
		}
	}
}

[ad name=”Google Adsense”]
There are some new IPrintJob classes introduced. They simulate newer types of products available to the creator classes.

ColorLaserPrintJob Class
Nothing unusual here. Just another IPrintJob class.

package printcenters
{
	import com.lonhosford.util.debug.lite.Debugger;
	/**
	 * ColorLaserPrintJob product class
	 * */
	internal class ColorLaserPrintJob implements IPrintJob
	{
		private var debugger:Debugger = Debugger.getInstance();
		public function ColorLaserPrintJob()
		{
			debugger.write("ColorLaserPrintJob()")
		}
		/**
		 * Simulate starting an ColorInkjetPrintJob
		 * @param fileName Name of file to print.
		 * */		
		public function start(fileName:String):void
		{
			debugger.write("ColorLaserPrintJob.start() - fileName:" + fileName);
		}
	}
}

ColorInkjetPrintJob Class
Another IPrintJob class. They can be pounded out. Anyone want to make a dot matrix print job?

package printcenters
{
	import com.lonhosford.util.debug.lite.Debugger;
	/**
	 * ColorInkjetPrintJob product class
	 * */
	internal class ColorInkjetPrintJob implements IPrintJob
	{
		private var debugger:Debugger = Debugger.getInstance();
		public function ColorInkjetPrintJob()
		{
			debugger.write("ColorInkjetPrintJob()")
		}
		/**
		 * Simulate starting an ColorInkjetPrintJob
		 * @param fileName Name of file to print.
		 * */		
		public function start(fileName:String):void
		{
			debugger.write("ColorInkjetPrintJob.start() - fileName:" + fileName);
		}
	}
}

Categories
Articles

Factory Design Pattern Minimalist Example For Actionscript 3 – Sanders & Cumaranatunge

By Lon (Alonzo) Hosford

This is the minimalist Factory design pattern from chapter 2 of William Sanders and Chandima Cumaranatunge Actionscript 3.0 Design Patterns

Actionscript 3 Design Patterns Learn More

This is an ActionScript project created in Flex Builder and updated to Flex Builder 4. Download the example code. You can build this with the free Flex SDK by using the code in the src folder. Same for Flash CS3 and CS4. You need to create a Flash Document in the src folder and set the document class to Chapter02_Factory_Minimalist_Flash. For your convenience you can download a Flash CS4 ready to go example.

This includes a basic Actionscript debugger console to display tracing statements on stage. Each class sends messages to the console to show their methods working. These messages help you follow the relationships in the Factory design pattern.

Application Class – Chapter02_Factory_Minimalist
This is the client class. The class simply instantiates CreatorA and CreatorB classes and calls the doStuff() method they inherit from the Creator class. The basic idea is that the ProductA and ProductB classes are uncoupled from the client. Uncoupling is a good OOP design principle.

/**
 * Demonstrates a minimalist example of decoupling the client, this file, from the products.
 * The product classes may be modified within the package and the creators maintain the
 * direct interface to the clients.
 * */
package
{
	import com.lonhosford.util.debug.lite.DebugConsole;
	import com.lonhosford.util.debug.lite.DebugMessage;
	import com.lonhosford.util.debug.lite.Debugger;
	import com.lonhosford.util.debug.lite.DebuggerEvent;

	import flash.display.Sprite;

	import example.CreatorA;
	import example.CreatorB;

	// {SET STAGE SIZE AND SPEED HERE}
	[SWF(width=500, height = 300, frameRate = 30)]

	public class Chapter02_Factory_Minimalist extends Sprite
	{
		private var debugConsole:DebugConsole = DebugConsole.getInstance();
		private static const backgroundColor:Number = 0xffffff;
		private static const backgroundBorderColor:Number = 0x666666;
		private static const backgroundBorderWidth:Number = 2;

		public function Chapter02_Factory_Minimalist()
		{

			stage.addChild(debugConsole);
			debugConsole.width = stage.stageWidth;
			debugConsole.height = stage.stageHeight;

			debugConsole.write("Actionscript 3.0 Design Patterns");
			debugConsole.write("William Sanders & Chandima Cumaranatunge");
			debugConsole.write("Chapter 2 Factory Minimalist Example");
			debugConsole.write("\n");

			var ca:CreatorA = new CreatorA();
			var cb:CreatorB = new CreatorB();

			ca.doStuff();
			cb.doStuff();
		}
	}
}

Creator Class
This class provides a “factory method” interface to each of the subclasses. The line 16 shows the factoryMethod() method. The method name for the example emphasizes its purpose. The factory method cannot be called from a client class. The method throws an IllegalOperationError to prevent that coding option.

[ad name=”Google Adsense”]
The factoryMethod() method returns a IProduct class. Each Creator subclass will return its own product all having a manipulate() method defined by the IProduct interface discussed later in this post. This Creator class then uses the product class manipulate() method on line 13.

package example
{
	import flash.errors.IllegalOperationError;

	public class Creator
	{
		public function Creator()
		{
		}
		public function doStuff():void
		{
			var product:IProduct = this.factoryMethod(); // this is SubClass CreatorA, CreatorB etc
			product.manipulate();

		}
		protected function factoryMethod():IProduct
		{
			throw new IllegalOperationError("Creator.factoryMethod() - Abstract method. Override in subclass");
			return null;
		}
	}
}

CreatorA Class
This is a class the client classes use. The Creater super class contains the doStuff() method clients use to interact with the product classes.

package example
{
	import com.lonhosford.util.debug.lite.DebugConsole;

	public class CreatorA extends Creator
	{
		private var debugConsole:DebugConsole = DebugConsole.getInstance();
		public function CreatorA()
		{
			debugConsole.write("CreatorA()");
		}
		override protected function factoryMethod():IProduct
		{
			debugConsole.write("CreatorA.factoryMethod() - creating Product1");
			return new Product1();
		}
	}
}

CreatorB Class

package example
{
	import com.lonhosford.util.debug.lite.DebugConsole;

	public class CreatorB extends Creator
	{
		private var debugConsole:DebugConsole = DebugConsole.getInstance();
		public function CreatorB()
		{
			debugConsole.write("CreatorB()");
		}
		override protected function factoryMethod():IProduct
		{
			debugConsole.write ("CreatorB.factoryMethod() - creating Product2");
			return new Product2();
		}
	}
}

[ad name=”Google Adsense”]
IProduct Interface
This interface provides a common manipulate() method for the Creator class, and all its subclasses, in the package. Each product class implements this interface.

package example
{
	public interface IProduct
	{
		function manipulate():void;
	}
}

Product1 Class
This is the worker bee class. It must implement the manipulate() method of the IProduct interface. The Creator class uses this method in its doStuff() method. Remember the doStuff() method is how client classes interact with the products.

package example
{
	import com.lonhosford.util.debug.lite.DebugConsole;

	internal class Product1 implements IProduct
	{
		private var debugConsole:DebugConsole = DebugConsole.getInstance();
		public function Product1()
		{
			debugConsole.write("Product1()");
		}
		public function manipulate():void
		{
			debugConsole.write("Product1.manipulate()");
		}
	}
}

Product2 Class

package example
{
	import com.lonhosford.util.debug.lite.DebugConsole;

	internal class Product2 implements IProduct
	{
		private var debugConsole:DebugConsole = DebugConsole.getInstance();
		public function Product2()
		{
			debugConsole.write("Product2()");
		}
		public function manipulate():void
		{
			debugConsole.write("Product2.manipulate()");
		}
	}
}
Categories
Articles

Factory Design Pattern Print Center Actionscript 3 – Sanders & Cumaranatunge – Part 1 of 2

By Lon (Alonzo) Hosford

This is the print center Factory design pattern from chapter 2 of William Sanders and Chandima Cumaranatunge Actionscript 3.0 Design Patterns.

Actionscript 3 Design Patterns Learn More

This is an ActionScript project created in Flex Builder and updated to Flex Builder 4. Download the example code. You can build this with the free Flex SDK by using the code in the src folder. Same for Flash CS3 and CS4. You need to create a Flash Document in the src folder and set the document class to Chapter02_Factory_PrintCenters. For your convenience you can download a Flash CS4 ready to go example.

This includes a basic Actionscript debugger console to display tracing statements on stage. Each class sends messages to the console to show their methods working. These messages help you follow the relationships in the Factory design pattern.

Application Class – Chapter02_Factory_PrintCenters
This is the client class. The class instantiates HighVolPrinterCenter and LowVolPrinterCenter classes and calls their print() method inherited from the PrintCenter class. The basic idea is the same as the minimalist example to uncouple the product classes from the clientInkJetPrintJob and WorkgroupPrintJob.

/**
 * Demonstrates a more concrete example of decoupling the client, this file, from the products.
 * In this case the products are print jobs on various printers. The print jobs are not coupled
 * to the client. Clients interface with creator classes representing a type of print center. 
 * The product classes doing the work are created by the print center creator classes.
 * <p>
 * This is part one of the example. 
 * </p>
 * */
package
{
	import com.lonhosford.util.debug.lite.DebugConsole;
	
	import flash.display.Sprite;
	
	import printcenters.HighVolPrinterCenter;
	import printcenters.LowVolPrinterCenter;
	import printcenters.PrintCenter;
	
	// {SET STAGE SIZE AND SPEED HERE}
	[SWF(width=500, height = 300, frameRate = 30)]
	public class Chapter02_Factory_PrintCenters extends Sprite
	{
		private var debugConsole:DebugConsole = DebugConsole.getInstance();
		public function Chapter02_Factory_PrintCenters()
		{
			stage.addChild(debugConsole);
			debugConsole.width = stage.stageWidth;
			debugConsole.height = stage.stageHeight;
			
			debugConsole.write("Actionscript 3.0 Design Patterns");
			debugConsole.write("William Sanders & Chandima Cumaranatunge");
			debugConsole.write("Chapter 2 Print Centers Example - Part 1");
			debugConsole.write("\n");
			
			
			debugConsole.write("\nPrint LongThesis.doc to high volume printer.");
			var pcHighVol:PrintCenter = new HighVolPrinterCenter();
			pcHighVol.print("LongThesis.doc");
			
			debugConsole.write("\nPrint ShortVita.doc to low volume printer.");
			var pcLowVol:PrintCenter = new LowVolPrinterCenter();
			pcLowVol.print("ShortVita.doc");


		}
	}
}

PrintCenter Class
This class provides a “factory method” interface to each of its subclasses LowVolPrintCenter and HighVolPrintCenter. The line 25 shows the createPrintJob()() method. The factory method cannot be called from a client class. The method throws an IllegalOperationError to prevent that coding option.

[ad name=”Google Adsense”]
The createPrintJob()() method returns a IPrintJob interface. Each Creator subclass will return its own product all having a createPrintJob()() method defined by the IPrintJob interface discussed later in this post. This PrintCenter class then uses the product class start() method on line 19.

package printcenters
{
	import flash.errors.IllegalOperationError;
	/**
	 * Handles file printing.
	 * */
	public class PrintCenter
	{
		public function PrintCenter()
		{
		}
		/**
		 * Simulate printing a file.
		 * @param fileName Name of file to print.
		 * */		
		public function print(fileName:String):void
		{
			var printjob:IPrintJob = this.createPrintJob();
			printjob.start(fileName);
		}
		/**
		 * Creates the IPrintJob products.
		 * @throws flash.errors.IllegalOperationError Must override in subclass.
		 * */		
		protected function createPrintJob():IPrintJob
		{
			throw new IllegalOperationError("PrintCenter.createPrintJob() - override in subclass");
			return null;
		}
	}
}

LowVolPrinterCenter Class
This is a class the client classes use. The PrintCenter super class contains the print() method clients use to print a document. The LowVolPrinterCenter then creates the correct IPrintJob class to do the work. In this case it is the InkJetPrintJob class. If programming requires using another IPrintJob class, the change does not impact the print() method interface client classes use.

package printcenters
{
	import com.lonhosford.util.debug.lite.Debugger;
	/**
	 * LowVolPrinterCenter creator class
	 * */
	public class LowVolPrinterCenter extends PrintCenter
	{
		private var debugger:Debugger = Debugger.getInstance();
		public function LowVolPrinterCenter()
		{
			debugger.write("LowVolPrinterCenter() - This is a creator.")
		
		}
		/**
		 * Create InkJetPrintJob object.
		 * @return InkJetPrintJob
		 * */
		override protected function createPrintJob():IPrintJob
		{
			debugger.write("LowVolPrinterCenter.createPrintJob()");
			return new InkJetPrintJob();
		}
	}
}

HighVolPrinterCenter Class
This is a second subclass to the PrintCenter class. It uses the IPrintJob class WorkgroupPrintJob.

package printcenters
{
	import com.lonhosford.util.debug.lite.Debugger;
	/**
	 * HighVolPrinterCenter creator class
	 * */
	public class HighVolPrinterCenter extends PrintCenter
	{
		private var debugger:Debugger = Debugger.getInstance();
		public function HighVolPrinterCenter()
		{
			debugger.write("HighVolPrinterCenter() - This is a creator.")
		}
		/**
		 * Create WorkgroupPrintJob object.
		 * @return WorkgroupPrintJob
		 * */
		override protected function createPrintJob():IPrintJob
		{
			debugger.write("HighVolPrinterCenter.createPrintJob()");
			return new WorkgroupPrintJob();
		}
	}
}

[ad name=”Google Adsense”]
Now there are two PrintCenter classes available to client programs. Both use the print() method to print documents. Next we look at the IPrintJob classes starting with the interface.

IPrintJob Interface
This interface defines one method start() for all IPrintJob classes to implement.

package printcenters
{
	/**
	 * Sets the interface for print job product classes
	 * */
	public interface IPrintJob
	{
		/**
		 * @param fileName Name of file to print.
		 * */		
		function start(fileName:String):void;
	}
}

InkJetPrintJob Class
This class implements the IPrintJob interface and includes the required start() method on line 18.

package printcenters
{
	import com.lonhosford.util.debug.lite.Debugger;
	/**
	 * InkJetPrintJob product class
	 * */
	internal class InkJetPrintJob implements IPrintJob
	{
		private var debugger:Debugger = Debugger.getInstance();
		public function InkJetPrintJob()
		{
			debugger.write("InkJetPrintJob()")
		}
		/**
		 * Simulate starting an InkJetPrintJob
		 * @param fileName Name of file to print.
		 * */		
		public function start(fileName:String):void
		{
			debugger.write("InkJetPrintJob.start() - fileName:" + fileName);
		}
	}
}

WorkgroupPrintJob Class
Like the InkJetPrintJob class this class implements the IPrintJob interface and includes the required start() method on line 18.

package printcenters
{
	import com.lonhosford.util.debug.lite.Debugger;
	/**
	 * WorkgroupPrintJob product class
	 * */
	internal class WorkgroupPrintJob implements IPrintJob
	{
		private var debugger:Debugger = Debugger.getInstance();
		public function WorkgroupPrintJob()
		{
			debugger.write("WorkgroupPrintJob()")
		}
		/**
		 * Simulate starting an WorkgroupPrintJob
		 * @param fileName Name of file to print.
		 * */		
		public function start(fileName:String):void
		{
			debugger.write ("WorkgroupPrintJob.start() - fileName:" + fileName);
		}
	}
}

Adding to the PrintCenter class
It is relatively easy to add another PrintCenter class. Here is the FancyPrintCenter class that creates the IProduct class MultifunctionPrintJob. Create the classes in the and see if you can add them to the application Chapter02_Factory_PrintCenters class.

FancyPrinterCenter class

package printcenters
{
	import com.lonhosford.util.debug.lite.Debugger;
	/**
	 * FancyPrinterCenter creator class
	 * */
	public class FancyPrinterCenter extends PrintCenter
	{
		private var debugger:Debugger = Debugger.getInstance();
		public function FancyPrinterCenter()
		{
			debugger.write("FancyPrinterCenter() - This is a creator.")
		}
		/**
		 * Create IPrintJob object.
		 * @return MultiFunctionPrintJob
		 * */
		override protected function createPrintJob():IPrintJob
		{
			debugger.write("FancyPrinterCenter.createPrintJob()");
			return new MultiFunctionPrintJob();
		}
	}
}

MultiFunctionPrintJob class

package printcenters
{
	import com.lonhosford.util.debug.lite.Debugger;
	/**
	 * MultiFunctionPrintJob product class
	 * */
	internal class MultiFunctionPrintJob implements IPrintJob
	{
		private var debugger:Debugger = Debugger.getInstance();
		public function MultiFunctionPrintJob()
		{
			debugger.write("MultiFunctionPrintJob()")
		}
		/**
		 * Simulate starting an MultiFunctionPrintJob
		 * @param fileName Name of file to print.
		 * */		
		public function start(fileName:String):void
		{
			debugger.write ("MultiFunctionPrintJob.start() - fileName:" + fileName);
		}
	}
}

Part 2 introduces parameters for selection product classes.

Categories
Articles

Actionscript 3 Revolving Animation Around a Center Point

By Lon (Alonzo) Hosford

I was working through chapter 3 of Keith Peter’s Foundation Actionscript 3.0 Animation: Making Things Move and came up with this Rotator class that will revolve any sprite around a given point.

Keith Peters AS3 Animation
Learn More

[August 18 2010] I updated this to an ActionScript project to Flex Builder 4. Download the example code. You can build this with the free Flex SDK by using the code in the src folder. Same for Flash CS3 and CS4. You need to create a Flash Document in the src folder and set the document class to Chapter02_Factory_PrintCenters. For your convenience you can download a Flash CS4 ready to go example.

Application Class – Animation_Circular_Rotation
This is the application class. The actual use of the Rotator class is all done on lines 81 to 86 with the _rotator instance and the Circle class circle instance. The rest of this class is dedicated to user interaction with the keyboard to start, stop and step the animation and with informational feedback using the DebugConsole class.

The circle created on line 80 is what the Rotator class instance _rotator revolves. The Rotator class constructor requires the Sprite object it will revolve and the radius as shown on line 85.

/**
 *  Purpose: Animating a rotation motion in Actionscript 3
 *  <p>Author: Lon Hosford https://www.lonhosford.com 908 996 3773</p>
 *  <p>Version history:</p>
 *  <p>	Number:			1.00.00</p>
 *  <p>	Date:			06/15/2007</p>
 *  <p>	Programmer:		Lon Hosford: https://www.lonhosford.com</p>
 *  <p>	Changes:		Original programming</p>
 * */	

package
{
	import com.lonhosford.util.debug.lite.DebugConsole;
	
	import flash.display.Shape;
	import flash.display.Sprite;
	import flash.display.StageScaleMode;
	import flash.events.Event;
	import flash.events.KeyboardEvent;
	import flash.events.TimerEvent;
	import flash.system.Capabilities;
	import flash.text.TextField;
	import flash.text.TextFormat;
	import flash.text.TextFormatAlign;
	import flash.ui.Keyboard;
	import flash.utils.Timer;
	

	[SWF(width=600, height = 770, frameRate = 30)]
	/**
	 *  Application class
	 * */	
	public class Animation_Circular_Rotation extends Sprite
	{
		private var _debugConsole:DebugConsole = DebugConsole.getInstance();
		public var maxDebugConsoleLines:Number = 500;				// Maximum lines in debug console.
																	// More line lowers performance.
		// Basic background - set your preference here
		public static const backgroundColor:Number = 0xcccccc;
		public static const backgroundBorderColor:Number = 0x666666;
		public static const backgroundBorderWidth:Number = 2;
		
		private var _rotator:Rotator;								// Rotation animator
		
		// Language
		private var _lang_clickStage:String = "Click stage to get keyboard focus.";
		private var _lang_enterKey:String = "ENTER starts and stops animation.";
		private var _lang_spacebar:String = "SPACE BAR increments animation one step. Auto repeats after delay.";
		private var _lang_debugCleared:String = "Debug window cleared every";
		private var _lang_debugClearedWhen:String = "lines when animating to maintain low memory.";
		private var _lang_traceDisabled:String = "Trace output suppressed when animation plays in Flash Control->Test Movie.";
		private var _lang_keyboardShortcuts:String = "In Flash after Control->Test Movie, select Control->Disable Keyboard Shortcuts.";
		// Space bar repeat timer
		private var _keySpacebarTimeDelay:Number = 350;					// Delay between each Keyboard.SPACE event.
		private var _keySpacebarTimer:Timer; 							// Timer for repeating Keyboard.SPACE events.

		public function Animation_Circular_Rotation()
		{
			// Set stage options
			initStage();
			// Create a background
			var backgroundRect:Shape = getRectShape(backgroundColor, backgroundBorderColor, backgroundBorderWidth, stage.stageWidth, stage.stageHeight)
			addChild(backgroundRect);
			
			// Add output monitor
			stage.addChild(_debugConsole);
			_debugConsole.width = stage.stageWidth;
			_debugConsole.height = stage.stageHeight * .25;
			_debugConsole.y = stage.stageHeight - _debugConsole.height;
			// Disable tracing to Flash External player. Tracing impairs performance.
			if ( Capabilities.playerType == "External")
			{
				_debugConsole.isTracing = false;
			}
			// Instructions
			var instruction_tf:TextField = instructionDisplay();
			addChild(instruction_tf);
			instruction_tf.x = (stage.stageWidth - instruction_tf.width) / 2;
			
			// Create sprite to rotate
			var circle:Circle = new Circle();
			
			// Create a rotator
			_rotator = new Rotator(circle, backgroundRect.width * .3);
			_rotator.x = (stage.stageWidth - _rotator.width) / 2;
			_rotator.y = instruction_tf.y + instruction_tf.height + 5;
			addChild(_rotator);
			_rotator.addEventListener(Event.ENTER_FRAME,rotatorEnterFrameEventHandler);
			
			// Use keyboard events to control the animation
			stage.addEventListener( KeyboardEvent.KEY_DOWN, keyPressed);
			stage.addEventListener( KeyboardEvent.KEY_UP, keyReleased);
			
			_keySpacebarTimer = new Timer(_keySpacebarTimeDelay,1); 
			_keySpacebarTimer.addEventListener(TimerEvent.TIMER, keySpacebarTimerEventHandler);
		}

[ad name=”Google Adsense”]


		/**
		 * Set any stage options per your needs
		 * */
		private function initStage():void 
		{ 
			stage.scaleMode = StageScaleMode.NO_SCALE;
		}
		/**
		 * Instructions display.
		 * */
		private function instructionDisplay():TextField 
		{
			var instructions_tf:TextField = new TextField();		
			var format:TextFormat = new TextFormat();
			format.font = "_typewriter";
			format.color = 0x000000;
			format.size = 12;
			format.indent = 2;
			instructions_tf.defaultTextFormat = format;
			instructions_tf.border = true;
			instructions_tf.borderColor = 0x000000;
			instructions_tf.background = true;
			instructions_tf.backgroundColor = 0xffffff;
			instructions_tf.autoSize = TextFormatAlign.LEFT
			instructions_tf.appendText(_lang_clickStage + "\n");
			instructions_tf.appendText(_lang_enterKey + "\n");
			instructions_tf.appendText(_lang_spacebar + "\n");
			instructions_tf.appendText(_lang_debugCleared + " " + maxDebugConsoleLines + " " + _lang_debugClearedWhen + "\n");
			instructions_tf.appendText(_lang_traceDisabled + "\n");
			instructions_tf.appendText(_lang_keyboardShortcuts);
			
			return instructions_tf;
		}
		/**
		 * Handler for KeyboardEvent.KEY_DOWN
		 * */
		private function keyPressed(evt:KeyboardEvent):void 
		{
			
			switch (evt.keyCode)
			{
				case Keyboard.SPACE:
					
					if (!_keySpacebarTimer.running)
					{
						_keySpacebarTimer.start();
					}	
					break;
			}
		}
		/**
		 * Handler for KeyboardEvent.KEY_UP 
		 * */
		private function keyReleased(evt:KeyboardEvent):void 
		{
			switch (evt.keyCode)
			{
				case Keyboard.SPACE:
					if (_keySpacebarTimer.running)
					{
						_keySpacebarTimer.stop();
						_keySpacebarTimer.reset();
					}
					if (_rotator.isPlaying)
					{
						_rotator.stop();
					}
					else
					{
						_rotator.step();
					}
					
					break;
				case Keyboard.ENTER:
					if (_rotator.isPlaying)
					{
						_rotator.stop();
					}
					else
					{
						_rotator.start();
					}
					break;
			}
		}
		/**
		 * Handler for TimerEvent.TIMER event. Resets the delay interval once the default delay 
		 * is reached.
		 * */
		private function keySpacebarTimerEventHandler(event:TimerEvent):void 
		{
			_rotator.start();
		}
		/**
		 * Handler for _rotator Event.ENTER_FRAME event. 
		 * */
		private function rotatorEnterFrameEventHandler(event:Event):void 
		{
			clearDebugConsoleFlashExternalPlayer();
		}
		/**
		 * Handles slower processing in Flash external player Control->Test Movie
		 * and clears debugConsole when 100 lines are reached.
		 * */
		
		private function clearDebugConsoleFlashExternalPlayer():void
		{
			if (_debugConsole.contentLineCount > maxDebugConsoleLines && _rotator.isPlaying )
			{
				_debugConsole.clear();
				
			}
		}
		/**
		 * Utility to draw a rectangle Shape object 
		 * */
		private function getRectShape(bgColor:uint, borderColor:uint, borderSize:uint, width:uint, height:uint):Shape 
		{
			var newShape:Shape = new Shape();
			newShape.graphics.beginFill(bgColor);
			newShape.graphics.lineStyle(borderSize, borderColor);
			newShape.graphics.drawRect(0, 0, width, height);
			newShape.graphics.endFill();
			return newShape;
		}
	}
}

Rotator Class
This is the class that does the rotation. The main work is done in the move() method on lines 154 – 187. Comments tell what each step accomplishes. The lines past 187 in the move() method are for information only and can be deleted. The move() method only advances the animation one step defined by the _vr variable on line 38. Increase the _vr variable will speed up the animation and decreasing slows the animation down. As an exercise you could make this a speed option via a setter method and the constructor.

The init() method on lines 74 to 94 set the sprite to animate inside a rectangular boundary.

package
{
	import com.lonhosford.util.debug.lite.DebugConsole;
	import com.lonhosford.util.debug.lite.Debugger;
	
	import flash.display.Shape;
	import flash.display.Sprite;
	import flash.events.Event;
	
	/**
	 *  Purpose: Circular rotation of a sprite around a radius
	 *  <p>Author: Lon Hosford www.lonhosford.com 908 996 3773</p>
	 *  <p>Version history:</p>
	 *  <p>	Number:			1.00.00</p>
	 *  <p>	Date:			06/15/2007</p>
	 *  <p>	Programmer:		Lon Hosford: https://www.lonhosford.com</p>
	 *  <p>	Changes:		Original programming</p>
	 * */	
	public class Rotator extends Sprite
	{
		/**
		 * A sprite object to rotate
		 * */
		private var _spriteToRotate:Sprite;
		/**
		 * Current angle in radians. 
		 * */
		private var _angle:Number = 0;  
		/**
		 * Radius of rotation. 
		 * @default 150
		 * */
		private var _radius:Number;
		/**
		 * Velocity of the angle change in radians. 
		 * @default .05
		 * */
		private var _vr:Number = .03; // Radians
		/**
		 * Center of rotation for x.
		 * */
		private var _centerX:Number;
		/**
		 * Center of rotation for y.
		 * */
		private var _centerY:Number;
		/**
		 * Coordinate x for _spriteToRotate.
		 * */
		private var _coordinateX:Number;
		/**
		 * Coordinate y for _spriteToRotate.
		 * */
		private var _coordinateY:Number;
		/**
		 * Animation is playing.
		 * */
		private var _isPlaying:Boolean = false;
		private var debugConsole:DebugConsole = DebugConsole.getInstance();
		/**
		 * Constructor
		 * @param radius see _radius
		 * */
		public function Rotator(spriteToRotate:Sprite, radius:uint = 150)
		{
			_spriteToRotate = spriteToRotate;
			_radius = radius;
			
			init();
		}

[ad name=”Google Adsense”]

		/**
		 * Initialize the class
		 * */
		private function init():void
		{
			var boundaryBorderWidth:Number = 1
			// Create a boundaries object to set container height and width 
			var boundaries:Shape = new Shape();
			boundaries.graphics.beginFill(0xcccccc, 0);
			boundaries.graphics.lineStyle(boundaryBorderWidth, 0x000000, 0);
			boundaries.graphics.drawRect(0, 0, _radius * 2 + _spriteToRotate.width , _radius * 2 + _spriteToRotate.height );
			boundaries.graphics.endFill();
			addChild(boundaries);
			
			// Compute the center of container
			_centerX = (boundaries.width - boundaryBorderWidth)/2 ;
			_centerY = (boundaries.height - boundaryBorderWidth)/2  ;
			
			// Set starting position for sprite to rotate
			
			// Add sprite
			_spriteToRotate.alpha = .5;
			addChild(_spriteToRotate);
			move();
			
			/*----------------------------------------------------------------------
			Start statistical data for information only.
			Can delete for actual implementations
			----------------------------------------------------------------------*/		
			debugConsole.write("\n");
			debugConsole.write("Rotator.init() - width:" + width);
			debugConsole.write("Rotator.init() - height:" + height);
			debugConsole.write("Rotator.init() - _angle:" + _angle);
			debugConsole.write("Rotator.init() - _radius:" + _radius);
			debugConsole.write("Rotator.init() - Math.cos(_angle):" + Math.cos(_angle));
			debugConsole.write("Rotator.init() - Math.sin(_angle):" + Math.sin(_angle));
			/*----------------------------------------------------------------------
			End statistical data for information only.
			Can delete above for actual implementations
			----------------------------------------------------------------------*/		
		}
		/**
		 * Handler for Event.ENTER_FRAME events
		 * */
		private function onEnterFrame(event:Event):void
		{
			move();
		}
		/**
		 * Get the playing status
		 * */
		public function get isPlaying():Boolean
		{
			return _isPlaying;
		}
		/**
		 * Starts the animation.
		 * */
		public function start():void
		{
			_isPlaying = true;
			addEventListener(Event.ENTER_FRAME, onEnterFrame);
		}
		/**
		 * Stops the animation.
		 * */
		public function stop():void
		{
			_isPlaying = false;
			removeEventListener(Event.ENTER_FRAME, onEnterFrame);
		}
		/**
		 * Animates one unit of velocity.
		 * */
		public function step():void
		{
			stop();
			move();
		}

[ad name=”Google Adsense”]

		/**
		 * Animates one velocity unit.
		 * <p>Performs computations for rotation and moves sprite object</p>
		 * */
		private function move():void
		{
			/*----------------------------------------------------------------------
			Sprite coordinates
			----------------------------------------------------------------------*/		
			var _coordinateX:Number = _centerX + Math.cos(_angle) * _radius;
			var _coordinateY:Number = _centerY + Math.sin(_angle) * _radius;
			/*----------------------------------------------------------------------
			Position sprite object
			----------------------------------------------------------------------*/	
			_spriteToRotate.x = _coordinateX;
			_spriteToRotate.y = _coordinateY;
			/*----------------------------------------------------------------------
			Augment the angle by the velocity
			----------------------------------------------------------------------*/		
			_angle += _vr;
			/*----------------------------------------------------------------------
			Draw triangle
			----------------------------------------------------------------------*/		
			graphics.clear();
			graphics.lineStyle(1);
			/*----------------------------------------------------------------------
			Draw hypotenuse
			----------------------------------------------------------------------*/		
			graphics.moveTo( _coordinateX, _coordinateY );
			graphics.lineTo(_centerX, _centerY);
			/*----------------------------------------------------------------------
			Draw adjacent leg
			----------------------------------------------------------------------*/		
			graphics.lineTo(_coordinateX , _centerY);
			/*----------------------------------------------------------------------
			Draw opposite leg
			----------------------------------------------------------------------*/		
			graphics.lineTo(_coordinateX, _coordinateY);
			
			/*----------------------------------------------------------------------
			Start statistical data for information only.
			Can delete for actual implementations.
			dx and dy are not used in the class.
			----------------------------------------------------------------------*/		
			debugConsole.write("\n");
			debugConsole.write("Rotator.move() - _vr:" + _vr);
			debugConsole.write("Rotator.move() - _angle:" + _angle);
			debugConsole.write("Rotator.move() - _coordinateX:" + _coordinateX);
			debugConsole.write("Rotator.move() - _coordinateY:" + _coordinateY);
			debugConsole.write("Rotator.move() - _centerX:" + _centerX);
			debugConsole.write("Rotator.move() - _centerY:" + _centerY);
			var dx:Number = _centerX - _coordinateX;
			var dy:Number = _centerY - _coordinateY;
			debugConsole.write("Rotator.move() - Length: hypotenuse:" + ( Math.sqrt(dx * dx + dy * dy)  ));
			dx = _centerX - _coordinateX;
			dy = 0;
			debugConsole.write("Rotator.move() - Length: adjacent leg:" + ( Math.sqrt(dx * dx + dy * dy)  ));
			dx = 0;
			dy = _centerY - _coordinateY;
			debugConsole.write("Rotator.move() - Length: adjacent leg:" + ( Math.sqrt(dx * dx + dy * dy)  ));
		
			/*----------------------------------------------------------------------
			End statistical data for information only.
			Can delete above for actual implementations
			----------------------------------------------------------------------*/		
			
		}
	}
}

Circle Class
This is the sprite that is revolving in the animation.

package {
	import flash.display.Sprite;
	/**
	 *  Purpose: Draw a circle in a Sprite
	 *  <p>Author: Lon Hosford www.lonhosford.com 908 996 3773</p>
	 *  <p>Version history:</p>
	 *  <p>	Number:			1.00.00</p>
	 *  <p>	Date:			06/15/2007</p>
	 *  <p>	Programmer:		Lon Hosford: https://www.lonhosford.com</p>
	 *  <p>	Changes:		Original programming</p>
	 * */	
	public class Circle extends Sprite {
		/**
		 * Radius of the circle. 
		 * @default 40	
		 * */
		private var _radius:Number;
		/**
		 * Fill color. 
		 * @default 0x000000	
		 * */
		private var _color:uint;
		/**
		 * Constructor.
		 * @param radius See _radius
		 * @param color See _color
		 * */
		public function Circle(radius:Number=40, color:uint=0x000000) 
		{
			_radius = radius;
			_color = color;
			
			init();
			
		}
		/**
		 * Initialize the class
		 * */
		public function init():void 
		{
			draw();
		}
		/**
		 * Draw class graphics
		 * */
		public function draw():void 
		{
			graphics.clear();
			graphics.beginFill(_color,alpha);
			graphics.drawCircle(0, 0, _radius);
			graphics.endFill();
		}
	}
}
Categories
Articles

Apollo is Now Air: Adobe Integrated Runtime

Adobe has announced a beta for Apollo. With it is a name change with a trademark. The new name is AIR standing for Adobe Integrated Runtime. As well in beta is Flex 3.

Adobe describes AIR as follows:

“AIR is a cross-operating system runtime that allows developers to use their existing web development skills to build and deploy rich Internet applications to the desktop. “

You can get the information and downloads at Adobe labs.

Categories
Articles

Actionscript 3 Language Features

Actionscript 2 (AS 2) is great! Actionscript 3 (As 3) is even better. Some of the benefits you might find pleasing include:

Runtime exception reporting

This allows the developer to see runtime failures in the code. Actionscript 2 fails silently when running to protect the user from seeing developer intended error messages.

EMCAScript for XML (E4X)

This basically means XML handling is built into the language. You can avoid parsing XML into object trees as it is automatic.

Regular Expressions

At last fast manipulation and processing of string. No more loops to trim spaces for example.

New Primitive Types

Number is the data type in AS 2.0. With AS 3.0 you have int for example that will take advantage of faster CPU math processing features.

Decomposed Display API

The display API is not soley dependent on the bulging MovieClip class. A lighter Sprite class is available. As well there is a Shape class to remove all that vector drawing code. So for basic vector shape UI items you can use the Sprite and Shape class and drop the overhead of the MovieClip class.

Event Handling is part of the Language

In AS 2.0 we needed to use additional code to register event listener. This was found deep in the Component documentation as the EventDispatcher and Delegate classes. In AS you had to build the equivalent of these for your projects and use the Function class methods for the call backs as one technique.