Categories
Articles

Box2D 2.1 Flash Hello World Falling Boxes

I decided it was time to try out Box2DFlash, a free 2D physics engine for Flash that works in both Flash and Flex Builder 4.

I found most examples were for version 2.02 and earlier and there is now a version 2.1a (alpha) which it appears everyone is treating as a release. I downloaded the 2.1a version and immediately was struggling to find good starting examples since the developer documentation is not ready for 2.1a save scant update notes.

I started out with a video tutorial from Todd Kerpelman who did a great job for anyone starting cold turkey. His examples are for Box2D version 2.0 and he has a note that he will update for 2.1. I also converted his Puggle version of Peggle Nights.

Todd may hold out revising videos as I read forum rumors that more major code revisions are possible with Box2D and judging from this update, there is no tolerance for maintaining backwards compatibility other than use the older version. Todd’s videos are longish and would be served better if he added code to copy for each video. However his explanations of Bxo2d in the videos are extremely helpful.

I found by taking Todd’s work and a Box2d 2.1a example by Allan Bishop, I was able to revise Todd’s example in 2.1a. Allan’s example is more basic than is Todd’s example. I also would like to point out Allan has several more 2.1a version examples that are intriguing that I intend to explore.

You can build this with the free Flex SDK by using the code in the src folder and be sure to include a path to the Box2DFlash 2.1a library. For Flash CS3 and later versions, you need to create a Flash Document in the src folder and set the document class to HelloWorldFallingBoxes01 and then add a library path to the Box2DFlash 2.1a code or SWC if you created one. For your convenience the Flash CS4 example download is included.

You can download Box2dFlash to work with the source, get the API documentation and more examples. I included a SWC library for version 2.1a in the example downloads so you will know they work despite what happens at Box2dFlash.org.

This article shows the code for the Flex project.

Application Class – HelloWorldFallingBoxes01
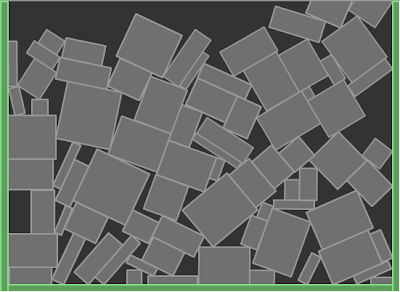
All the code is contained in this class except for the Box2d library. The applicationCompleteHandler creates the Box2D world. The world contains a floor and left and right walls. It also will contain a bunch of falling rectangles that I am calling falling boxes. It sets a debug feature so we can visualize the physic data computed and starts an ENTER_FRAME event to make updates.

All the measurements are in meters so there is ratio PIXELS_TO_METERS constant on line 60 to handle that conversion when you want to think in pixels.

The Box2D world works with “center” registration points and so the measurements for the container, in this case the Flash movie, are provided as constants on line 44 and 48 to create the offsets.

The MAX_WORLD_BODIES constant on line 68 is used as an upper limit in adding the falling boxes. The walls, floor and falling boxes are referred to as bodies in Box2D. The MAX_WORLD_BODIES constant along with the NEXT_BOX_IN_INTERVAL constant on line 56 will control the addition of falling boxes.

<?xml version="1.0" encoding="utf-8"?>
<!--
/**
* Demonstration of Box2D 2.01a dropping boxes into container.
* */
--><s:Application 
   		xmlns:fx="http://ns.adobe.com/mxml/2009" 
		xmlns:s="library://ns.adobe.com/flex/spark" 
		xmlns:mx="library://ns.adobe.com/flex/mx" 
		applicationComplete="applicationCompleteHandler(event)"
		width = "550"
		height = "400"
		>
	<fx:Declarations>
		<!-- Place non-visual elements (e.g., services, value objects) here -->
	</fx:Declarations>
	<fx:Script>
		<![CDATA[
			import Box2D.Collision.Shapes.b2PolygonShape;
			import Box2D.Collision.b2AABB;
			import Box2D.Common.Math.b2Vec2;
			import Box2D.Dynamics.b2Body;
			import Box2D.Dynamics.b2BodyDef;
			import Box2D.Dynamics.b2DebugDraw;
			import Box2D.Dynamics.b2FixtureDef;
			import Box2D.Dynamics.b2World;
			import mx.events.FlexEvent;
			/**
			 * Properties for background
			 * @see background_bc
			 */
			private static const backgroundColor:Number = 0x333333;
			/**
			 * The Box2D world
			 */
			private var _world:b2World;
			/**
			 * Frames per second. 
			 */
			private const FPS:uint = 30;
			/**
			 * Movie width 
			 */
			private const SWF_WIDTH:int = 550;
			/**
			 * Movie height
			 */
			private const SWF_HEIGHT:int = 400;
			/**
			 * Wall thickness
			 */
			private const WALL_THICKNESS:int = 5;
			/**
			 * Interval, in frames, between adding boxes to fall.
			 */
			private const NEXT_BOX_IN_INTERVAL:int = 5;
			/**
			 * Ratio of pixels to meters. 30 is a defacto standard.
			 */
			private static const PIXELS_TO_METER:Number = 40;
			/**
			 * Number of frames until next box is added.
			 * */
			private var _nextBoxIn:int = 0;
			/**
			 * Maximum bodies including boxes, floor and walls.
			 * */
			private const MAX_WORLD_BODIES:int = 80;
			/**
			 * Handler for applicationComplete event. Setup world and begin animation.
			 * */
			protected function applicationCompleteHandler(event:FlexEvent):void
			{
				trace("applicationCompleteHandler(...)");
				// Setup the world
				setupWorld();
				// Create walls and floor
				createWallsAndFloor();
				// Visualize with debugDraw
				setupDebugDraw();
				// Listen to ENTER_FRAME event.
				addEventListener(Event.ENTER_FRAME, enterFrameHandler);
			}

[ad name=”Google Adsense”]
This section updates the world. The world updates with the Step method shown on line 89.

There is also logic on line 111 – 118 to add falling boxes at the top of the animation using randomized sizes and positions we will see in the addBox() method later. Here the coding is simply trying to time the frame intervals when a new falling box is added and to deal with some of the new requirements in Box2D 2.1a for updating the world.

			/**
			 * Handler for ENTER_FRAME event.
			 * */
			private function enterFrameHandler(e:Event):void
			{
				updateWorld();
			}
			/**
			 * Update world. Add additional boxes.
			 * */
			private function updateWorld():void
			{
				//trace("Main.updateWorld(...)");
				// Box2D manual recommends 1/60 seconds 
				// set it to the SWF framerate
				var timeStep:Number = 1 / FPS;
				// velocityIterations and positionIteration with 10 being the 
				// suggested count for each. 
				// Fewer iterations boosts performances 
				// but comes at the cost of accuracy.
				var velocityIterations:int = 6;
				var positionIterations:int = 2;
				// Update the world
				_world.Step(timeStep, velocityIterations, positionIterations);
				// As of version 2.1 we must clear the forces.
				_world.ClearForces();
				// Reduce frame delay for adding box
				_nextBoxIn--;
				// Time to add another box
				if ( _nextBoxIn <= 0 && _world.GetBodyCount() < MAX_WORLD_BODIES)
				{
					addBox();
					// Reset the box frame delay
					_nextBoxIn = NEXT_BOX_IN_INTERVAL;
				}
				// Draw the debug data.
				_world.DrawDebugData();
			}

This function creates the world. The 2.1a b2Word constructor no longer requires a universe size. The constructor arguments are now down to two.

			/**
			 * Setup the world.
			 * */
			private function setupWorld():void
			{
				trace("Main.setupWorld()");
				// Define gravity. Y = 9.8 meters per second.
				var gravity:b2Vec2 = new b2Vec2( 0, 9.8);
				// Ignore sleeping babies
				var ignoreSleeping:Boolean = true;
				_world = new b2World( gravity, ignoreSleeping );
			}

[ad name=”Google Adsense”]
In the createFloor() method, the groundBody b2Body is created and represent the floor. Version 2.1a uses b2FixtureDef. You create fixture definition for material properties. You provide the shape to the fixture, and call b2Body.CreateFixture.

			/**
			 * Create the walls and floor.
			 * */
			private function createWallsAndFloor():void
			{
				trace("Main.createWallsAndFloor()");
				createFloor();
				createWalls();
			}
			/**
			 * Create the floor.
			 * */
			private function createFloor():void
			{
				trace("Main.createFloor()");
				// Define the ground body.
				var groundBodyDef:b2BodyDef= new b2BodyDef();
				// Set position
				groundBodyDef.position.Set(	(SWF_WIDTH / 2) / PIXELS_TO_METER, 
					(SWF_HEIGHT - WALL_THICKNESS) / PIXELS_TO_METER );
				// Factory design pattern to create the body.
				var groundBody:b2Body = _world.CreateBody(groundBodyDef);
				// Create our shape.
				var groundBox:b2PolygonShape = new b2PolygonShape();
				// Set the box dimensions. 
				// Width 1/2 of MovieClip less offset for left and right wall thicknesses 
				// Height = wall thickness.
				groundBox.SetAsBox( 
					( (SWF_WIDTH ) / 2) / PIXELS_TO_METER - ( WALL_THICKNESS * 2) / PIXELS_TO_METER, 
					WALL_THICKNESS / PIXELS_TO_METER);
				// Create a fixture definition for body
				var groundFixtureDef:b2FixtureDef = new b2FixtureDef();
				// Set shape
				groundFixtureDef.shape = groundBox;
				// Set density
				groundFixtureDef.density = 1;
				// Set friction 100%
				groundFixtureDef.friction = 1;
				// Create fixture
				groundBody.CreateFixture(groundFixtureDef);
			}

Creating the walls mirrors the code for creating the floor. The b2BodyDef is reused for both wall b2Body bodies because the word CreateBody method copies and does not provide a pointer to a b2BodyDef. There are computations for position and box sizes stand next to the floor.

			/**
			 * Create the walls.
			 * */
			private function createWalls():void
			{
				trace("Main.createWalls() - left wall");
				// Define the wall body.
				var wallBodyDef:b2BodyDef= new b2BodyDef();
				
				wallBodyDef.position.Set( WALL_THICKNESS / PIXELS_TO_METER, ( SWF_WIDTH - WALL_THICKNESS ) / PIXELS_TO_METER );
				// Factory design pattern to create the body.
				var leftWallBody:b2Body = _world.CreateBody(wallBodyDef);
				// Create shape.
				var leftWallBox:b2PolygonShape = new b2PolygonShape();
				// Set as a box.
				leftWallBox.SetAsBox(WALL_THICKNESS / PIXELS_TO_METER, ( SWF_WIDTH - WALL_THICKNESS )  / PIXELS_TO_METER);
				// Create a fixture definition for left and right wall bodies
				var wallFixtureDef:b2FixtureDef = new b2FixtureDef();
				// Set shape 
				wallFixtureDef.shape = leftWallBox;
				// Set density
				wallFixtureDef.density = 0;
				// Set friction 50%
				wallFixtureDef.friction = 0.5;
				// Set restitution to 30%
				wallFixtureDef.restitution = 0.3;
				// Create fixture
				leftWallBody.CreateFixture(wallFixtureDef);
				trace("Main.createWalls() - right wall");
				wallBodyDef.position.Set(
					545 / PIXELS_TO_METER, 
					( SWF_WIDTH - WALL_THICKNESS ) / PIXELS_TO_METER );
				// Factory design pattern to create the body.
				var rightWallBody:b2Body = _world.CreateBody(wallBodyDef);
				// Create our shape.
				var rightWallBox:b2PolygonShape = new b2PolygonShape();
				// Redefine shape
				wallFixtureDef.shape = rightWallBox;
				// Set as a box.
				rightWallBox.SetAsBox(
					WALL_THICKNESS / PIXELS_TO_METER, 
					( SWF_WIDTH - WALL_THICKNESS ) / PIXELS_TO_METER);
				// Create fixture
				rightWallBody.CreateFixture(wallFixtureDef);
			}

[ad name=”Google Adsense”]
The addBox method creates a new falling box. It follows the same code steps as the floor. Differences include that the boxBodyDef type is dynamic to allow for movement, the use of SetAsOrientedBox on line 238 instead of SetAsBox used for floor and walls. The SetAsOrientedBox allows for rotation. To get to the angle argument you need to provide a b2Vec2 center point.

Randomizing the box sizes and starting positions is included for some variety.

			/**
			 * Add a falling box.
			 * */
			private function addBox():void
			{
				trace("Main.addBox()");
				var boxBodyDef:b2BodyDef= new b2BodyDef();
				boxBodyDef.position.Set( 
					randomInt(15, 530) / PIXELS_TO_METER, 
					randomInt(-100, -50) / PIXELS_TO_METER );
				// Crates move.
				boxBodyDef.type = b2Body.b2_dynamicBody;
				// Here we can see the factory design pattern being used to create the body.
				var boxBody:b2Body = _world.CreateBody(boxBodyDef);
				// Create our shape.
				var boxShape:b2PolygonShape = new b2PolygonShape();
				// Randomize the crate size and convert to meters.
				var hx:Number = randomInt(5, 40) / PIXELS_TO_METER;
				var hy:Number = randomInt(5, 40) / PIXELS_TO_METER;
				// Set as an oriented box
				boxShape.SetAsOrientedBox(
					hx, 
					hy,
					new b2Vec2(hx / 2, hy / 2), 		     // Center
					(Math.random() * 360) * (Math.PI / 180)	// Rotation random degrees converted to radians
				);	
				
				// Create a fixture definition for crate
				var boxFixtureDef:b2FixtureDef = new b2FixtureDef();
				// Set shape
				boxFixtureDef.shape = boxShape;
				// Set density
				boxFixtureDef.density = 0.7;
				// Set friction 80%
				boxFixtureDef.friction = 0.8;
				// Set restitution to 30%
				boxFixtureDef.restitution = 0.3;
				// Create fixture
				boxBody.CreateFixture(boxFixtureDef);
			}

Here we have some utilities. First is the b2DebugDraw to make the physics data visual and a method to compute a random number from a range.

The b2DebugDraw is added to the SpriteVisualElement box2DContainer on line 265.

			/**
			 * Setup the b2DebugDraw
			 * */
			private function setupDebugDraw():void
			{
				trace("Main.setupDebugDraw()");
				var spriteToDrawOn:Sprite = new Sprite();
				box2DContainer.addChild(spriteToDrawOn);
				var debugDraw:b2DebugDraw = new b2DebugDraw();
				debugDraw.SetSprite(spriteToDrawOn);
				debugDraw.SetDrawScale(PIXELS_TO_METER);
				debugDraw.SetFlags(b2DebugDraw.e_shapeBit);
				debugDraw.SetLineThickness(2.0);
				debugDraw.SetFillAlpha(0.6);
				_world.SetDebugDraw(debugDraw);
			}
			/**
			 * Return a random int from a range.
			 * @param lowVal  Start of the range.
			 * @param highVal  End of the range.
			 * @return Random int from lowVal to highVal
			 * */
			private function randomInt(lowVal:int, highVal:int):int
			{
				if ( lowVal <= highVal)
				{
					return (lowVal + Math.floor(Math.random() * ( highVal - lowVal + 1)));
				}
				else
				{
					throw (new Error("Main.randomInt(...) lowVal exceeds highVal"));
				}
			}

		]]>
	</fx:Script>

These are the Flex visual components. Simply a background using the BorderContainer and a the Flex 4 SpriteVisualElement to contain the b2DebugDraw.

	   <!--
	   Background for app 
	   --> 
	   <s:BorderContainer id = "background_bc"
						  width="{width}" height = "{height}"
						  
						  backgroundColor="{backgroundColor}">
		   
		   <!--
		   Container for the Box2D world
		   -->
		   <s:SpriteVisualElement id = "box2DContainer" />
	   </s:BorderContainer> 
</s:Application>
Categories
Articles

Parsley MVC, RemoteObject, Zend AMF and MySQL Basic Flex Example

After conquering a basic Parsley Framework Flex example I wanted to create a minimal example of using the Flex Parsley framework, Zend AMF and MySQL. The Flex implementation goal is to mold a model view controller framework using Parsley and to communicate via Flex RemoteObject to Zend AMF. Eventually I applied what I learned to revamp DefineIt.com with Parsley and Zend AMF.

There are many approached to using Parsley for MVC. The Parsley documentation is very light on the subject. These also entail including using other frameworks like Caringorm. In this example I kept it simply by just using the Parsley messaging features and creating my own controller class.

I found other examples of Parsley that go further into its features. You might look at Christophe Coenraets’ example. This is referenced from the Parsley documentation . Christophe includes an update and add feature to the application. It also contains a dynamically loaded image class. It is a bit over featured and thus over involved for a pure beginner. It is void of substantive explanation leaving you to explore the Parsley documentation to try to understand why one approach was chosen over another in code. Worse code has no comments. This should be a minimum requirement for any referenced sample code. However there are some good Flex and Parsley techniques in there that can be helpful and one to bookmark for your learning process.

Learn More About Flex 4 From Adobe

Parsley 2.3 is used and the SWCs are included in the example Flex 4 project download I have here. I did appreciate these SWCs also being included in the downloads from the Parsley download page. Lets you get to learning faster.

You can build this with the free Flex SDK by using the code in the src folder and be sure to include a path to the Parsley and Spicelib library.

When you run this application, the trace log will show you the interactions between the model, controller, view and service.

Application Class – Parsley_Configuration.mxml
This is the main MXML file. Line 15 links the Parsley_Configuration.mxml file that configures Parsley framework.

Line 16 tells Parsley to include this mxml file and thus allows us to inject the ApplicationModel data.

I put all locale language into the model to simplify the example. In the effort the ApplicationModel class for application level data only contains the locale language title for the application you can see referenced in the Label on lines 26 and 39.

Line 40 contains the Panel to display the data grid.

<?xml version="1.0" encoding="utf-8"?>
<s:Application xmlns:fx="http://ns.adobe.com/mxml/2009" 
			   xmlns:s="library://ns.adobe.com/flex/spark" 
			   xmlns:hellozend="com.alh.parsley.example.hellozend.*"
			   xmlns:parsley="http://www.spicefactory.org/parsley"
			   xmlns:mx="library://ns.adobe.com/flex/mx"
			   xmlns:sf="http://www.spicefactory.org/parsley"
			   minWidth="955" minHeight="600" 
			   xmlns:views="com.alh.parsley.example.hellozend.views.*"
			   >
	<fx:Declarations>
		<!-- 
		Parsley configuration MXML file
		-->
		<parsley:ContextBuilder config="Parsley_Configuration" />
		<sf:Configure/>
	</fx:Declarations>
	<fx:Script>
		<!&#91;CDATA&#91;
			import com.alh.parsley.example.hellozend.model.ApplicationModel;
			/**
			 * Parsley injects the ApplicationModel here.
			 * */
			&#91;Inject&#93;
			&#91;Bindable&#93;
			public var model:ApplicationModel;
			
		&#93;&#93;>
	</fx:Script>
	<!-- 
		UI
	-->
	<s:layout>
		<s:VerticalLayout gap="10" 
						  horizontalAlign="center"
						  paddingLeft="12" paddingRight="12" paddingBottom="12" paddingTop="12"
						  />
	</s:layout>
	<s:Label text="{model.lang_AppTitle}" fontSize="20"/>
	<views:AllMembersGrid/>
</s:Application>

Parsley Configuration – Parsley_Configuration.mxml
This is the file Parsley reads for configuration.

I included the RemoteObject definitions here as well. I am following Christophe Coenraets’ example on this. It makes sense to me to have this as part of the configuration file. Remember to change the YOUR_GATEWAY_URL on line 13 to reflect your link to the Zend AMF or other RemoteObject service.

You may note there is no services xml or configuration file. The channel information is in the MXML instead. You can learn more on this by reading
ZEND AMF (Action Message Format) Minimalist Example Using RemoteObject and MySQL

On lines 27 – 30 I have four Actionscript classes handling the model, view and controller. They are listed here so we can use the [Inject] metatag for Parsley.

<?xml version="1.0" encoding="utf-8"?>
<Objects 
	xmlns:fx="http://ns.adobe.com/mxml/2009"
	xmlns="http://www.spicefactory.org/parsley"
	xmlns:s="library://ns.adobe.com/flex/spark" 
	xmlns:hellozend="com.alh.parsley.example.hellozend.*" 
	xmlns:model="com.alh.parsley.example.hellozend.model.*" 
	xmlns:services="com.alh.parsley.example.hellozend.services.*" 
	xmlns:controller="com.alh.parsley.example.hellozend.controller.*">
	<fx:Declarations>
		<s:ChannelSet id = "zend_amf_channel_set">
			<s:channels>
				<s:AMFChannel uri="YOUR_GATEWAY_URL"/>
			</s:channels>
		</s:ChannelSet>
		<!-- MembershipService RemoteObject -->
		<s:RemoteObject	id="membershipService_ro" 
						destination="zend-amf" 
						source="MembershipService" 
						channelSet="{zend_amf_channel_set}"
						showBusyCursor="true" 
						>
		</s:RemoteObject>
		<!--
			Parsley defined objects slated for injection where &#91;Inject&#93; metatag appears.
		-->
		<model:ApplicationModel/>
		<model:MembershipModel/>
		<services:MembershipServiceRemote/>
		<controller:MembershipController/>
</fx:Declarations>
</Objects>

Application Model Class – ApplicationModel.as
This class defines application level data and we only have a language variable to simplify the example for localization.

package com.alh.parsley.example.hellozend.model
{
	/**
	 * Model for application level data
	 * */
	public class ApplicationModel
	{
		/**
		 * UI language in model to simplify example
		 * 
		 * Language for Application
		 * */
		[Bindable]
		public var lang_AppTitle:String = "Minimalist Parsley Zend AMF Example Using RemoteObject";;
	}
}

Membership Model Class – MembershipModel.as
This class defines membership data. Again you can see the variables to simplify the example for localization.

The key data here is the ArrayCollection on line 13 for the member data.

package com.alh.parsley.example.hellozend.model
{
	import mx.collections.ArrayCollection;
	/**
	 * Model for membership
	 * */
	public class MembershipModel
	{
		/**
		 * List of members;
		 * */
		[Bindable]
		public var members:ArrayCollection;
		/**
		 * UI language in model to simplify example
		 * 
		 * Language for AllMembersGrid view
		 * */
		[Bindable]
		public var lang_AllMembersGridTitle:String = "Membership Listing";
		[Bindable]
		public var lang_MemberKey:String = "Member Key";
		[Bindable]
		public var lang_FirstName:String = "First Name";
		[Bindable]
		public var lang_LastName:String = "Last Name";
		[Bindable]
		public var lang_EmailAddress:String = "Email Address";
		[Bindable]
		public var lang_GetMembers:String = "Get Members";
		[Bindable]
		public var lang_ClearMembers:String = "Clear";
	}
}

IMembershipService Class – IMembershipService.as
Interface to define methods for membership service classes. We only have one in the example: MembershipServiceRemote.

package com.alh.parsley.example.hellozend.services
{
	import mx.rpc.AsyncToken;
	/**
	 * Interface to define MembershipService classes
	 * */
	public interface IMembershipService
	{
		function getAllMembers():AsyncToken;
	}
}

[ad name=”Google Adsense”]
MembershipServiceRemote Class – MembershipServiceRemote.as
This class deals with the server service. Only the controller communicates with this class by calling the get getAllMembers() method.

Line 46 is the interface back to the MVC or to the application however you want to look at it. Here a Parsley message is created for the MembershipGetAllMembersEvent.GET_ALL_MEMBERS event that you will see the MembershipController class handles.

You could have the controller pass its own result and fault handlers to the getAllMembers() method and eliminate the MembershipGetAllMembersEvent.GET_ALL_MEMBERS message.

As a further simplification, the faults are all routed to the catchAllServiceErrorHandler(…) method where a view component is inserted breaking a clean MVC. You could create a message for the fault handler to dispatch and have the controller to handle this.

package com.alh.parsley.example.hellozend.services
{
	import com.alh.parsley.example.hellozend.events.MembershipGetAllMembersEvent;
	import com.alh.parsley.example.hellozend.services.IMembershipService;
	import mx.controls.Alert;
	import mx.rpc.AsyncResponder;
	import mx.rpc.AsyncToken;
	import mx.rpc.events.FaultEvent;
	import mx.rpc.events.ResultEvent;
	import mx.rpc.remoting.RemoteObject;
	/**
	 * IMembershipService class to handle RemoteObject data communications with server.
	 * */
	public class MembershipServiceRemote implements IMembershipService
	{
		/**
		 * Specify the remote service for Parsley to inject.
		 * */
		[Inject(id="membershipService_ro")]
		public var service:RemoteObject;		
		/**
		 * Parsley creates an event dispatcher function
		 * */
		[MessageDispatcher]
		public var dispatcher:Function;

		/**
		 * Get all members from RemoteObject service.
		 * */
		public function getAllMembers():AsyncToken
		{
			trace ("SERVICE: MembershipServiceRemote.getAllMembers()");
			var token:AsyncToken = service.getAllMembers();
			token.addResponder(
				new AsyncResponder(getAllMembersResultsHandler, catchAllServiceErrorHandler));
			return token;
		}
		/**
		 * ResultEvent handler for service.getAllMembers()
		 * */
		protected function getAllMembersResultsHandler(event:ResultEvent, result:Object):void
		{
			trace ("SERVICE: MembershipServiceRemote.getAllMembersResultsHandler()");
			//event.result == Array.
			var members:Array = event.result as Array;
			dispatcher( new MembershipGetAllMembersEvent(MembershipGetAllMembersEvent.GET_ALL_MEMBERS, members));
		}
		/**
		 * Default handler for MembershipServiceRemote calls
		 * */
		protected function catchAllServiceErrorHandler(e:FaultEvent):void
		{
			Alert.show(e.toString());
		}
	}
}

MembershipController Class – MembershipController.as
This controller ties in the MembershipModel class and the MembershipServiceRemote class on line 18 and 24 respectively.

The controller listens for the MembershipEvent events on line 29. The Parsley [MessageHandler] tag makes this happen. These events are dispatched in the view.

On line 46 the controller listens for the MembershipGetAllMembersEvent dispatched from the MembershipServiceRemote class.

package com.alh.parsley.example.hellozend.controller
{
	import com.alh.parsley.example.hellozend.events.MembershipEvent;
	import com.alh.parsley.example.hellozend.events.MembershipGetAllMembersEvent;
	import com.alh.parsley.example.hellozend.model.MembershipModel;
	import com.alh.parsley.example.hellozend.services.MembershipServiceRemote;
	import mx.collections.ArrayCollection;
	/**
	 * Controller for Membership model and views.
	 * */
	public class MembershipController
	{
		/**
		 * Parsley injects the MembershipModel here.
		 * */
		[Inject]
		[Bindable]
		public var model:MembershipModel;
		/**
		 * Parsley injects the MembershipService here.
		 * */
		[Inject]
		[Bindable]
		public var service:MembershipServiceRemote;
		/**
		 * Parsley identified handler for MembershipEvent
		 * */
		[MessageHandler]
		public function membershipEventHandler( message:MembershipEvent ):void
		{
			trace ("CONTROLLER: MembershipController.membershipEventHandler(...) - message.type:" + message.type);
			switch (message.type )
			{
				case MembershipEvent.GET_ALL_MEMBERS:
					service.getAllMembers();
					break
				case MembershipEvent.CLEAR_ALL_MEMBERS:
					model.members.removeAll();
					break
			}
		}
		/**
		 * Parsley identified handler for MembershipGetAllMembersEvent
		 * */
		[MessageHandler]
		public function membershipGetAllMembersEventHandler( message:MembershipGetAllMembersEvent ):void
		{
			trace ("CONTROLLER: MembershipController.membershipGetAllMembersEventHandler(...)");
			model.members = new ArrayCollection(message.members);
		}
	}
}

[ad name=”Google Adsense”]
Membership Grid View – AllMembersGrid.mxml
This is a Panel containing a DataGrid and Buttons for the user interaction.

Lines 27 and 28 sets up the class to dispatch Parsley messages. Line 35 dispatches the MembershipEvent.CLEAR_ALL_MEMBERS event and line 43 dispatches the MembershipEvent.GET_ALL_MEMBERS event. The MembershipController class handles these messages to update the model and communicate with the service as needed.

This view is tied to the MembershipModel class via Parsley on line 23. The DataGrid binds to the model members variable.

Other bindings for the language localizations appear as well.

<?xml version="1.0" encoding="utf-8"?>
<s:Panel xmlns:fx="http://ns.adobe.com/mxml/2009" 
		 xmlns:s="library://ns.adobe.com/flex/spark" 
		 xmlns:mx="library://ns.adobe.com/flex/mx"
		 xmlns:sf="http://www.spicefactory.org/parsley"
		 title = "{model.lang_AllMembersGridTitle}"
		>
	<fx:Declarations>
		<!-- 
		Parsely will manage this component.
		-->
		<sf:Configure/>
	</fx:Declarations>
	<fx:Script>
		<!&#91;CDATA&#91;
			import com.alh.parsley.example.hellozend.events.MembershipEvent;
			import com.alh.parsley.example.hellozend.model.MembershipModel;
			/**
			 * Parsley injects the MembershipModel here.
			 * */
			&#91;Inject&#93;
			&#91;Bindable&#93;
			public var model:MembershipModel;
			/**
			 * Parsley creates an event dispatcher function
			 * */
			&#91;MessageDispatcher&#93;
			public var dispatcher:Function;
			/**
			 * Dispatch MembershipEvent.CLEAR_ALL_MEMBERS event
			 * */
			protected function clearDataGrid():void
			{
				trace("VIEW: " + className + ".clearDataGrid()");
				dispatcher( new MembershipEvent( MembershipEvent.CLEAR_ALL_MEMBERS ));
			}
			/**
			 * Dispatch MembershipEvent.GET_ALL_MEMBERS event
			 * */
			protected function getAllMembers():void
			{
				trace("VIEW: " + className + ".getAllMembers()");
				dispatcher( new MembershipEvent( MembershipEvent.GET_ALL_MEMBERS ));
			}
		&#93;&#93;>
	</fx:Script>
	<s:layout>
		<s:VerticalLayout gap="10" 
						  paddingLeft="12" paddingRight="12" paddingBottom="12" paddingTop="12"
						  />
	</s:layout>
	<mx:DataGrid  id="member_dg"  height="100" dataProvider="{model.members}">
		<mx:columns>
			<mx:DataGridColumn headerText="{model.lang_MemberKey}" dataField="memberKey"/>
			<mx:DataGridColumn headerText="{model.lang_FirstName}" dataField="firstName"/>
			<mx:DataGridColumn headerText="{model.lang_LastName}" dataField="lastName"/>
			<mx:DataGridColumn headerText="{model.lang_EmailAddress}" dataField="emailAddress" width="200"/>
		</mx:columns>
	</mx:DataGrid>
	<s:HGroup horizontalAlign="center" width="100%">
		<s:Button label="{model.lang_GetMembers}" click="{getAllMembers();}"/>
		<s:Button label="{model.lang_ClearMembers}" click="{clearDataGrid();}"/>
	</s:HGroup>

</s:Panel>

MembershipEvent.as
This is a standard Event class to inform the MVC framework all membership data is required or needs to be cleared. These free the view from being coupled with the service or updating the model.

package com.alh.parsley.example.hellozend.events
{
	import flash.events.Event;
	/**
	 * Events related to membership.
	 * */
	public class MembershipEvent extends Event
	{
		/**
		 * Request to retrieve all membership data
		 * */
		public static const GET_ALL_MEMBERS:String = "com.alh.parsley.example.hellozend.events.MembershipEvent.getAllMembers";
		/**
		 * Request to clear all membership data
		 * */
		public static const CLEAR_ALL_MEMBERS:String = "com.alh.parsley.example.hellozend.events.MembershipEvent.clearAllMembers";

		public function MembershipEvent(type:String, bubbles:Boolean=false, cancelable:Boolean=false)
		{
			super(type, bubbles, cancelable);
		}
	}
}

MembershipGetAllMembersEvent.as
This event message signals success retrieval of members data from the service.

package com.alh.parsley.example.hellozend.events
{
	import flash.events.Event;
	/**
	 * Event defining service receipt of membership data.
	 * */
	public class MembershipGetAllMembersEvent extends Event
	{
		public static const GET_ALL_MEMBERS:String = "com.alh.parsley.example.hellozend.events.MembershipGetAllMembersEvent.getAllMembers";
		/**
		 * Membership data
		 * */
		public var members:Array;
		
		public function MembershipGetAllMembersEvent(type:String, members:Array, bubbles:Boolean=false, cancelable:Boolean=false)
		{
			super(type, bubbles, cancelable);
			this.members = members;
		}
	}
}

Zend AMF Gateway PHP Script
This is the gateway program for the Zend Amf. This is the file that you reference on line 13 of the Parsley_Configuration.mxml file. In this example it was named index.php.

<?php
/**
*  Sample Zend AMF gateway
*  @return Endpoint &#91;Zend Amf Endpoint&#93;
* */

// Configurable values
// Debugging values
$debug = true;                             // Debugging status
if ($debug)
{
	// Report all errors, warnings, interoperability and compatibility
	error_reporting(E_ALL|E_STRICT);
	// Show errors with output
	ini_set("display_errors", "on");
}
else
{
	error_reporting(0);
	ini_set("display_errors", "off");
}
// Add the Zend AMF installation folder to the include path.
// In this example the frameworks folder is a sibling folder to
// this application folder. The frameworks folder contains the Zend
// folder that is extracted from http://framework.zend.com/download/amf
ini_set("include_path", ini_get("include_path") . PATH_SEPARATOR . "..\\frameworks" );

// Instantiate the Zend Amf server
require_once 'Zend/Amf/Server.php';
$server = new Zend_Amf_Server();

// Register your service classes
require_once 'MembershipService.php';
$server->setClass("MembershipService");

//Map ActionScript value objects to the PHP value objects.
$server->setClassMap("MemberData", "MemberData");

// Return the handle.
echo ($server->handle());

?>

[ad name=”Google Adsense”]
MembershipService Class
This is the service class that contains remote methods. Generally a the database and business logic is delegated to another API you write. In this case they are all together for simplicity.

<?php
/**
*	Service class exposing the methods to deal with membership.
*   This example includes business logic for simplicity of study.
*/
require_once 'MemberData.php';
class MembershipService
{
	public function MembershipService()
	{
		// Connect to MySql database.
		// Supply your own MySQL access values.
		// These are defaults when running on your own private computer.
		mysql_connect("localhost", "root", "");
		// Select the database.
		// Supply your own database name.
		mysql_select_db("test");
	}
	/**
	*	Get all members and all fields.
	*/
	public function getAllMembers()
	{
		// Array of MemberData objects.
		$members = array();
		// Selecting all fields and all records from table.
		// Supply your own table name and optionally your own SQL statement.
		$result = mysql_query("SELECT * FROM zend_amf_members");
		// Assuming mysql_query success. Slog through records.
		while ($row = mysql_fetch_assoc($result))
		{
			// Create a MemberData value object and populate.
			$member = new MemberData();
			$member->memberKey = $row["memberKey"];
			$member->firstName = $row["firstName"];
			$member->lastName = $row["lastName"];
			$member->emailAddress = $row["emailAddress"];
			array_push($members, $member);
		}
		// Return the members array to client.
		return $members;
	}
}
?>

MemberData Value Object Class for PHP
This is the value object on the server side to define the field names for a member object. This is mapped to the client side on line 37 of the Zend AMF gateway script.

<?php
/**
 * Value object defining the member data
 * */
class MemberData
{
  public $memberKey;	// uint
  public $firstName;	// String
  public $lastName;		// String
  public $emailAddress;	// String
}
?>

SQL To Create Testing Table
The PHP script uses zend_amf_members for the table and this is the SQL to create that table. In this example the database was called test.

SET SQL_MODE="NO_AUTO_VALUE_ON_ZERO";

--
-- Database: `test`
--

-- --------------------------------------------------------

--
-- Table structure for table `zend_amf_members`
--

CREATE TABLE IF NOT EXISTS `zend_amf_members` (
  `memberKey` int(10) unsigned NOT NULL auto_increment,
  `firstName` varchar(30) NOT NULL default '',
  `lastName` varchar(30) NOT NULL default '',
  `emailAddress` varchar(50) NOT NULL default '',
  PRIMARY KEY  (`memberKey`)
) ENGINE=InnoDB DEFAULT CHARSET=latin1 COMMENT='Zend Amf Examples' AUTO_INCREMENT=7 ;

--
-- Dumping data for table `zend_amf_members`
--

INSERT INTO `zend_amf_members` (`memberKey`, `firstName`, `lastName`, `emailAddress`) VALUES
(1, 'Donald', 'Duck', 'quacker@pond.com'),
(2, 'Daffy', 'Duck', 'daft_2x@farm.org'),
(3, 'Elmer', 'Fudd', 'elmer.fudd@hunters.net'),
(4, 'Bugs', 'Bunny', 'whats_up_doc@underground.org'),
(5, 'Yosemite', 'Sam', 'varmint_chaser@forest.com'),
(6, 'Wile', 'Coyote', 'ceo@acme.com');

Categories
Articles

Basic Parsley Framework Flex Example Explained

I decided to break down the Parsley framework for Flex and Flash projects. This is my own minimalist example. I am not going to extol virtues or evils with using Parsley and assume you just want to get a basic example that explains the pieces.

This does not tie into web server but I added a basic example that uses Zend AMF, PHP, MySQL, Flex Remote Objects.

Also if you want to look at a very basic Flash Actionscript example see Parsley Hello World For A Flash Builder Actionscript Project.

It was hard to find a good minimalist starter example that takes the time to explain the details. The Sitronnier (blogginglemon) examples had other technologies or unneeded features cluttering the code and was devoid of any substantive elaboration. The Sitronnier examples are linked out of the Parsley documentation and are worthwhile bookmarking to review once you get your feet wet.

The best I have found is Arturo Alvarado’s posts at Art’s Flex Notes. The 4 part series includes a comparative framework analysis and why he prefers Parsley. Art breaks his Parsley example down with one more level of granularity than I do here. I hope Art continues to add to his series as he communicates very clearly.

The “Hello World” getting started example in the Parsley documentation is also a great starting point except there is no explanation outside of comments to soothe your into it. But the comments are great and I added my own coding style to this example and simplified further along with a few changes to better illustrate some items.

My example focuses on the main structure and foundational features in Parsley. There is much more available in Parsley to learn and explore.

Learn More About Flex 4 From Adobe

Parsley 2.3 is used and the SWCs are included in the example Flex 4 project download I have here. I did appreciate these SWCs also being included in the downloads from the Parsley download page. Lets you get to learning faster.

You can build this with the free Flex SDK by using the code in the src folder and be sure to include a path to the Parsley and Spicelib library.

Application Class – ParsleyFramework_HelloWorld.mxml
This is the main MXML file. Line 12 links another MXML file, ParselyFramework_HelloWorld_Configuration, that configures Parsley framework. Other than that, this appears to be a basic Flex MXML file with two UI components.

<?xml version="1.0" encoding="utf-8"?>
<s:Application xmlns:fx="http://ns.adobe.com/mxml/2009" 
			   xmlns:s="library://ns.adobe.com/flex/spark" 
			   xmlns:hw="com.alh.parsely.example.helloworld.*"
			   xmlns:parsley="http://www.spicefactory.org/parsley"
			   xmlns:mx="library://ns.adobe.com/flex/mx" 
			   minWidth="955" minHeight="600">
	<fx:Declarations>
		<!-- 
		Parsley configuration MXML file
		-->
		<parsley:ContextBuilder config="ParsleyFramework_HelloWorld_Configuration" />
	</fx:Declarations>
	<!-- 
		UI
	-->
	<s:VGroup width="100%" height="98%"  gap="10" horizontalAlign="center">
		<hw:InputPanel width="50%" height="100%" title="Input Panel"/>
		<hw:OutputPanel width="50%" height="100%"  title="Output Panel"/>
	</s:VGroup>

</s:Application>

Parsley Configuration – ParsleyFramework_HelloWorld_Configuration.mxml
This is a Parsley configuration file. Parsley reads this file.

There are three model files in this application. One, InputModel, is for the InputPanel, one, OutputModel, for the OutputPanel and a shared model, SharedModel.

This configuration file identifies these for the Parsley framework to use.

<?xml version="1.0" encoding="utf-8"?>
<Objects 
	xmlns:fx="http://ns.adobe.com/mxml/2009"
	xmlns="http://www.spicefactory.org/parsley"
	xmlns:hw="com.alh.parsley.example.helloworld.*">
	<fx:Declarations>
		<!--
			Parsley defined objects slated for injection where [Inject] metatag appears.
		-->
		<hw:SharedModel/>
		<hw:InputModel/>
		<hw:OutputModel/>
	</fx:Declarations>
</Objects>

[ad name=”Google Adsense”]
InputPanel.mxml
This is a UI component for our MVC framework. It lets a user enter text and press a button to submit. It validates that the entry contains input.

Line 13 registers this UI component with Parsley.

Lines 23-25 inject or we could say include the contents of InputModel, the data for a MVC framework.

InputPanel is self contained in its messaging but broadcasts a message via the InputModel model sendInputMessage (…) method on line 44.

Line 35 was my way of demonstrating the Parsley event to notify that a model has loaded properly. I do not see it necessary here other from a demonstration point of view. More about this when we review InputModel.

I decided to use the model to store the localization language rather than Flex resource manager for simplicity. I do not like localization language embedded in UI code so this is fine for demonstration and also small apps where manual language change has a low chance of being needed. You see the language references on lines 64 and 70.

Line 80 demonstrates the use of a nested model. The InputModel contains the SharedModel. More on that when we get to look at InputModel.

<?xml version="1.0" encoding="utf-8"?>
<s:Panel 
	xmlns:fx="http://ns.adobe.com/mxml/2009" 
	xmlns:s="library://ns.adobe.com/flex/spark"
	xmlns:sf="http://www.spicefactory.org/parsley"
	enabled="false"
	updateComplete="updateCompleteHandler(event)"
	>
	<fx:Declarations>
		<!-- 
		Parsley will manage this component.
		-->
		<sf:Configure/>
	</fx:Declarations>
	<fx:Script>
		<![CDATA[
			import mx.controls.Alert;
			import mx.events.FlexEvent;
			/** 
			 * Inject the model.
			 * The [Inject] metadata searches context for an object of matching type.
			 */
			[Inject]
			[Bindable]
			public var model:InputModel;
			/** 
			 * Handler from the UpdateComplete event
			 */
			protected function updateCompleteHandler(event:FlexEvent):void
			{
				// Demonstrates ways to test injection occured. See InputModel.
				// Model is injected: model != null
				// and
				// model init() was completed: model.initialized
				enabled =  model != null && model.initialized;
			}
			/** 
			 * Send a message to Parsley framework.
			 */
			private function sendMessage():void
			{
				if (input_ti.text.length > 0)
				{
					model.sendInputMessage(input_ti.text);
					input_ti.text = "";
				}
				else
				{
					Alert.show("Please enter a message.", "Attention");
				}
			}
		]]>
	</fx:Script>
	<!--
		UI
	-->
	<s:layout>
		<s:VerticalLayout gap="10" paddingLeft="12" paddingRight="12" paddingBottom="12" paddingTop="12"/>
	</s:layout>
	<s:HGroup verticalAlign="middle">
		<!--
			Reference to model
		-->
		<s:Label text="{model.lang_typeMessageHere + ' '}"/>
		<s:TextInput id="input_ti"/>
		<!--
			Reference to model
		-->
		<s:Button id ="send_button"
			label="{model.lang_send}" 
			click="sendMessage()"/>
	</s:HGroup>
	<!--
		Filler
	-->
	<s:Rect height="100%"/>
	<!--
		Use of a nested dependency. The sharedModel is a SharedModel object.
	-->
	<s:Label text="{model.sharedModel.lang_numberOfMessagesSent + ' ' +  model.sharedModel.numberOfMessagesSent }"/>
</s:Panel>

InputModel.mxml
This is data and messaging. By its name it says the model is more localized to the “input” UI component, but that is not a restriction.

Remember that the Parsley configuration mxml file, discussed above, registered this file.

Lines 20 and 21 show how to create a dispatcher method with Parsley. The dispatcher event is called on line 41.

Line 41 contains the Event, or in Parsley we say message, named InputMessage. We will look at this after we done with InputModel.

Line 39 shows the sendInputMessage(…) method used in InputPanel to broadcast the button click. This decouples the InputMessage event from the UI and places control with the model. Changing the event or adding additional logic or events leaves the UI unchanged. The UI is thus linked by the method sendInputMessage(…).

You may need to know if the model loaded properly. Parsley will call a method on its objects. You use the [Init] meta tag to identify the method and here it is shown on line 34. The init() method on line 35 sets the initialized variable in the model. The initialized variable then can be used by code dependent on the model to know it is loaded and firing. You see that back in the InputPanel code on line 34.

Lines 13 to 15 show how to inject another model. In this case the SharedModel file by its name implies having data shared by more than one area of the framework. Depending on your application structure you may find one model for all is sufficient or as demonstrated in this example having the model distributed for a modular approach.

package com.alh.parsley.example.helloworld
{
	public class InputModel
	{
		/**
		 * State of the init method executing or not. 
		 * */
		[Bindable]
		public var initialized:Boolean;
		/**
		 * Nest another model using injection. 
		 * */
		[Inject]
		[Bindable]
		public var sharedModel:SharedModel;
		/**
		 * Define a message in the model
		 * The [MessageDispatcher] metatag adds function to Parsley for sending (dispatch) messages.
		 */ 
		[MessageDispatcher]
		public var sendMessage:Function;
		/**
		 * Language
		 */ 
		[Bindable]
		public var lang_send:String = "Send";
		[Bindable]
		public var lang_typeMessageHere :String = "Type your message here:";
		
		/**
		 * The [Init] metadata tells Parsley to call the annotated method after 
		 * an instance of this object is created and configured. Used in InputPanel.
		 */ 
		[Init]
		public function init() : void 
		{
			initialized = true;
		}
		public function sendInputMessage(text:String) : void 
		{
			sendMessage(new InputMessage(InputMessage.SEND_MESSAGE,text));
		}
	}
}

[ad name=”Google Adsense”]
InputMessage.as
InputMessage is a custom Actionscript event class. Can be used in other frameworks or no framework. However the InputModel makes this a Parsley message.

package com.alh.parsley.example.helloworld
{
	import flash.events.Event;
	/** 
	 * Defines an input message for application.
	 */
	public class InputMessage extends Event
	{
		public static const SEND_MESSAGE:String = "com.alh.parsley.example.helloworld.send_message";
		/** 
		 * The message text
		 */
		public var messageText:String = "";
		/** 
		 * Constructor
		 */
		public function InputMessage(type:String, messageText:String, bubbles:Boolean = true, cancelable:Boolean = true)
		{
			super(type, bubbles, cancelable);
			this.messageText = messageText;
		}
	}
}

OutputPanel.mxml
Repeats many of the similarities of the InputPanel. There is no messaging included here. Basic binding to the Output model, that we will look at next, is set on lines 21 to 23.

Lines 32 and 40 have the bound values.

<?xml version="1.0" encoding="utf-8"?>
<s:Panel 
	xmlns:fx="http://ns.adobe.com/mxml/2009" 
	xmlns:s="library://ns.adobe.com/flex/spark"
	xmlns:sf="http://www.spicefactory.org/parsley"
	>
	<fx:Declarations>
		<!-- 
		Parsley will manage this component.
		-->
		<sf:Configure/>
	</fx:Declarations>
	<fx:Script>
		<![CDATA[
			/** 
			 * The [Inject] metadata tells Parsley to inject a dependency by 
			 * searching the context for an object of matching type.
			 */
			[Inject]
			[Bindable]
			public var model:OutputModel;
		]]>
	</fx:Script>
	<!--
		UI
	-->
	<s:layout>
		<s:VerticalLayout gap="10" paddingLeft="12" paddingRight="12" paddingBottom="12" paddingTop="12"/>
	</s:layout>
	<s:Label text="{model.lang_messagesTitle + ' '}"/>
	<!--
		Using model to bind values
	-->
	<s:TextArea width="100%" height="100%" text="{ model.messages }"/>
	<!--
		Use of a nested dependency. The sharedModel is a SharedModel object.
	-->
	<s:Label text="{model.sharedModel.lang_numberOfMessagesSent + ' ' +  model.sharedModel.numberOfMessagesSent }"/>
</s:Panel>

[ad name=”Google Adsense”]
OutputModel.as
This is another local model that by its name associates with InputPanel.

The meta tag [MessageHandler] registers the sendInputMessageHandler(…) method to receive InputMessage events. You recall the InputModel is dispatching InputMessage events.

The sendInputMessageHandler(…) basically updates the messages model value.

The practice of nesting the SharedModel is repeated on lines 13 -15.

package com.alh.parsley.example.helloworld
{
	public class OutputModel
	{
		/** 
		 * Hold the appended list of text messages sent.
		 */
		[Bindable]
		public var messages:String = "";
		/**
		 * Nest another model using injection. 
		 * */
		[Inject]
		[Bindable]
		public var sharedModel:SharedModel;
		/**
		 * Language
		 */ 
		[Bindable]
		public var lang_messagesTitle:String = "Messages Received:";
		/**
		 * Route InputMessage types to this method
		 * The [MessageHandler] metadata tells Parsley to make the routing happen.
		 */
		[MessageHandler]
		public function sendInputMessageHandler( message:InputMessage ) : void 
		{
			// Increment the message count.
			sharedModel.numberOfMessagesSent++;
			// Prepend a line number.
			message.messageText = sharedModel.numberOfMessagesSent + ". " + message.messageText;
			// Update model.
			messages += message.messageText + "\n";
		}
	}
}

SharedModel.as
Model data assumed by the file name shared throughout the application. You can see this above in InputModel and OutputModel that in turn allow InputPanel and OutputPanel to use this data.

package com.alh.parsley.example.helloworld
{
	public class SharedModel
	{
		[Bindable]
		public var numberOfMessagesSent:Number = 0;
		
		[Bindable]
		public var lang_numberOfMessagesSent :String = "Number of messages sent:";

	}
}

Categories
Articles

Away3D Hello World Rotating Sphere in Flex 4 and Flash

I was looking around for an updated “Hello World” Away3D example and found many examples out of date, unnecessarily complex or not proofed for orphan code.

The unnecessarily complex examples attempted explaining more than was necessary and neglected clarifying the code.

Many examples used the “open ended object” parameters for methods and constructors. These types of parameters are the root cause for code failing both for the developers of the api and the users. A class property changes and someone forgets that the constructor has a loose compile time parameter. Thus we users are left scratching heads. Magic is cool but should be restricted to side shows. I recommend sticking with setting individual properties and avoiding these types of parameters unless there is a class to define an object to pass so the compiler can reduce the mishaps.

Learn More About Away3D from Away3D Team Members

I am using the Away3D version 3.5 code. I included that code in these examples since open source code tends to be subject to change and volatile. Many of the Away3D examples I have seen are broken with this version and the author failed to clarify the exact version they were using or take them down.

You can build this with the free Flex SDK by using the code in the src folder and be sure to include a path to the Away3D library. For Flash CS3 and later versions, you need to create a Flash Document in the src folder and set the document class to Away3D_HelloWorld_Rotating_Sphere_AS3 and then add a library path to the Away3d code or SWC if you created one. For your convenience the Flash CS4 example download is included.

This article shows the code for the Flex project.

Application Class – Away3D_HelloWorld_Rotating_Sphere_Flex
All the code is contained in this class except for the Away3D library. The applicationCompleteHandler creates the Away3D objects and event registration. This uses the Sphere primitive included in Away3D. Only the wire frame is shown so that you can see the x, y and z axes to help get a perspective. The sphere object is dead center in its container for all three axes. You are viewing the sphere from a negative position on the z axis.

<?xml version="1.0" encoding="utf-8"?>
<!--
/**
* Away3D 3.5.0 basic example showing centering a wireframe sphere in a View3D all centered on stage.
* */
-->
<s:Application xmlns:fx="http://ns.adobe.com/mxml/2009" 
			   xmlns:s="library://ns.adobe.com/flex/spark" 
			   xmlns:mx="library://ns.adobe.com/flex/mx" 
			   applicationComplete="applicationCompleteHandler(event)"
			   width="500" height="500">
	<fx:Declarations>
		<!-- Place non-visual elements (e.g., services, value objects) here -->
	</fx:Declarations>
	<fx:Script>
		<![CDATA[
			import away3d.containers.View3D;
			import away3d.materials.WireColorMaterial;
			import away3d.primitives.Sphere;
			import away3d.primitives.Trident;
			
			import mx.events.FlexEvent;
			
			// Properties for background
			private static const backgroundColor:Number = 0xcccccc;
			private static const backgroundBorderColor:Number = 0x666666;
			private static const backgroundBorderWeight:Number = 2;

			private var view:View3D;						// View to contain the Sphere
			private var sphere:Sphere;					// Sphere to animate and position.
			private var speed:Number = .1;				// Speed for sphere rotationY property

			protected function applicationCompleteHandler(event:FlexEvent):void
			{
				var wireColorMaterial:WireColorMaterial;	// Optional colors for Sphere.
								
				// Create a View3D and center on stage
				view = new View3D();
				view.x = stage.stageWidth / 2;
				view.y = stage.stageHeight / 2;
				// Add viewport to the container
				away3DContainer.addChild(view);
				
				// Create a Sphere. Default position is 0,0,0;
				sphere = new Sphere();
				sphere.radius = 250;
				sphere.segmentsW = 12; 
				sphere.segmentsH = 9;
				
				// Create a color for the sphere wire model. Optional.
				wireColorMaterial = new WireColorMaterial();
				wireColorMaterial.alpha = 0;	// Default wireColorMaterial.color is transparent.;
				wireColorMaterial.wireColor = 0x0000ff;
				sphere.material = wireColorMaterial;
				
				// Add the sphere to the scene
				view.scene.addChild(sphere);
				
				// Add x, y and z axes for position perspective.
				var axis:Trident = new Trident(250, false);
				view.scene.addChild(axis);
				
				// Register listener for the ENTER_FRAME event.
				addEventListener(Event.ENTER_FRAME, enterFrameEventHandler);
			}

[ad name=”Google Adsense”]
This code is simply the ENTER_FRAME event handler and the function for updating the view and the state of the 3D objects to create the animation. The sphere rotationY property is animated.

			/**
			 * ENTER_FRAME event handler. 
			 * */
			public function enterFrameEventHandler(e:Event):void
			{
				updateView();
			}
			/**
			 * Computes the animation changes and updates view.
			 * */
			public function updateView():void
			{
				// Rotate sphere around the Y-axis. 
				sphere.rotationY += speed;
				// Render the view.
				view.render();
			} 

		]]>
	</fx:Script>

[ad name=”Google Adsense”]
This Flex version is a spark implementation. The SpriteVisualElement is used as the container. Older versions of Flex will require creating a UIComponent.

A background is included to help see the impact of changing positioning properties of the View3d and the Sphere should you want to play.

	<!--
	Background for app 
	--> 
	<s:BorderContainer id = "background_bc"
					   width="{width}" height = "{height}"
					   borderWeight="{backgroundBorderWeight}"
					   borderColor="{backgroundBorderColor}"
					   backgroundColor="{backgroundColor}">
		
		<!--
			Container for the Away3D Sprite objects
		-->
		<s:SpriteVisualElement id = "away3DContainer" />
	</s:BorderContainer> 
</s:Application>

References
Away3d.com/

Categories
Articles

ZEND AMF (Action Message Format) Minimalist Example Using RemoteObject and MySQL

I always liked and appreciated the AMFPHP implementation of Adobe Action Message Format. I have seen it implemented in some robust applications and it held its own. Among its best features is the browser which is very handy for testing. However Adobe has now gotten involved with Zend AMF and this is a quick shot at putting it together using the RemoteObject class.

The first example I looked at is from Lee Brimelow’s Introduction to ZendAMF at gotoAndLearn.com. This is a great example and worth the watch to get a rounded view of using Zend AMF. He uses NetConnection and Responder classes in Flash CS4. You can use his example in Flex and Air.

Adobe Flash Builder 4 and Flex 4 - Essential Training
Learn More About Flex 4

Eventually I put Zend AMF to practical use by revamping DefineIt.com to use it along with the Parsley framework.

Flash CS4 does not have a native RemoteObject class, so that leads us to using Flex.

Download files
You can build this with the free Flex SDK by using the code in the src folder. This example was built with Flex 4.

The following uses the code from the Flex example, but other than the Application and WindowedApplication tags the code is the same.

Application Class – ZendAMFRemoteObjectGetTable_Flex
Rather than use a services-config.xml file linked to the compiler line, I choose to include the channel information in the MXML. More on this method is detailed by Chris Callendar’s post Using Flex and AMFPHP without a services-config.xml file.

<?xml version="1.0" encoding="utf-8"?>
<!--
Demonstrates use of the RemoteObject to communicate with Zend AMF.
<p>Author: Lon Hosford https://www.lonhosford.com 908 996 3773</p>
-->
<s:Application xmlns:fx="http://ns.adobe.com/mxml/2009"
			   xmlns:s="library://ns.adobe.com/flex/spark"
			   xmlns:mx="library://ns.adobe.com/flex/mx" minWidth="955" minHeight="600">
	<fx:Declarations>
		<!-- Alternative to services-config.xml added to the compiler option services -->
		<s:ChannelSet id = "zend_amf_channel_set">
			<s:channels>
				<s:AMFChannel uri="{GATEWAY_URL}"/>
			</s:channels>
		</s:ChannelSet>
		<!-- MembershipService RemoteObject -->
		<s:RemoteObject	id="members_ro"
						destination="zend-amf"
						source="MembershipService"
						channelSet="{zend_amf_channel_set}"
						showBusyCursor="true"
						fault="membersError(event)">
			<s:method name="getAllMembers" result="getAllMembersResult(event)"/>
		</s:RemoteObject>
	</fx:Declarations>

[ad name=”Google Adsense”]
On line 33 you need to set the GATEWAY_URL to match your configuration. You might want to use a default file name such as index.php for the gateway script so you only need a path to the folder.

	<fx:Script>
		<!&#91;CDATA&#91;
			import mx.controls.Alert;
			import mx.events.FlexEvent;
			import mx.rpc.events.FaultEvent;
			import mx.rpc.events.ResultEvent;
			// &#91;ADD YOUR HTTP URL TO THE GATEWAY PHP SCRIPT&#93;
			private const GATEWAY_URL:String = "http://YOUR_DOMAIN/PATH_TO_GATEWAY SCRIPT/";
			/**
			 * Member value object. Not used in this example. Included for information only.
			 * Use this to convert the data received. In this example the DataGrid dataprovider
			 * property converted the incoming amf array to an ArrayCollection and we mapped
			 * using the DataGridColumn dataField property.
			 * */
			private var memberData:MemberData;
			&#91;Bindable&#93;
			private var lang_title:String = "Minimalist Zend AMF Example Using RemoteObject";
			/**
			 * Invoke RemoteObject members_ro getAllMembers method.
			 * */
			protected function getAllMembers():void
			{
				members_ro.getAllMembers();
			}
			/**
			 * Empties the member_dg DataGrid.
			 * */
			protected function clearDataGrid():void
			{
				member_dg.dataProvider = {};
			}
			/**
			 * RemoteObject members_ro ResultEvent handler for the remote getAllMembers method.
			 * <p>Data arrives as an array and dataProvider property converts to ArrayCollection.
			 * The member_dg DataGrid contains DataGridColumn to match the expected field using
			 * the dataField property.</p>
			 * */
			protected function getAllMembersResult(e:ResultEvent):void
			{
				member_dg.dataProvider = e.result; // ResultEvent result property is an array
			}
			/**
			 * RemoteObject members_ro default FaultEvent handler.
			 * */
			protected function membersError(e:FaultEvent):void
			{
				Alert.show(e.toString());
			}
		&#93;&#93;>
	</fx:Script>

[ad name=”Google Adsense”]
This is the UI. The member_dg DataGrid contains DataGridColumn to match the expected fields in the MemberData object using the dataField property. This is a one to one relationship, however you may find times where you need to construct your own fields such as a concatenation of first and last name and thus populate the DataGrid with your own collection object.

	<s:VGroup horizontalAlign="center" width="100%" paddingTop="25">
		<s:Label text="{lang_title}" fontSize="20"/>

		<mx:DataGrid  id="member_dg"  height="100">
			<mx:columns>
				<mx:DataGridColumn headerText="Member Key" dataField="memberKey" width = "100"/>
				<mx:DataGridColumn headerText="First Name" dataField="firstName"/>
				<mx:DataGridColumn headerText="Last Name" dataField="lastName"/>
				<mx:DataGridColumn headerText="Email Address" dataField="emailAddress" width="200"/>
			</mx:columns>
		</mx:DataGrid>
		<s:HGroup>
			<s:Button label="Get Members" click="{getAllMembers();}"/>
			<s:Button label="Clear" click="{clearDataGrid();}"/>
		</s:HGroup>
	</s:VGroup>

</s:Application>

MemberData Value Object Class for Actionscript
This is the value object on the client side to define the field names for a member object. This is mapped to the server side on line 37 of the Zend AMF gateway script.

package
{
	/**
	 * Value object defining the member data
	 * */
	[RemoteClass(alias="MemberData")]
	[Bindable]
	public class MemberData
	{
		public var memberKey:uint;
		public var firstName:String;
		public var lastName:String;
		public var emailAddress:String;
	}
}

Zend AMF Gateway PHP Script
This is the gateway program for the Zend Amf. This is the file that is referenced on line 13 of the MXML file. In this example it was named index.php.

<?php
/**
*  Sample Zend AMF gateway
*  @return Endpoint &#91;Zend Amf Endpoint&#93;
* */

// Configurable values
// Debugging values
$debug = true;                             // Debugging status
if ($debug)
{
	// Report all errors, warnings, interoperability and compatibility
	error_reporting(E_ALL|E_STRICT);
	// Show errors with output
	ini_set("display_errors", "on");
}
else
{
	error_reporting(0);
	ini_set("display_errors", "off");
}
// Add the Zend AMF installation folder to the include path.
// In this example the frameworks folder is a sibling folder to
// this application folder. The frameworks folder contains the Zend
// folder that is extracted from http://framework.zend.com/download/amf
ini_set("include_path", ini_get("include_path") . PATH_SEPARATOR . "..\\frameworks" );

// Instantiate the Zend Amf server
require_once 'Zend/Amf/Server.php';
$server = new Zend_Amf_Server();

// Register your service classes
require_once 'MembershipService.php';
$server->setClass("MembershipService");

//Map ActionScript value objects to the PHP value objects.
$server->setClassMap("MemberData", "MemberData");

// Return the handle.
echo ($server->handle());

?>

[ad name=”Google Adsense”]
MembershipService Class
This is the service class that contains remote methods. Generally a the database and business logic is delegated to another API you write. In this case they are all together for simplicity.

<?php
/**
*	Service class exposing the methods to deal with membership.
*   This example includes business logic for simplicity of study.
*/
require_once 'MemberData.php';
class MembershipService
{
	public function MembershipService()
	{
		// Connect to MySql database.
		// Supply your own MySQL access values.
		// These are defaults when running on your own private computer.
		mysql_connect("localhost", "root", "");
		// Select the database.
		// Supply your own database name.
		mysql_select_db("test");
	}
	/**
	*	Get all members and all fields.
	*/
	public function getAllMembers()
	{
		// Array of MemberData objects.
		$members = array();
		// Selecting all fields and all records from table.
		// Supply your own table name and optionally your own SQL statement.
		$result = mysql_query("SELECT * FROM zend_amf_members");
		// Assuming mysql_query success. Slog through records.
		while ($row = mysql_fetch_assoc($result))
		{
			// Create a MemberData value object and populate.
			$member = new MemberData();
			$member->memberKey = $row["memberKey"];
			$member->firstName = $row["firstName"];
			$member->lastName = $row["lastName"];
			$member->emailAddress = $row["emailAddress"];
			array_push($members, $member);
		}
		// Return the members array to client.
		return $members;
	}
}
?>

MemberData Value Object Class for PHP
This is the value object on the server side to define the field names for a member object. This is mapped to the client side on line 37 of the Zend AMF gateway script.

<?php
/**
 * Value object defining the member data
 * */
class MemberData
{
  public $memberKey;	// uint
  public $firstName;	// String
  public $lastName;		// String
  public $emailAddress;	// String
}
?>

SQL To Create Testing Table
The PHP script uses zend_amf_members for the table and this is the SQL to create that table. In this example the database was called test.

SET SQL_MODE="NO_AUTO_VALUE_ON_ZERO";

--
-- Database: `test`
--

-- --------------------------------------------------------

--
-- Table structure for table `zend_amf_members`
--

CREATE TABLE IF NOT EXISTS `zend_amf_members` (
  `memberKey` int(10) unsigned NOT NULL auto_increment,
  `firstName` varchar(30) NOT NULL default '',
  `lastName` varchar(30) NOT NULL default '',
  `emailAddress` varchar(50) NOT NULL default '',
  PRIMARY KEY  (`memberKey`)
) ENGINE=InnoDB DEFAULT CHARSET=latin1 COMMENT='Zend Amf Examples' AUTO_INCREMENT=7 ;

--
-- Dumping data for table `zend_amf_members`
--

INSERT INTO `zend_amf_members` (`memberKey`, `firstName`, `lastName`, `emailAddress`) VALUES
(1, 'Donald', 'Duck', 'quacker@pond.com'),
(2, 'Daffy', 'Duck', 'daft_2x@farm.org'),
(3, 'Elmer', 'Fudd', 'elmer.fudd@hunters.net'),
(4, 'Bugs', 'Bunny', 'whats_up_doc@underground.org'),
(5, 'Yosemite', 'Sam', 'varmint_chaser@forest.com'),
(6, 'Wile', 'Coyote', 'ceo@acme.com');
Categories
Articles

Adobe AIR NativeProcess Silent Print PDF with BioPDF’s Acrobat Wrapper

By Lon (Alonzo) Hosford
A current Adobe Air Windows OS project I am developing requires printing a Adobe PDF file without user interaction or at the minimum pressing a simple print button without seeing a print dialog window. This is often called silent printing.

Adobe Reader prior to version 8 allowed silent printing from the command line. You find references throughout the internet AcroRd32.exe /N /T PdfFile PrinterName [PrinterDriver[PrinterPort]] However for security this was changed to require the user to finish the printing. If you are developing a kiosk as I am, we want to avoid users having to know how to use printer dialogs or Adobe Reader menus.

[ad name=”Google Adsense”]

Javascript Injection
In researching the alternatives I found the ability to insert Javascript into the PDF file you want to print. This requires Adobe Acrobat Pro and a manual effort of a highly technical nature. I tried this and for a once in while PDF file it is acceptable, but not suited for dynamically third party software generated PDF files or PDF files from multiple sources. Plus it still would require AIR showing the HTMLLoader wrapping the Adobe Reader. You can review this alternative in Adobe Cookbooks.

Other alternatives were command line implementations offered by PDF software companies. These would allow using the NativeProcess in Adobe AIR to execute the printing without user intervention or allow designing a simple user interface like a big print button.

PDFPrint
A decent command line solution was PDFPrint from VeryPDF. Price is $199 (US) per installation. The trial version seemed to work well cobbled by a watermark and page count limitation, but the price forced me to press on.

printto.exe
I came across printto.exe from BioPDF. The printto.exe program uses the default application set by the Windows OS which is Acrobat Reader for PDF. This actually works but it does leaves Acrobat Reader open. I did not try it with other Acrobat Reader clones. Still you can use it, works with any file and it is free free.

GhostScript
Another choice is GhostScript. This works well once you select a “device”. You need to install it and run from the installation directory. I put it on a Windows XP machine and the command line was "C:\Program Files\gs\gs8.71\bin\gswin32c.exe" "@printtestgscmdline.txt" The argument @printtestgscmdline.txt is a way to feed the arguments from a file. The arguments I used are -sDEVICE="printer-device-id" -dNOPAUSE "full-path-to-pdf/your.pdf" -c quit. To get the valid printer device id you can get a list by starting ghostscript interactive mode and typing devicenames ==. I passed on this as I could not get the silencing arguments to work if you copied the installation directory executable files to another directory or machine. I needed something more portable. Also I am not sure of the PDF currency of the software.

Acrobat Wrapper version 2.0.0.23
The one I settled on that is free for non-commercial use. The program file name is acrowrap.exe and called Acrobat Wrapper version 2.0.0.23. You can download and use it without any watermarks or page limits. For commercial use you need to buy PDF Writer at $29 (US) per user with price cuts starting with 2 users; but you do not have to install that. Acrobat Wrapper downloads and installs on its own. Once installed you can take the acrowrap.exe from the installation directory and place it in any folder or computer and it happily runs from the command line. Thus for our commercial use we will buy licenses of PDF Writer for each copy of acrowrap.exe we install on our kiosks. The one drawback is when the printing is delayed the Adobe Reader window appears in a ghostly fashion but not accessible by the user.

You folks at BioPDF should make Acrobat Wrapper a product and simplify so that you do not have to install to get the executable. Also if you can keep Acrobat Reader minimized, that would be sweet.

[ad name=”Google Adsense”]

Using Acrobat Wrapper
The following is a demonstration of how to use Acrobat Wrapper with a NativeProcess Adobe Air application. In this example the user will hit the print button. If your file is generated or downloaded automatically for the user, you can go directly to printing without further user interaction.

I added some options like full screen and always in front for a kiosk type of installation. See code lines 29 and 30 respectively for settings and 46 to 54 for the implementation.

Create an Air project in Flex Builder and paste the code below into the main application mxml.

You need to download and install Acrobat Wrapper on any Windows computer. Then create a folder in your Flex application under the “src” folder and name it the name “native_apps” shown on code line 19 or provide your own folder name. Copy to this folder the acrowrap.exe file from the installation directory that Acrobat Wrapper placed it. For example on a Windows XP computer it was C:\Program Files\bioPDF\Acrobat Wrapper.

Add a sub folder named “in” or a name of your choice on code line 24. The “in” folder will hold your PDF file named on code line 23.

Testing Hints
In testing you will find that if it fails there is no feedback from acrowrap.exe we can pickup from the exit event handler. The exit code is 0 when it prints or fails to print. Thus the best debugging is to create a batch file and mimic what is happening in the AIR application until you find the solution. For example double back slashing and having the “/t” typed as “\t” were problems I encountered.

Also you need Acrobat Reader installed.

Download Flex Builder 4 Project File

<?xml version="1.0" encoding="utf-8"?>
<!--
    Purpose: Demonstrate NativeProcess printing PDF with arcowrap from BioPDF
	Author: Lon Hosford www.lonhosford.com 908 996 3773
	Date: August 12, 2010

-->
<s:WindowedApplication xmlns:fx="http://ns.adobe.com/mxml/2009" 
					   xmlns:s="library://ns.adobe.com/flex/spark" 
					   xmlns:mx="library://ns.adobe.com/flex/mx"
					   height = "500"
					   applicationComplete="applicationCompleteHandler(event)"
					   >
	<fx:Script>
		<![CDATA[
			import mx.controls.Alert;
			import mx.events.FlexEvent;
			import mx.managers.CursorManager;
			private const NATIVE_APP_REL_PATH:String = "native_apps"; 	// Relative to applicationDirectory
			private const PDF_PRINT_APP_FILE_NAME:String = "acrowrap.exe"; 
			private const PDF_PRINT_APP_SWITCH:String = "/t"; 			// Required switch for acrowrap.exe
																		// to close Adobe Reader.
			private const PDF_FILE_NAME:String = "readme.pdf";			// Const for demo only. Var is ok.
			private const PDF_FILE_REL_PATH:String = "in";				// Relative to applicationDirectory
			private const PRINTER_NAME:String = "";						// Blank will use default printer
																		// Network printer double backslash
																		// Ex:\\\\ServerName\\PrinterName
		
			private var displayFullScreen:Boolean = true;				// Full screen state
			private var displayAlwaysInFront:Boolean = true;			// Always in front state
			
			// Language localization
			private var lang_Attention:String = "Attention";
			private var lang_NativeNotSupported:String = "NativeProcess not supported. Flash Version: ";
			private var lang_IsWindowsOSOnly:String = " is a Windows OS only program.";
			[Bindable]
			private var lang_PrintPDFBtnLabel:String = "Print PDF";
			[Bindable]
			private var lang_ClearBtnLabel:String = "Clear";
			[Bindable]
			private var lang_ConsoleLabel:String = "Console:";
			protected function applicationCompleteHandler(event:FlexEvent):void
			{
				console(className + ".applicationCompleteHandler(...)");
				// Display full screen
				if (displayFullScreen)
				{
					stage.displayState = StageDisplayState.FULL_SCREEN;
				}
				// Make this application always in front 
				if (displayAlwaysInFront)
				{
					this.alwaysInFront = true;
				}
				// NativeProcess not supported
				if (!NativeProcess.isSupported)
				{
					showNativeProcessUnsupported();
				}
			}
			/* ========================================================================
				NativeProcess
			======================================================================== */
			/**
			 * Print the pdf
			 * */
			public function printPDF():void
			{	 
				var process:NativeProcess;
				var backSlashPattern:RegExp = /\\/g;
				var exeFileName:File;
				var printFileName:String;
				var processArgs:Vector.<String>;
				
				setUIStateToPrinting();
				
				// Windows OS
				if (Capabilities.os.toLowerCase().indexOf("win") > -1)
				{
					// Create File object of the application directory
					exeFileName = File.applicationDirectory;
					// Refine the file object to the NativeApps subdirectory of application directory
					exeFileName = exeFileName.resolvePath(NATIVE_APP_REL_PATH);
					// Refine the file object the application file name
					exeFileName = exeFileName.resolvePath(PDF_PRINT_APP_FILE_NAME);
					printFileName = exeFileName.nativePath.substr(0, exeFileName.nativePath.indexOf(exeFileName.name))  +  PDF_FILE_REL_PATH + "\\" + PDF_FILE_NAME;
					printFileName = printFileName.replace(backSlashPattern, "\\\\")	;
					console("Printing " + printFileName);
					processArgs = new Vector.<String>();
					processArgs.push(PDF_PRINT_APP_SWITCH); 
					processArgs.push(printFileName); 
					processArgs.push(PRINTER_NAME); 
						
					var nativeProcessStartupInfo:NativeProcessStartupInfo;
					nativeProcessStartupInfo = new NativeProcessStartupInfo();
					nativeProcessStartupInfo.arguments = processArgs ; 
					nativeProcessStartupInfo.executable = exeFileName  ;
					
					
					console("Executing " + nativeProcessStartupInfo.executable.nativePath);
					console("Arguments " + nativeProcessStartupInfo.arguments.toString());
					
					// Create NativeProcess, create listeners and start.
					process = new NativeProcess();
					process.addEventListener(NativeProcessExitEvent.EXIT, nativeProcessExitEventHandler);
					process.addEventListener(IOErrorEvent.STANDARD_ERROR_IO_ERROR, ioEventHandler);
					process.start(nativeProcessStartupInfo);
					this.focusManager.showFocus();
				}
				else 
				{
					showUnsupportedOS();
				}
			}
			/**
			 * Signals the native process has exited. The exitCode property contains the 
			 * value the process returns to the host operating system on exit. 
			 * If the AIR application terminates the process by calling the exit() 
			 * method of the NativeProcess object, the exitCode property is set to NaN. 
			 * */
			public function nativeProcessExitEventHandler(event:NativeProcessExitEvent):void
			{
				console(className + ".nativeProcessExitEventHandler(...) - Process exited with " + event.exitCode);
				setUIStateToReady();
			}
			/**
			 * Signals that reading from the standard error (stderror) stream has failed. 
			 * */
			public function ioEventHandler(event:IOErrorEvent):void
			{
				console(className + ".ioEventHandler(...) - IOError - " + event.toString());
				setUIStateToReady();
			}
			/* ========================================================================
				UI 
			======================================================================== */
			/**
			 * Set the UI ready state. Not printing.
			 * */
			public function setUIStateToReady():void
			{
				print_btn.enabled = true;
				CursorManager.removeBusyCursor();
			}
			/**
			 * Set the UI printing state.
			 * */
			public function setUIStateToPrinting():void
			{
				print_btn.enabled = false;
				CursorManager.setBusyCursor();
			}
			/**
			 * Show unsupported OS.
			 * */
			public function showUnsupportedOS():void
			{
				Alert.show( PDF_PRINT_APP_FILE_NAME + lang_IsWindowsOSOnly, lang_Attention);
				setUIStateToReady()
			}
			/**
			 * Show native process unsupported.
			 * */
			public function showNativeProcessUnsupported():void
			{
				Alert.show( lang_NativeNotSupported + Capabilities.version, lang_Attention);
			}
			/**
			 * Clear the console
			 * */
			public function clearConsole():void
			{
				console_ta.text = "";
			}
			/**
			 * Append to the console
			 * */
			public function console(msg:String):void
			{
				trace(msg);
				console_ta.text += msg + "\n";
			}
		]]>
	</fx:Script>
	<s:VGroup width="100%" height = "100%" >
		<s:Button id = "print_btn" label="{lang_PrintPDFBtnLabel}" click="printPDF()"/>
		<s:Label text="{lang_ConsoleLabel}" textAlign="left"/>
		<s:TextArea id="console_ta" height = "100%" width="100%"/>
		<s:Button label="{lang_ClearBtnLabel}" click="clearConsole()"/>
	</s:VGroup>
</s:WindowedApplication>


Categories
Articles

Flex Asteriods Game Ship Animation

By Lon (Alonzo) Hosford

This example is based on Keith Peters ground breaking book on animation for ActionScript 3, Foundation Actionscript 3.0 Animation: Making Things Move.

Keith lays out the basic fundamentals of motion. A great start point example to understand velocity, friction, acceleration and direction is the Asteroids game style ship moving through space. I also reproduced a similar example using HTML5 canvas you can view here: HTML5 Canvas Based Animation Asteriods Space Ship Movement

Keith Peters AS3 Animation
Learn More

Many similar examples just assume you are going to use the keyboard to control the ship. This example decouples the ship acceleration and movement from keyboard. However we then double back and use the keyboard to control the ship. You will see in the MXML Application code, the keyboard events call methods on the ArrowShip class. However you could provide buttons for mouse clicks or even go crazy with a multi-touch application.

The example is created in Flex Builder Running Eclipse but can be adapted to AIR or Flash. Download the example code. You can also use Flash CS3 and CS4. You need create a Flash document in the src directory and set AsteriodsShipMovement as you document class. You also need to include the Flex 3 library, the Flex.swc file, into your Actionscript 3 settings. Tareq AlJaber article shows how that is done on page two of his article Embedding metadata with Flash. For your convenience you can download a Flash CS4 file that is set up, but still you may need to check the Actionscript 3 settings if the movie will not play because you might have a non-standard installation. Download the Flash CS4 example.

You can use any graphic for the ship. More on how to do that is noted on the comments for ArrowShip class code.

I added lots of comments in the code. The following is an overview of each code piece.

The AsteroidsShipMovement class is the main class to start the example. Line 17 is where you set the size and speed of your Flash movie.

The background is a simple shape. You can embellish to your preference. See line 34.

The ship needs a mask to define when it leaves view. That can be any size but generally is the same size as the stage or smaller. Thus your flying area can be smaller. The mask must be a rectangle. See line 38.

AsteroidsShipMovement.as

package
{
.
.
.
	import com.alh.ui.ships.ArrowShip;
	import com.alh.ui.ships.Ship;
	import flash.display.MovieClip;
	import flash.display.Shape;
	import flash.display.Sprite;
	import flash.display.StageScaleMode;
	import flash.events.KeyboardEvent;
	import flash.geom.Rectangle;
	import flash.ui.Keyboard;

	// SET GAME SIZE AND SPEED HERE
	[SWF(width=600, height = 600, frameRate = "30")]

	public class AsteriodsShipMovement extends Sprite
	{
		// Basic game background - set your preference here
		public static const backgroundColor:Number = 0x0000ff;
		public static const backgroundBorderColor:Number = 0x666666;
		public static const backgroundBorderWidth:Number = 2;

		// Create the ship
		private var arrowShip:ArrowShip;
		public function AsteriodsShipMovement()
		{
			// Set stage options
			initStage();

			// Create a background
			var backgroundRect:Shape = getRectShape(backgroundColor, backgroundBorderColor, backgroundBorderWidth, stage.stageWidth, stage.stageHeight)
			addChild(backgroundRect);

			// Create the boundaries for the arrowShip, create the arrowShip.
			var shipMaskRect:Shape = getRectShape(0x000000, 0x000000, backgroundBorderWidth, stage.stageWidth, stage.stageHeight)
			arrowShip = new ArrowShip(shipMaskRect);
			addChild(arrowShip);
			arrowShip.x = shipMaskRect.width / 2;
			arrowShip.y = shipMaskRect.height / 2;

			// Use keyboard events to control the ship
			stage.addEventListener( KeyboardEvent.KEY_DOWN, keyPressed);
			stage.addEventListener( KeyboardEvent.KEY_UP, keyReleased);
		}
		/**
		 * Set any stage options per your needs
		 * */
		private function initStage():void
		{
			stage.scaleMode = StageScaleMode.NO_SCALE;
		}
		/**
		 * Handler for KeyboardEvent.KEY_DOWN
		 * */
		private function keyPressed(evt:KeyboardEvent):void
		{
			// Either accelerate or turn the ship
			switch (evt.keyCode)
			{
				case Keyboard.UP:
					arrowShip.accelerate(Ship.START);
					break;
				case Keyboard.LEFT:
					arrowShip.turn(Ship.LEFT, Ship.START);
					break;
				case Keyboard.RIGHT:
					arrowShip.turn(Ship.RIGHT, Ship.START);
					break;
			}
		}

		/**
		 * Handler for KeyboardEvent.KEY_UP
		 * */

		private function keyReleased(evt:KeyboardEvent):void
		{
			// Either stop accelerating or stop turning the ship
			switch (evt.keyCode)
			{
				case Keyboard.UP:
					arrowShip.accelerate(Ship.STOP);
					break;
				case Keyboard.LEFT:
					arrowShip.turn(Ship.LEFT, Ship.STOP);
					break;
				case Keyboard.RIGHT:
					arrowShip.turn(Ship.RIGHT, Ship.STOP);
					break;
			}
		}
		/**
		 * Utility to draw a rectangle Shape object
		 * */
		private function getRectShape(bgColor:uint, borderColor:uint, borderSize:uint, width:uint, height:uint):Shape
		{
			var newShape:Shape = new Shape();
			newShape.graphics.beginFill(bgColor);
			newShape.graphics.lineStyle(borderSize, borderColor);
			newShape.graphics.drawRect(0, 0, width, height);
			newShape.graphics.endFill();
			return newShape;
		}

	}
}

The ArrowShip class is a subclass of the Ship class. The Ship class does all the common functions for ship objects. The ArrowShip class is basically the skin. You subclass the Ship class and add your ship image on line 11.

ArrowShip.as

.
.
.
package com.alh.ui.ships
{
	import flash.display.DisplayObject;

	public class ArrowShip extends Ship
	{

		[Embed(source="/assets/ArrowShip.png")]
		private var ShipImg:Class;
		private var a:int;
		/**
		 * Constructor
		 * param maskRect represents the container boundaries for the ship and its mask
		 * */
		public function ArrowShip(maskRect:DisplayObject) : void
		{
			super(maskRect);
			super.addShipImage(new ShipImg(),270);

		}
	}
}

The Ship class implements the animation direction, velocity, friction, and acceleration principles set out in Keith Peters’ book, Foundation Actionscript 3.0 Animation: Making Things Move!.
Instead of including Keyboard movement in the class as many animators do, the accelerate and turn methods were included. The UI or any code can call these methods to control the ship. On a more advanced level you could create an interface to further specify these methods in all types of objects that move forward and turn.

Ship.as

.
.
.
package com.alh.ui.ships
{

	import flash.display.DisplayObject;
	import flash.display.MovieClip;
	import flash.display.Sprite;
	import flash.events.Event;

	/**
	 * Generic class for a space ship moving through space
	 * This class is intended to be abstract
	 * */
	public class Ship extends MovieClip
	{

		private var _shipDirectionOffset:Number = 0; 	// Offset front of ship in artwork in degrees.
														// Artwork may have the ship facing in different
														// directions and this makes the adjustment
														// 0 = artwork ship faces right. 270 faces up.
		private var _speed:Number = 0.3;				// Acceleration increment
		private var _rotateSpeed:Number = 3;			// Turning speed in degrees
		private var _vx:Number = 0;						// Velocity for x (direction and speed)
		private var _vy:Number = 0;						// Velocity for y(direction and speed)
		private var _friction:Number = 0.95;			// Percent reduction in _vx and _vy
		private var _accelerate:Boolean = false;		// True if increasing _vx and _vy, false if not
		private var _turnLeft:Boolean = false;			// Right turn direction request
		private var _turnRight:Boolean = false;			// Object has right turn direction request

		public static const START:int = 0;				// Start moving or turning
		public static const STOP:int = 1;				// Stop moving or turning
		public static const LEFT:int = 0;				// Turn left
		public static const RIGHT:int = 1;				// Turn right

		/**
		 * Constructor
		 * param maskRect represents the container boundaries for the ship and its mask
		 * */
		public function Ship(maskRect:DisplayObject) : void
		{
			mask = maskRect;
			// Register handler for Event.ENTER_FRAME
			addEventListener(Event.ENTER_FRAME, enterFrameEventHandler, false, 0, true);
		}
		/**
		 * Add the ship image and its directional offset
		 * param imgClass is the artwork
		 * param shipDirectionOffset see _shipDirectionOffset for notes
		 * */
		internal function addShipImage(imgClass:DisplayObject, shipDirectionOffset:Number):void
		{
			_shipDirectionOffset = shipDirectionOffset;
			// Add in ship image
			var shipSprite:Sprite = new Sprite();
			shipSprite.addChild(imgClass);

			// Add ship sprite and center
			addChild(shipSprite);
			shipSprite.x = shipSprite.width / 2* -1;
			shipSprite.y = shipSprite.height / 2 * -1;

		}
		/**
		 * Accelerates ship or stops acceleration
		 * param startStopState valid values START and STOP
		 * */
		public function accelerate(startStopState:int):void
		{
			// Set the accelerating state
			_accelerate = startStopState == START;
		}
		/**
		 * Turn ship
		 * param turnDirection valid values LEFT and RIGHT
		 * param startStopState valid values START and STOP
		 * */
		public function turn(turnDirection:int, startStopState:int):void
		{
			// Set the left turn state
			if (turnDirection == LEFT)
			{
				_turnLeft = startStopState == START;
			}
			// Set the right turn state
			if (turnDirection == RIGHT)
			{
				_turnRight = startStopState == START;
			}
		}
		/**
		 * Event.ENTER_FRAME event handler
		 * */
		protected function enterFrameEventHandler(e:Event) : void
		{
			// Acceleration is on
			if (_accelerate )
			{
				// Conversion of rotation degrees (rotation + _shipDirectionOffset) and speed to velocity
				_vy += Math.sin(degreesToRadians(rotation + _shipDirectionOffset)) * _speed;
				_vx += Math.cos(degreesToRadians(rotation + _shipDirectionOffset)) * _speed;
			}
			// Acceleration is off
			else
			{
				// reduce velocity by friction
				_vy *= _friction;
				_vx *= _friction;
			}

			// Change direction right
			if (_turnRight)
			{
				rotation += _rotateSpeed;
			}
			// Change direction left
			else if (_turnLeft)
			{
				rotation += -_rotateSpeed;
			}

			// Move position by velocity
			y += _vy;
			x += _vx;

			// Exiting right side of mask
			if (x - width / 2 > mask.width)
			{
				x = 0;
			}
			// Exiting left side of mask
			else if (x + width / 2 < 0)
			{
				x = mask.width;
			}

			// Exiting top of mask
			if (y - height / 2 > mask.height)
			{
				y = 0;
			}
			// Exiting bottom of mask
			else if (y + height / 2 < 0)
			{
				y = mask.height;
			}
		}
		/**
		 * Change the default friction value
		 * */
		protected function set friction(friction:Number):void
		{
			_friction = friction;
		}
		/**
		 * Change the default speed value
		 * */
		protected function set speed(speed:Number):void
		{
			_speed = speed;
		}
		/**
		 * Change the default rotateSpeed value
		 * */
		protected function set rotateSpeed(rotateSpeed:Number):void
		{
			_rotateSpeed = rotateSpeed;
		}
		/**
		 * Utility to convert Actionscript degrees (0-360) to Trig radians (57.2958 degrees).
		 * */
		private function degreesToRadians(degrees:Number) : Number
		{
			return degrees * Math.PI / 180;
		}

	}

}

Categories
Articles

Adobe AIR (P2P) Peer To Peer Text Chat with NetGroup

By Lon (Alonzo) Hosford

This is a minimalist example of an Adobe AIR peer to peer text chat application using the NetGroup class for peer communication. Create an new AIR application and replace all the code with the code below.

[ad name=”Google Adsense”]

You need to change line 15 to include your own Adobe Stratus developer key. You can use the Adobe Stratus server by obtaining a developer key at Adobe Labs.

On line 16 you need to create a name for your group. You want something unique so consider a reverse domain prefix such as com.yourdomain plus an application name and something unique. For example com.bugsbunny.carrot-chat.b7-4d;8k9.

You can also make this a Flex application. Create a flex application and paste all but the WindowedApplication MXML tags between your Application MXML tags.

The application starts once the user clicks the connect button. This establishes a connection with the Adobe Stratus server on line 51. Once the connection is successful, ncNetStatus(…) handler receives a NetConnection.Connect.Success event code and calls the setupGroup() method on line 100. The setupGroup() method creates the requisite specification to join the group you identified in line 16.

Once the user selects the user name and clicks connect, the user name cannot be changed. That is an application design choice on line 190 with the enabled property for the user_ti TextInput component. However you might notice the new Flex 4 two way binding used for the userName variable and the user_ti TextInput component text property on line 190. If you want to change the user name after the connection just remove the enabled property on line 190.

.
.
.
<?xml version="1.0" encoding="utf-8"?>
<s:WindowedApplication xmlns:fx="http://ns.adobe.com/mxml/2009"
					   xmlns:s="library://ns.adobe.com/flex/spark"
					   xmlns:mx="library://ns.adobe.com/flex/mx"
					   creationComplete="creationCompleteHandler(event)"
					   height="600" width="800"
					   >
	<fx:Script>
		<![CDATA[
			import mx.events.FlexEvent;
			private const SERVER:String = "rtmfp://stratus.adobe.com/";
			private const DEVKEY:String = "{YOUR ADOBE STRATUS DEVELOPER KEY}";
			private const NETGROUP:String = "{YOUR NETGROUP NAME}";
			private var _nc:NetConnection;
			private var _netGroup:NetGroup;

			// NetGroup specifier for NETGROUP
			[Bindable]
			private var groupSpecWithAuthorizations:String;

			// Connected to Stratus server and to NETGROUP
			[Bindable]
			private var _connected:Boolean = false;

			// _userName name in chat.
			[Bindable]
			private var _userName:String;

			// Used to store our P2P Peer ID for binding to UI.
			[Bindable]
			private var _nearID:String;

			// Counter to make every NetGroup post message unique
			private var _msgOutCount:int = 0;

			/**
			 * CreationComplete event handler for WindowedApplication
			 * */
			protected function creationCompleteHandler(event:FlexEvent):void
			{
				console (className + ".creationCompleteHandler(...) - Capabilities.version:" + Capabilities.version);
				// Generate a default user name;
				_userName = "user" +  Math.round(Math.random()*10000);
			}
			/**
			 * Connect with Stratus server
			 * */
			private function connect():void
			{
				_nc = new NetConnection();
				_nc.addEventListener(NetStatusEvent.NET_STATUS,ncNetStatus);
				_nc.connect(SERVER+DEVKEY);
			}
			/**
			 * NetStatusEvent.NET_STATUS event handler for _nc and _netGroup
			 * */
			private function ncNetStatus(event:NetStatusEvent):void
			{
				console( className + ".ncNetStatus(...) - event.info.code:" + event.info.code);

				switch(event.info.code)
				{
					case "NetConnection.Connect.Success":
						_nearID = _nc.nearID;// or you can use event.target.nearID;
						setupGroup();
						break;
					case "NetGroup.Connect.Success":
						_connected = true;
						break;
					case "NetGroup.Posting.Notify":
						receivePostNotifyMessage(event.info.message);
						break;
					// FYI: More NetGroup event info codes
					case "NetGroup.Neighbor.Connect":
					case "NetGroup.LocalCoverage.Notify":
					case "NetGroup.SendTo.Notify": // event.info.message, event.info.from, event.info.fromLocal
					case "NetGroup.MulticastStream.PublishNotify": // event.info.name
					case "NetGroup.MulticastStream.UnpublishNotify": // event.info.name
					case "NetGroup.Replication.Fetch.SendNotify": // event.info.index
					case "NetGroup.Replication.Fetch.Failed": // event.info.index
					case "NetGroup.Replication.Fetch.Result": // event.info.index, event.info.object
					case "NetGroup.Replication.Request": // event.info.index, event.info.requestID
					default:
					{
						break;
					}
				}
			}

			// ========================================
			//  NETGROUP Methods
			// ========================================

			/**
			 * Connect with the NETGROUP
			 * */
			private function setupGroup():void
			{
				console( className + ".setupGroup()");
				var groupspec:GroupSpecifier = new GroupSpecifier(NETGROUP);
				// Allow group members to open channels to server
				groupspec.serverChannelEnabled = true;
				// Allow group members to post
				groupspec.postingEnabled = true;

				// Create the group specifi
				groupSpecWithAuthorizations = groupspec.groupspecWithAuthorizations();

				// Join the group specified by groupspec
				_netGroup = new NetGroup(_nc, groupSpecWithAuthorizations);

				// Register listener for NetGroup NetStatus events
				_netGroup.addEventListener(NetStatusEvent.NET_STATUS, ncNetStatus);
			}
			/**
			 * Post a message to NETGROUP;
			 * @param messageText String. Text message to send.
			 * */
			private function sendMessageToGroup(messageText:String):void
			{
				console( className + ".sendMessageToGroup(...) - messageText:" + messageText);
				// Construct message object
				var netGroupMessage:Object = new Object();
				netGroupMessage.sender = _netGroup.convertPeerIDToGroupAddress(_nc.nearID);
				netGroupMessage.user = _userName;
				netGroupMessage.text = messageText;
				netGroupMessage.sequence = ++ _msgOutCount;// Only unique message objects are sent.
				// Send netGroupMessage object to all members of the NETGROUP
				_netGroup.post(netGroupMessage);
			}
			/**
			 * Receive a NetGroup.Posting.Notify message from NETGROUP
			 * @param netGroupMessage Object. NetGroup post message object.
			 * */
			private function receivePostNotifyMessage(netGroupMessage:Object):void
			{
				updateUI(netGroupMessage.user, netGroupMessage.text)
 			}

			// ========================================
			//  UI Methods
			// ========================================

			/**
			 * Join chat group
			 * */
			private function joinChat():void
			{
				// Connect to server
				connect();
			}
			/**
			 * Post a message to NETGROUP;
			 * */
			private function sendMessage():void
			{
				// Send message to NetGroup
				sendMessageToGroup(message_ti.text);
				// Update local view of message sent
				updateUI(_userName, message_ti.text);
			}
			/**
			 * Update UI with message object received from NETGROUP
			 * @param userName String. Name of user sending message.
			 * @param messageText String. Text of message to sent.
			 * */
			private function updateUI(userName:String, messageText:String):void
			{
				chat_ta.appendText( userName + ": " + messageText + "\n");
			}

			private function console(msg:String):void
			{
				trace(msg);
				out_ta.appendText(msg + "\n");
			}
		]]>
	</fx:Script>
	<s:layout >
		<s:VerticalLayout horizontalAlign="left"
						  paddingLeft="10" paddingTop="10" paddingRight="10" paddingBottom="10"/>
	</s:layout>
	<!--UI For Chat-->
	<s:Label text = "Chat log:" />
	<s:TextArea id="chat_ta" height = "120" width="100%"/>
	<s:HGroup width="100%">
		<s:TextInput  id="user_ti" text="@{_userName}" enabled="{!_connected}"/>
		<s:Button label="Connect" click="joinChat()" enabled="{!_connected}" />
		<s:TextInput  id="message_ti"  width="70%" enter="sendMessage()" enabled="{_connected}"/>
		<s:Button label="Send" click="sendMessage()" enabled="{_connected}" />
		<s:Button label="Clear" click="chat_ta.text = '';"   />

	</s:HGroup>

	<!--UI For Tracing P2P-->
	<s:Label text = "P2P Information" paddingTop="20"/>

	<s:HGroup horizontalAlign="left" width="100%" >
		<s:Label text = "Peer Id: " />
		<s:Label id = "peerId_lbl" text = "{_nearID}"/>
	</s:HGroup>

	<s:HGroup horizontalAlign="left" width="100%" >
		<s:Label text = "Group Id: " />
		<s:Label id = "groupId_lbl" text = "{groupSpecWithAuthorizations}" />
	</s:HGroup>

	<s:Label text = "Trace log:" paddingTop="20"/>

	<s:TextArea id="out_ta"  height = "250" width="100%" lineBreak="explicit" fontFamily="_typewriter"/>
	<s:HGroup horizontalAlign="center" width="100%">
		<s:Button label="Clear" click="out_ta.text = '';"   />
	</s:HGroup>
</s:WindowedApplication>

I had experienced some problems with launching the application in Eclipse Flex Builder 4. I had published the application and launched on other computers. The Flex Builder 4 launch would not post to the NetGroup or receive from it if launched before other application instances on other machines. However if it was launched after another application instance was launched, it seemed to post and receive posts.